Moved into a rental place (out of my parent's house) and I have interacted more with a toolbox and tools in the past week then the rest of my life combined.
My parents gave me their old vacuum which had lost its suction. I took apart the tubing and found it had a clog right at the power nozzle. I used a cheap plastic drain snake to fish out the clog. A mystery plastic piece had gotten stuck in there. After removing it, it works fine. It does overheat, however. I checked all the filters and found them to be clean, so not sure what the issue is there.
The washing machine wasn't broken, but it was a front loader and the gasket was filled with mildew/mould. I scrubbed it down with vinegar, and then ran 3-4 different wash cycles with vinegar to get it clean enough to use. It still has a bit of a smell to it, but it doesn't transfer to our clothes or anything.
The dryer didn't dry clothes very well. My dad and I checked the vent, but it was as clean as far as we could see it (I live in an apartment building). After some YouTube research, I found that the blower motor can get full of lint. So I took apart the front of the dryer and cleaned all the lint out of there. It works much better now, but isn't perfect. But that's about as far as I will go, as it is my landlord's, not mine.
I was closing the kitchen cabinet door, and the handle came off! I thought I was in trouble, but I was able to screw it back in no problems. I decided to tighten all the handles while I was at it.
The shower had a slow drain. I figured it was hair and bought those cheap plastic drain snakes. The problem was it barely fit into the opening of the drain. I managed to get it in there with some messing around, but all the hair monster stuck in there couldn't fit through the hole. I used two screwdrivers like chopsticks to get all the crap out. It drains great now!
Fixit Log

Re: Fixit Log
I hate it when some landlord rents a place to me with a slow drain. Of the 16 drains in my home two were slow. We couldn’t check all of them till after we moved in. One had hair from washing a dog in the sink and another had a plastic cap lodged in it.
I have a wash basin in my basement that catches the wash water. My drain is one of those old style ones that takes a rubber plug and is recessed a bit. I stuffed one of these in to catch hairs that inevitably come out in the washer discharge. Works as a strainer. I got the idea recently when I snaked it and pulled out a ball of my late mom’s gray hairs. Enough hair came out of her wash to tangle up down there. And hair seems to last forever in water.

I have a wash basin in my basement that catches the wash water. My drain is one of those old style ones that takes a rubber plug and is recessed a bit. I stuffed one of these in to catch hairs that inevitably come out in the washer discharge. Works as a strainer. I got the idea recently when I snaked it and pulled out a ball of my late mom’s gray hairs. Enough hair came out of her wash to tangle up down there. And hair seems to last forever in water.
-
jacob
- Site Admin
- Posts: 17120
- Joined: Fri Jun 28, 2013 8:38 pm
- Location: USA, Zone 5b, Koppen Dfa, Elev. 620ft, Walkscore 77
- Contact:
Re: Fixit Log
It doesn't last long (<1hr) in chlorine though. Plugs seems to be a combination of hair and soap residue. Thus chlorine (to dissolve the hair) followed by hot water (to dissolve the soap) has fixed 95% of our drain problems if done on a regular basis.
Re: Fixit Log
Do you use pool chorine or bleach? That sounds like a great idea. I have to clean my wife’s vanity basin once a year. It’s easy to tell which one of us is bald.
Re: Fixit Log
Yes! Even before I unclogged the drain, I got a cheap plastic drain strainer from the dollar store. It started catching the hair, so we weren't adding to the problem. I got something similar for the kitchen sink as well for food particles (I have never seen a garburator installed in a sink in Canada, but when I lived in Florida they seems standard in every house).
My parents used similar devices at their place for a long time, and haven't had to deal with clogs as long as I can remember.
The one we have for the tub is a little too good, it's difficult to get the hair out once it is caught, but I'd rather clean that out then deal with clogs.
Re: Fixit Log
We use the tubshroom thingy, haven't had to deal with slow drains ever since, and it's super easy to remove the hair from it.
Re: Fixit Log
You shouldn't put bleach down the drain if you are on a septic system.
Re: Fixit Log
Learned how to brass braze steel today. I used it and failed at a fix on a bronze lock mechanism. Turned out the lock wasn't bronze. It was pot metal. Turned it into a pile of slag in two seconds with my torch. I failed but while learning the technique I managed to braze these two washers together. They're fixed to one another very well. The equipment was cheap ($75) and you can use this technique to bond steel to steel or dissimilar metals that can be brazed. But not pot metal.
So I thought I'd show the process since some people here seem to ask about welding. This is not welding because you are not fusing parent material together. It's more like soldering on steroids. I TIG weld but that is another level in cost and complexity. Faced with an antique lock repair I didn't want to rebuild my set again and fill the expired argon bottle so I decided to learn brazing.
I used this cheap brass wire from Walmart craft department. Three bucks. People use it to make bead bracelets. Just make sure it's yellow brass.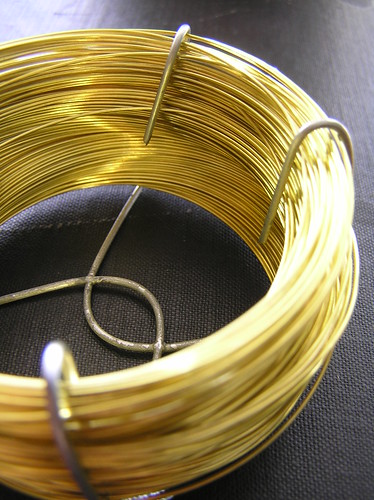
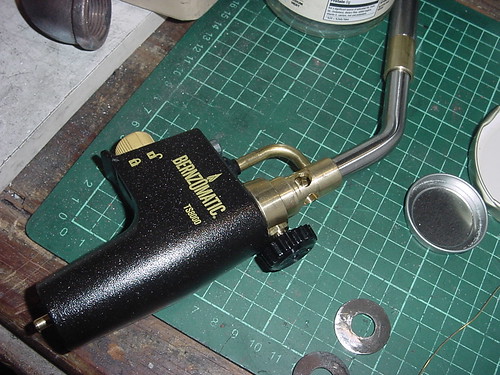
I bought this torch at Home Depot. Bernzomatic TS8000 It is a great deal. Sixty bucks. Gets much hotter than a propane torch. It comes with a yellow MAP gas cylinder but will run on propane too. A cheap propane torch doesn't get hot enough to braze anything substantial. This torch head does the trick.
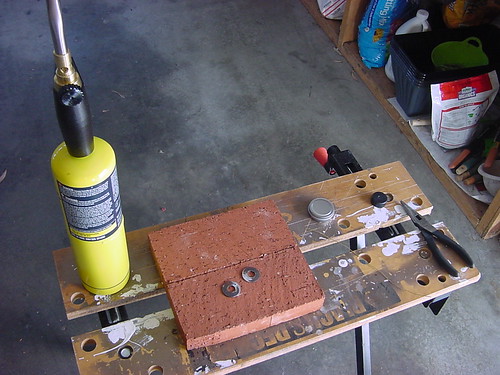
My cheap welding table. Bricks from Home Depot. One buck.
Flux. Borax laundry booster. Pure borax crystal. Five bucks.

Prep your pieces by grinding the surface to expose fresh metal.

Heat it cherry red. Dip your heated brass wire in borax to make a flux coated brazing rod. Dab the borax on the work piece and melt it on like wax. Then feed in the brass wire. Check some YouTube brazing videos for the technique. That is basically how I learned this skill. I'd seen it done as a kid but I'd never tried it personally. It's stupid easy.

Let it cool. It takes a long time to cool because it's on bricks. The bricks were important to keep the heat in the part. Most people chuck the part in a vise and they fail to get the part hot enough. The bricks are critical because they won't suck the heat out of the part. You don't have that much headroom with the MAP torch. You need every Watt you can get.

And there it is. The bond is tough. Much tougher than solder. Basically glued together with brass. The bond will also withstand a good amount of heat unlike epoxy repairs.

Cheap. Good. Easy to learn.
So I thought I'd show the process since some people here seem to ask about welding. This is not welding because you are not fusing parent material together. It's more like soldering on steroids. I TIG weld but that is another level in cost and complexity. Faced with an antique lock repair I didn't want to rebuild my set again and fill the expired argon bottle so I decided to learn brazing.
I used this cheap brass wire from Walmart craft department. Three bucks. People use it to make bead bracelets. Just make sure it's yellow brass.
I bought this torch at Home Depot. Bernzomatic TS8000 It is a great deal. Sixty bucks. Gets much hotter than a propane torch. It comes with a yellow MAP gas cylinder but will run on propane too. A cheap propane torch doesn't get hot enough to braze anything substantial. This torch head does the trick.
My cheap welding table. Bricks from Home Depot. One buck.
Flux. Borax laundry booster. Pure borax crystal. Five bucks.
Prep your pieces by grinding the surface to expose fresh metal.
Heat it cherry red. Dip your heated brass wire in borax to make a flux coated brazing rod. Dab the borax on the work piece and melt it on like wax. Then feed in the brass wire. Check some YouTube brazing videos for the technique. That is basically how I learned this skill. I'd seen it done as a kid but I'd never tried it personally. It's stupid easy.
Let it cool. It takes a long time to cool because it's on bricks. The bricks were important to keep the heat in the part. Most people chuck the part in a vise and they fail to get the part hot enough. The bricks are critical because they won't suck the heat out of the part. You don't have that much headroom with the MAP torch. You need every Watt you can get.
And there it is. The bond is tough. Much tougher than solder. Basically glued together with brass. The bond will also withstand a good amount of heat unlike epoxy repairs.
Cheap. Good. Easy to learn.
-
Gilberto de Piento
- Posts: 1968
- Joined: Tue Nov 12, 2013 10:23 pm
Re: Fixit Log
Is this the method used to build and repair steel bike frames?
-
jacob
- Site Admin
- Posts: 17120
- Joined: Fri Jun 28, 2013 8:38 pm
- Location: USA, Zone 5b, Koppen Dfa, Elev. 620ft, Walkscore 77
- Contact:
Re: Fixit Log
I was just about to comment, because I was building up parts to make my own frame about a decade ago. I even have the same torch that Sclass has complete with MAPP gas (not all torches can run MAPP because it burns hotter than propane). The answer is more or less yes, only according to my "research" DIY bike frames use silver brazing (a literal silver rod, so pretty expensive). For silver you make a flux paste out of borax, table salt, and water. I don't know whether the reason for using silver is strength, ease, or aesthetics.Gilberto de Piento wrote: ↑Wed Apr 20, 2022 11:04 amIs this the method used to build and repair steel bike frames?
Re: Fixit Log
I wouldn’t use this torch for bike frame building. If you’re going to do that I’d buy a TIG torch. They’ve come down a lot in price.
Re: Fixit Log
About 2.5 weeks ago I went to start my car and nothing. Battery dead. Ok, I tried jump starting it, but the battery wouldn't hold a charge. It was from 2013, so I figured it was at the end of it's life and replaced it with a new one. I go to start my car again, just a single click. I checked all the connections and fuses, nothing loose or burned out. So I decided to replace the starter, figuring that was bad and was the real culprit. Surprisingly very easy process, hardest part was getting access to the bolts. I first got the wrong size so I had to go back to the store and switch it out. The right one in, all the wires connected once more andddd nothing.
Meanwhile, I am able to start the car via push/bump start (it's a manual) so that leads me to think there's nothing wrong with the engine or fuel lines. So I figure it's something in the ignition process but I'm wandering in the dark because I'm learning all of this on the fly. I finally got a new ignition switch, figuring that may be the problem since everything else within the ignition system is now brand new. Well, after waiting a week for it to arrive, I quickly put it in, reattached the battery cables and nothing. Just one click.
My most mechanically minded/skilled friend was over tonight trying to help me troubleshoot it. He is at a loss for how to fix it but thinks the starter is successfully plunging (hence the one click) and is trying to engage with the flywheel but is not able to for some reason. We tried tapping the solenoid to see if that would help but no luck there either. I took out the starter again tonight and put everything back in. The flywheel appears undamaged, just normal wear, and has no play. Still the same result after putting everything back in. I'm at a loss for what to do and am about ready to go with my tail between my legs to the local mechanic.
Anyone have any thoughts or suggestions?

Re: Fixit Log
Solenoid? Our old VW did the same and would spin if I held a screwdriver across the poles (IN NEUTRAL!). I eventually installed a solenoid bypass which solved it.
Re: Fixit Log
If you haven't already, clean and reattach all ground connections on the motor, battery and chassis.
Re: Fixit Log
Probably this.
But here is how you diagnose it.
Get a digital volt meter. The cheapest one at harbor freight or Amazon will work.
You want to find where you are losing voltage along your circuit when you are cranking. Put the black lead on the negative terminal of the battery and the red lead on the positive. And I mean poke on the center of the post not on the clamp. Have somebody crank the car. This is your baseline voltage under load. It should be around 10V.
Now take the red lead and poke the clamp. Crank the car again. This will test if the clamp is also getting 10V or how good the connection is. Then move the black lead to the clamp on the negative side and crank. This will test your negative connection at the battery. Then move the black probe to the end of the negative battery connection at end of the wire away from the battery.
What you’re doing is checking the voltage drop (or resistance) of each connection in your starting circuit. You should be getting roughly the same voltage each time or you are losing voltage. On the positive side you can move towards the starter.
Alternatively you can measure the voltage drop across each connection. Like from post to clamp using your red and black leads. A perfect connection will be close to 0V. You are looking for a nominal drop across what should be a metal to metal 0V connection. Start at the battery and work your way down to the positive input of the motor. The check the negative side which is the body of the motor to its ground strap to the car chassis to the negative terminal of the battery.
This is the systematic way to pinpoint the bad connection. You’ll eventually find it if you’re systematic. It isn’t as fast as easy as throwing parts at the problem but you will eventually pinpoint the place where you are losing power.
Re: Fixit Log
Thanks everyone. I figure it's likely not the solenoid since it's brand new. I'll check the grounding wires later this morning. I think my neighbor has a voltmeter, I'll try that if the grounding wires prove fruitless.
Re: Fixit Log
Fixed!! I started checking the grounding cables, no luck. I texted my neighbor about a voltmeter and he came by with his dad not long after. We did some troubleshooting with the voltmeter just as @sclass suggested, battery seemed good but starter did not. So I took off the starter again and we tried to get it to run up by the battery. Didn't want to at first so he thought the solenoid was bad, but then noticed some sparks at the positive terminal of the battery. I had brushed the terminal again this morning but there was still a really thin layer on the wire ends. Scraped them off with a knife and put the starter back in. Sure enough, fired right up, real strong.
 Lesson learned, really make sure the simple stuff is right first before going further and use a voltmeter. Thanks again for all the suggestions!
 Lesson learned, really make sure the simple stuff is right first before going further and use a voltmeter. Thanks again for all the suggestions!
Re: Fixit Log
Good lesson that will pay dividends.
The meter is your eyes for the invisible. A mechanical system can be debugged with eyes and ears. An electrical system needs instrumentation. The $10 digital voltmeter will get you a long way towards seeing a problem made up of invisible electrons.
It’s worth it to watch a couple of YouTube videos on how to measure voltage, current and resistance on a simple circuit (like a battery wired to a lightbulb). That low level of knowledge can help you systematically debug a lot of electrical systems.
Re: Fixit Log
I repaired a lawnmower handle for a friend of mine with my flux core welder. I'd say it actually turned out pretty well. It snapped near the base of the mower. He had it rigged up with a rod and pipe clamps as a temporary fix, but he wanted me to do something a little more permanent if possible.
So I cut the ends off and cleaned up with my grinder. Then I pondered. To either use a larger 1/16" pipe as a sleeve of sorts or my own scrap pipe that had the same outside diameter but was double the wall thickness...after thinking and asking folks who know more about this than I do, I went with the sleeve option. The gap was ~2 5/8" so I cut an 8" piece to spread the stress out more evenly. On the bottom there is a 2" overlap and up top about 3 1/2" overlap so it should be stronger. Then the welding was basically a lap joint except on 3/4" pipe. It was challenging, but I got it done. I welded in positions I have never welded before, and I got one new minor burn from the sparks. Take a look at it though! After hitting it with the flap disc and painting it, it doesn't look bad at all. The real test is to see how it holds up to lawnmowing this summer. My friend runs a property maintenance/contracting business so it's going to be really tested. He's happy with it though, it is far stronger than the fix he had there before.
Gap

Fit up

Sleeve option I went with

Weld

Done

So I cut the ends off and cleaned up with my grinder. Then I pondered. To either use a larger 1/16" pipe as a sleeve of sorts or my own scrap pipe that had the same outside diameter but was double the wall thickness...after thinking and asking folks who know more about this than I do, I went with the sleeve option. The gap was ~2 5/8" so I cut an 8" piece to spread the stress out more evenly. On the bottom there is a 2" overlap and up top about 3 1/2" overlap so it should be stronger. Then the welding was basically a lap joint except on 3/4" pipe. It was challenging, but I got it done. I welded in positions I have never welded before, and I got one new minor burn from the sparks. Take a look at it though! After hitting it with the flap disc and painting it, it doesn't look bad at all. The real test is to see how it holds up to lawnmowing this summer. My friend runs a property maintenance/contracting business so it's going to be really tested. He's happy with it though, it is far stronger than the fix he had there before.
Gap
Fit up
Sleeve option I went with
Weld
Done