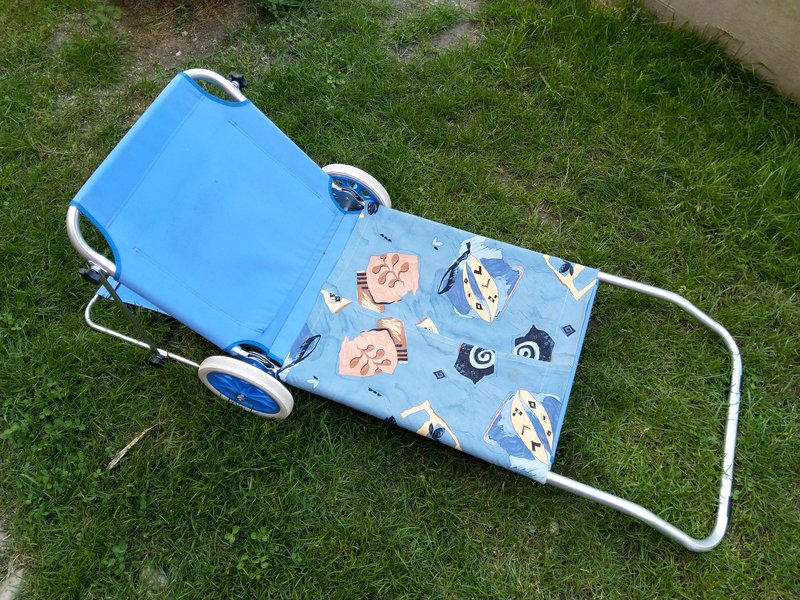
@horsewoman - that is an interesting lounger design. Why does it have wheels? Does it double as a cart?
I have a couple of new fixes today. Face mask repairs and bread machine seal. I recall you had a bad seal in your bread pan so I thought I'd post up this fix. I started getting dark greasy streaks in my kneaded dough and it freaked me out. I traced it to the shaft seal in my bread maker's pan. The seal leaked and was allowing oil to get on my bread dough. I've had trouble with these in the past and when they really go bad, water leaks into the bearing and destroys it. I decided to tear mine apart to see what is going on. Used bread machines are quite a hot commodity in my area due to the pandemic. I am unable to locate another one for $10. I could get an Oster online for $90 but I really like the model I'm using for its power and programming.
Undo the snapring on the bottom and remove the shaft, seal and bearing spacers. It just pushes out the top once the snap ring is off.

Everything is out and you can see the bearing in the bottom of the pan. Bearing survived.
Here is the shaft and spacers. You can see the seal at 12 o'clock which is the gray rubber doughnut. It is destroyed. Some hair fell in there somehow and it tangled around the shaft and destroyed the seal. It helps to have good snap ring pliers to get the retainer off.

Measure the inner diameter of the seal (shaft) and the outer diameter and height. That's how shaft oil seals seem to be sold on ebay. I got a food grade one made of viton rubber. Here it is pressed in.

After that I just reassemble the shaft, spacers and retaining rings after oiling the bearing with some baby oil. Hopefully it won't put oil on my bread in the future.
Next I was having trouble with this dust respirator. I've been wearing this on my shopping trips during the pandemic and it is starting to show wear. I've used it a few years mowing lawns, cleaning dusty homes and for brake jobs. The elastic is just dying. And it isn't comfortable when I tighten in down to make a good seal. The head harness portion is melted directly to the elastic bands and isn't easy to rebuild with new elastic.

The mask is still good. I just need new elastic.
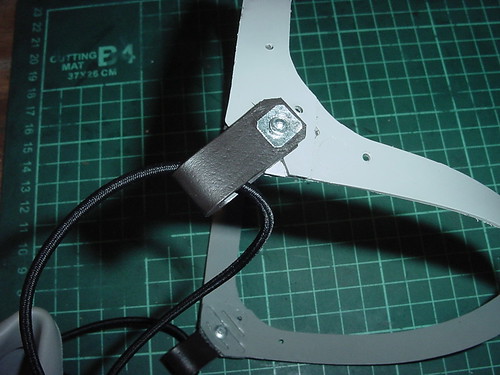
You can see where the elastic attaches to the head piece. It just got fused on at the factory. I'll need to fasten new elastic at this point after I cut away the old stuff. The old stuff is just dead elastic. Over stretched. Soaked and destroyed by sweat, sunscreen and bug repellent.

My idea was to replace the flat elastic band with shock cord. One because I have a lifetime supply now (got 100m for $12 on ebay for fabric masks). Two because I think it will last longer than the flat band which seems not durable. For this I needed a loop of tough material to attach to the head harness. I chose plastic from a peroxide bottle.

Harvest.

, on Flickr
Form into loops from the brown bottle material and rivet to the existing harness as anchor points for my new shock cord. Some trimming, drilling and riveting required. Basic tools used like scissors, drill and cheap rivet gun.

, on Flickr
Much nicer. I found out that I needed some metal backing like a washer behind the rivet to give it a base to hold on to. The shock cord threads through the loop.
And here it is fixed. The shock cords even work with the existing friction ratcheting buckles on the mask so I can tighten on the go. Well I'm almost done. One gotcha.

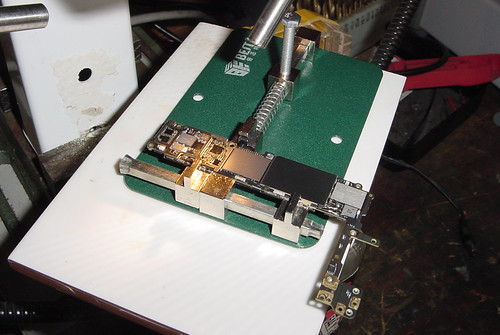
While I riveted the loops I didn't notice I'd cracked the head piece. See photos above. I put nice cracks in each side from the rivet pressure. I recall from a few posts ago Jacob mentioned you could use a soldering iron to melt plastic. I watched a few good youtube videos about plastic welding with zip ties.
https://www.youtube.com/watch?v=C8gZjw1Bkeo This is brilliant. How many times have we had some cracked piece of plastic that needed a strong yet flexible fix along a crack? This is just the solution. I was able to use my soldering iron to melt the plastic and fuse a zip tie into the cracks and repair the head harness. The junction is about as tough as a zip tie and that is just perfect. Easy and cheap. Soldering iron + zip tie.
The technique is like soldering mixed with painting. It took about one minute to master. The iron seems to be the perfect temperature to fuse and melt yet not destroy the plastic.
Superior to glue because this joint needs to flex regularly. Very strong repair. Now I can get some more life out of this mask. I like it and they are difficult to buy right now. Do this outdoors because the fumes may not be healthy. I wore a charcoal canister mask while I did it.

That's all folks.