Fixit Log
Re: Fixit Log
@bigato: are smartphones doing these things to our brains or are we doing them ourselves? I think they are but a tool and it's our responsibility to use them responsibly.
I see my smartphone's main benefit in how it replaces several other devices (dumbphone, MP3 player, watch, camera, kindle, laptop/tablet etc.). Also, having access to the internet almost anywhere is very useful.
I see my smartphone's main benefit in how it replaces several other devices (dumbphone, MP3 player, watch, camera, kindle, laptop/tablet etc.). Also, having access to the internet almost anywhere is very useful.
Re: Fixit Log
I don’t have a good idea either. It’s just a feeling I get when I look inside a phone. There is a level of integration, refinement and beauty that just cannot come out of nowhere. Entropy thermodynamics law forgot the exact one. I visualize a river of guck sloughed off to produce the shiny little object in my hand that looks so nice and clean.tonyedgecombe wrote: ↑Sun Aug 25, 2019 2:23 amI’m not sure phones have that much of an environmental cost, compared to running a car, flying, eating beef, owning too much house.
I want to extract as much value as possible from mine whilst minimising costs but I don’t feel particularly guilty about owning it.
Once nice thing about repairing is I get to see how Apple puts things together. They are by far the cutting edge in assembly from their system on chip microstructure to their novel materials. We used to dream about the stuff in PowerPoint back in 2000. Now it’s sitting right under my microscope. Size is misleading.
I think this stuff may have a bigger impact than we can imagine. But I may have to visit a Congolese cobalt mine or a fab in Shenzhen making facial recognition dot projector ICs before I’m sure.
Re: Fixit Log

Changed a set of brake pads tonight on one of my cars. The great thing about Duralast pads from AutoZone is the lifetime guarantee. You buy them once, they record your car and log you into their system by your name and phone number. When your pads wear out you go in and buy another pair. Change out the worn pads and return them to Autozone and they’ll give you a 100% refund. You basically get free brake pads after the first set.
They’re pretty cheap pads at $20. The assumption is you’ll sell the car before you need a new set and not pass on the warranty info. Luckily I drive the same kind of car I since 2002.
Kind of a sales gimmick but it basically gives me free brake jobs since I do my own work. I live on a big hill and wear out brakes every 2.5 years on my daily driver.
-
paretotime
- Posts: 12
- Joined: Mon Sep 16, 2019 10:58 pm
Re: Fixit Log
Changed the door swing on our fridge to be right handed instead of left handed. It was placed in the kitchen in such a position that the door opened to the hallway, and not towards the counters and food prep area. Makes a huge difference in our food prep flow now that it is corrected. The only problem is that the fridge had possibly been switched before and a few of the screws were glued in. With prying all came apart and back together except for the lower door handle screw which had to be sheared. The handle was temporarily held on by just the top screws which might have been fine with some adhesive, or a new screw hole drilled in - but before I could do that it was pulled in a moment of hurry and the door handle broke in 2. So sad, the main fix was $0 and less than an hour to change over the freezer and fridge doors. The handle replacement is $96 for the lowest I can find it online. I'm going handle-less so far and it works fine. Might keep it this way.
Money saving fixes
Routine battery replacement on my smartphone. These kind of repairs on iphones go from $25 at the mall kiosk to $70 at Apple Store. I get these chinese batteries on ebay. This one cost me $7 and it included a bunch of tools like plastic pry tools, a pentalobe screwdriver, a phillips screwdriver,a suction cup to lift off the glass. Instructions on Youtube. Fifteen minutes saved twenty dollars and a trip to the mall. Just follow the steps online. Some of the newer phones are more troublesome by design. My iphone 6 was easy. Had a sudden business trip and I didn't want my phone going dead on me now that we use the phones for boarding, taxi and comms.

So I've been watching YouTube videos on this clamping tool called Clamptite that makes hose clamps out of wire. I thought it would fit here because it is a cheap way to make hose clamps. Conceivably you can make cheap and good hose clamps once you buy their expensive tool. I have a bunch of garden hose scraps at my place that need splicing with barbs. Coyotes keep chewing holes in the hoses and I have to remove sections. I was thinking this was a cheap way to do repairs.
https://youtu.be/3NXVnmMjFk4
There are a bunch of people making their DIY versions of this tool using cheap hardware store parts. I threw one together for $4 after watching this video.
https://youtu.be/I3g7-qBDAGY
So I went ahead and made this tool. I actually made two. One to keep in my car with some wire in case I needed to fix a water hose or fuel hose on the fly. Here is what I came up with. I kind of flipped the Russian design upside down and 3d printed a nice knob (remixed from Thingiverse) for the top. Made some nice clamps. I didn't double up the wires like the videos. I am primarily using it for low pressure emission control plumbing on one of my cars that needed some PCV modifications.
an almost free clamp. takes a little fidgeting to get it together. the wire is basically free. I have hundreds of feet lying around left over from projects and scavenged from the trash.

My version of the tool.

tightening wire by spinning the knob.

locking the wire by bending it over.
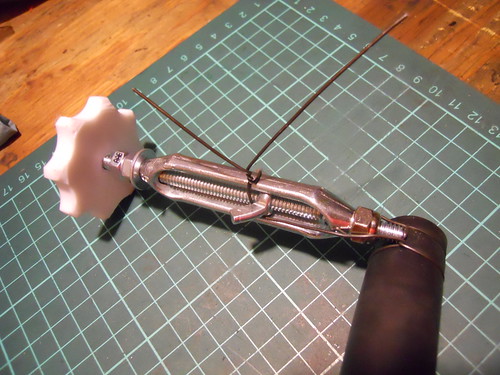
You can get the wire quite tight. The bending over part adds additional tension. The wires really dig into the hose. I actually broke some wires by being over zealous.
detail of the tool tip

My opinion is the tool makes really nice low profile clamps. Screw clamps stick up too much. I don't like how long it takes to actually "make" the clamp. But you're basically getting a clamp almost for free. A big spool of 40 mil stainless steel wire costs $8 at Harbor Freight. Face it, it is cheap but you have to do a little work.
At least I didn't have to buy the tool from Clamptite which ranges from $30 - $60 depending on the model/material.
Coming up, some electronics repair. I have discovered a new tool called a T7 electronic component tester. Basically a little $15 device from China ebay that will interrogate parts, figure out what they are and tell you what their parameters are if they are functioning. I'm still working on the debugging technique because it is unlike classical electronic troubleshooting where you understand the function of the device, use schematics and trace a fault from end to end. This little thing allows you to pull suspect parts and do a go/no go test on them. Then I swap in new parts when I find a blown part. Not sure if this is an effective method yet. Stay tuned.
/SaoJR3] [/url]DIY: transistor tester kit (open source) by linux-works, on Flickr

So I've been watching YouTube videos on this clamping tool called Clamptite that makes hose clamps out of wire. I thought it would fit here because it is a cheap way to make hose clamps. Conceivably you can make cheap and good hose clamps once you buy their expensive tool. I have a bunch of garden hose scraps at my place that need splicing with barbs. Coyotes keep chewing holes in the hoses and I have to remove sections. I was thinking this was a cheap way to do repairs.
https://youtu.be/3NXVnmMjFk4
There are a bunch of people making their DIY versions of this tool using cheap hardware store parts. I threw one together for $4 after watching this video.
https://youtu.be/I3g7-qBDAGY
So I went ahead and made this tool. I actually made two. One to keep in my car with some wire in case I needed to fix a water hose or fuel hose on the fly. Here is what I came up with. I kind of flipped the Russian design upside down and 3d printed a nice knob (remixed from Thingiverse) for the top. Made some nice clamps. I didn't double up the wires like the videos. I am primarily using it for low pressure emission control plumbing on one of my cars that needed some PCV modifications.
an almost free clamp. takes a little fidgeting to get it together. the wire is basically free. I have hundreds of feet lying around left over from projects and scavenged from the trash.

My version of the tool.

tightening wire by spinning the knob.

locking the wire by bending it over.

You can get the wire quite tight. The bending over part adds additional tension. The wires really dig into the hose. I actually broke some wires by being over zealous.
detail of the tool tip

My opinion is the tool makes really nice low profile clamps. Screw clamps stick up too much. I don't like how long it takes to actually "make" the clamp. But you're basically getting a clamp almost for free. A big spool of 40 mil stainless steel wire costs $8 at Harbor Freight. Face it, it is cheap but you have to do a little work.
At least I didn't have to buy the tool from Clamptite which ranges from $30 - $60 depending on the model/material.
Coming up, some electronics repair. I have discovered a new tool called a T7 electronic component tester. Basically a little $15 device from China ebay that will interrogate parts, figure out what they are and tell you what their parameters are if they are functioning. I'm still working on the debugging technique because it is unlike classical electronic troubleshooting where you understand the function of the device, use schematics and trace a fault from end to end. This little thing allows you to pull suspect parts and do a go/no go test on them. Then I swap in new parts when I find a blown part. Not sure if this is an effective method yet. Stay tuned.
/SaoJR3]
 [/url]DIY: transistor tester kit (open source) by linux-works, on Flickr
wire binder V.2
So I wasn't terribly happy with the feel of my wire binder shown above. It felt floppy in use and didn't feel stout unless there was a lot of tension in the wires. It bothered me for a bit and I came up with this little plastic bushing to fix the slop. No more floppiness at the expense of a little of its pull range. I tested it out and it still has enough tension range.
The dog bone shaped nut was made on the 3d printer. The tolerances were too tight but I just heated the part up in situ using a heat gun for 30 seconds and it loosened right up. Works great now and restricts the unwanted degree of freedom.

Detail of guide nut. The use model of the printer is different. I spent twenty minutes at my cad station designing it. Then six minutes printing it. It is kind of upside down compared to the old way of finding a piece of stock, scribing, drilling and filing at the vise till I get the desired part dimensions. Feels more like word processing and I now can make more by hitting print multiple times. I ended up making two. One for the shop and one for the car.

The dog bone shaped nut was made on the 3d printer. The tolerances were too tight but I just heated the part up in situ using a heat gun for 30 seconds and it loosened right up. Works great now and restricts the unwanted degree of freedom.

Detail of guide nut. The use model of the printer is different. I spent twenty minutes at my cad station designing it. Then six minutes printing it. It is kind of upside down compared to the old way of finding a piece of stock, scribing, drilling and filing at the vise till I get the desired part dimensions. Feels more like word processing and I now can make more by hitting print multiple times. I ended up making two. One for the shop and one for the car.

-
SavingWithBabies
- Posts: 882
- Joined: Mon Aug 31, 2015 2:50 pm
- Location: Midwest, USA
Re: Fixit Log
My 3d printer is still my hammer. I bought some cheap old shelves with some built in drawers on a lower part and the old MDF had bowed out towards each side. End result is the draw sliders were pulled outwards maybe 2-3mm which was enough to allow the drawers to fall down off the roller wheel. I could fix this quite easily with other material. Perhaps some cardboard or paper? Or washers? But there were some downsides to washers in that I wanted to fix the problem once and for all (at least until it bows more) and washers wouldn't support the full 1" or so width of the slide brackets.
So I printed out some 1.6mm plastic squares with holes in the right places. That fixed it right up and the drawers no longer fall down. I wasn't sure if I'd need the full ~3.2mm so I divided it but it turns out with just one side with the spacers, the fit is great so I went with that. They look like this:

Printed in gray (this is the larger spacer, other one is at rear of slide bracket):

On the other hand, I had a loose broomstick from a short broom I'd cut down for use in the RV (that we're now using in the apartment). And I debated 3D printing something but I ended up using hot glue as that was a more pragmatic solution. I could have found another material and cut it to size for these spacers but printing gave me precise dimensions and I could just print some more once I was sure I had it right (and I was free to go do something else while waiting for the print to complete).
So I printed out some 1.6mm plastic squares with holes in the right places. That fixed it right up and the drawers no longer fall down. I wasn't sure if I'd need the full ~3.2mm so I divided it but it turns out with just one side with the spacers, the fit is great so I went with that. They look like this:

Printed in gray (this is the larger spacer, other one is at rear of slide bracket):

On the other hand, I had a loose broomstick from a short broom I'd cut down for use in the RV (that we're now using in the apartment). And I debated 3D printing something but I ended up using hot glue as that was a more pragmatic solution. I could have found another material and cut it to size for these spacers but printing gave me precise dimensions and I could just print some more once I was sure I had it right (and I was free to go do something else while waiting for the print to complete).
-
SavingWithBabies
- Posts: 882
- Joined: Mon Aug 31, 2015 2:50 pm
- Location: Midwest, USA
Re: Fixit Log
@Sclass I like the wire hose clamper tool. And I've debated one of those testers. I haven't bought one yet but I recently would have liked the ability to test some capacitors. Have you tried it for that yet? Seems like a very useful tool.
Re: Fixit Log
The tester post is coming up. The tester works well for what it is. Certainly good enough to check the functionality of components. I recently had he chance to test half a dozen variants and they work about the same. The price difference is the user interface.
Works great on caps. Make sure to discharge the cap first. You can burn out the tester if you have a high voltage across the terminals.
I’m having some trouble with my new blind debug process. The hope was I could go into a broken device, start individually testing suspect components without any knowledge or documentation of the circuits function, then replace the defective part and thus repair the item.
It’s not quite working out. I’m good at fixing things where I have a diagram and knowledge of the theory of operation. Then I systematically go from one end to the other to find the fault using things like a voltmeter, power supply, signal generator and oscilloscope. I wanted to try to get away from this style and develop a fault tracing technique that relies more on the cheap tester than actual understanding. Kind of like using a Tricorder.
Stay tuned.
Re: Fixit Log
So I’ve been working on this climate control amplifier in my Mercedes. My hope was that I’d fix it by testing for bad components using the cheap tester. The tester works quite well. I found several capacitors that were out of spec and three damaged transistors. Unfortunately it took a heck of a long time to do this because the parts needed to be desoldered from the board. After I put everything back together, my car AC still didn’t work. Worse, sometimes my heat would turn on full blast even when I was calling for AC. My compressor was on so the AC and heater just worked against each other. I created a different set of symptoms by only fixing parts of the circuitry.
As I dug deeper through the system I realized the fault was no longer in the amplifier but in a switchboard on the dash. I took that apart and reheated old solder joints and cleaned up the boards. Still no luck. I don’t really understand how the circuit works and I don’t have schematics. My hope was I could find questionable stuff with the tester and I’d replace it.
Well it just didn’t work out as planned. I gave up tonight after hacking on this thing a week. It turns out there are some electromechanical parts that are falling apart. I don’t know where to buy individual components to replace them so I ended up buying new Mercedes parts to fix the car.
Didn’t save much money on this one. The new push button box cost me $250. Hopefully this is where the problem lies. I’ll post up some photos of the process. I basically went after things that fail. In order of common failures,
1) cracked solder. Sometimes called “cold solder” this is usually the result of thermal cycling on high current solder joints. After awhile the solder joints cracks. The fix is reflowing solder with a soldering iron. This often can be visually detected.
2) old electrolytic capacitors. These leak, swell or just dry out. The capacitors in this circuit are for the analog computer that regulates cabin temperature. So delays and integration is off when the caps go bad after thirty years. I did find bad ones and I changed them.
3) bad output amplifiers. Transistors on the output often go bad. They’re heavily loaded and they see the bulk of the thermal stress. Basically I check every part of the circuit connected to something off the board. So these transistors control the solenoids and motors on the air flaps and hot water valves. One was out of spec and it happened to be discolored indicating thermal stress.
4) bad input amps/preamps. These see signals coming in from off board and can also get damaged by fault conditions up stream. I couldn’t test these on my board using the tester but you can check the voltages between the inverting and non inverting inputs to see if they are close to 0 volts indicating stable regulation. Unfortunately parts off board are often part of the control loop so the failure can cause a railed amplifier yet be far away in another subsystem. Regardless, I had some LM324s in a junk box so I swapped out the LM2902s. Somewhat downgraded in performance but I don't think it'll matter.
Ok, well I’ll post up some photos of the fun. It was a negative result. I’m not sure if this debugging style is all that great. It certainly did not work well on this one. I made my final conclusions to replace the entire HVAC controller after I obtained a wiring diagram online and started trying to understand the theory of operation of the system and its components. Not quite what I’d set out to do. Originally I wanted to fly blind and let the tester guide me.
Last edited by Sclass on Wed Nov 06, 2019 10:44 pm, edited 1 time in total.
Re: Fixit Log
the board

tools: soldering braid, solda-pult and a soldering iron (not shown)
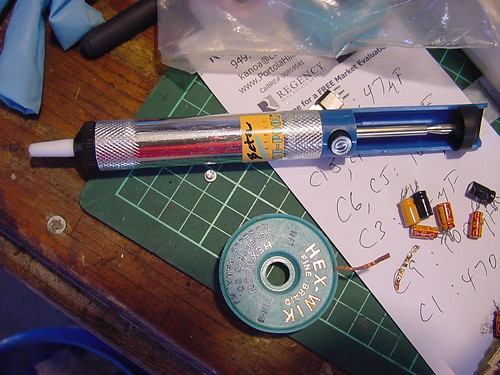
remove components from board

testing


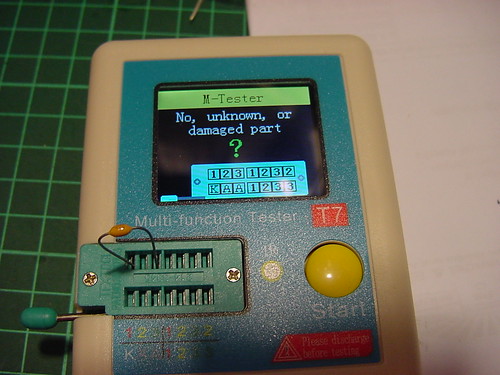
tester didn't work on small inductors and capacitors. they basically aren't there as far as the tester knows.
22pF in other words not really there.
burned heat sink on a transistor. I pulled transistor and its gain is below spec. damaged


Some various tests. Inductor, bicolor LED showing two junctions. MOSFET
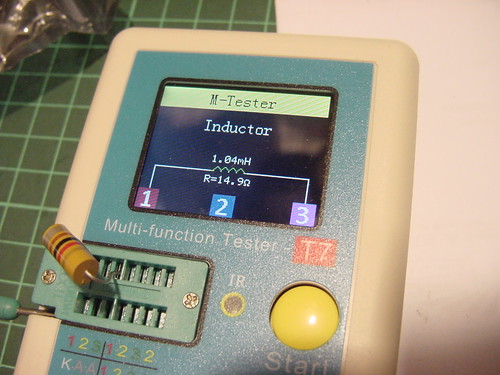

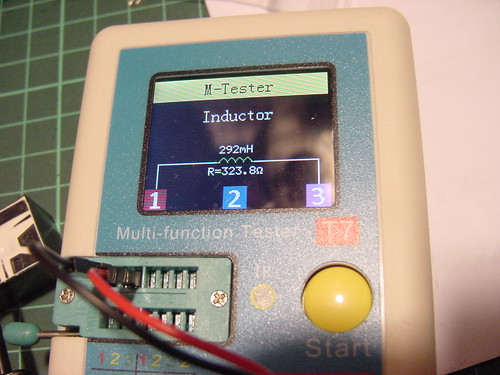
very small inductor


tools: soldering braid, solda-pult and a soldering iron (not shown)

remove components from board

testing


tester didn't work on small inductors and capacitors. they basically aren't there as far as the tester knows.
22pF in other words not really there.

burned heat sink on a transistor. I pulled transistor and its gain is below spec. damaged


Some various tests. Inductor, bicolor LED showing two junctions. MOSFET


very small inductor


Re: Fixit Log
Ended poorly.
So I finally fixed the climate controller in my car. I got really frustrated and gave up. I whipped out my credit card and started buying parts. I didn’t buy thousand dollar Mercedes parts but I ended up dropping $350 for remanufactured units. Push button controls for the heater and ac and the analog computer. I kept swapping components and the problems changed but the system was never quite bug free.
So after I put my black boxes in the system was still flakey. Sometimes the blower would come on and sometimes not. It was repeatable when it did happen which was interesting. Then sometimes it worked normally.
I started reading my owner’s manual and it turns out there is a thermal switch on the engine that turns off the blower if the engine is too cold. Cold engine switch to ground opens. I checked the diagram and indeed the car had it but I wasn’t sure where it was located. There are several electrical sensors on the engine so it was unclear what to test. I went to the Internet and found just where to look on the engine. Checked the switch and it was good. Dang. But I noticed the wire was a bit dangly that connected it to the main harness.
I tugged on it and it was just hanging. The wire had broken off and the ends were dragging a long the firewall alternately floating and grounding the connection as I drove along. This would confuse the controller.
With a solderless *crimp splice (btw a good item for fixit if you don’t want or can’t solder) joined the wires and bam my ac, heat and blower function perfectly. Sadly I caved in and spent the $350 when a $0.25 crimp wire splice might have saved it.
Since I returned the original cores to the rebuilder I’ll never know if I could have fixed it for cheap. But I guess $350 isn’t bad compared to what the Mercedes dealer would have done to me to diagnose and replace the electronics.
Sensor
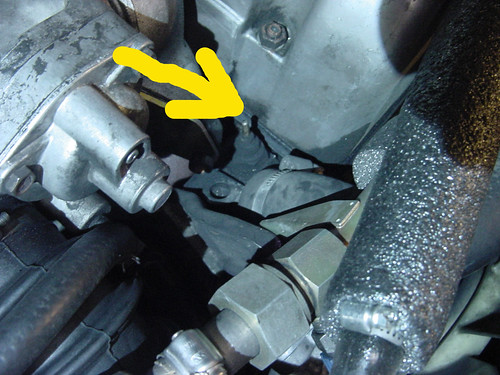
Severed wire:

other end going to the harness near the receiver drier

Sad, but happy my car is in good working order. It is rare to drive in 30 yo MB with perfectly functioning AC and controls. It’s hard and expensive to repair. I’m running a tally in my head and I think I have about $700 in parts alone invested in getting HVAC working on this.
New compressor, parallel flow condenser, new Freon, new oil, new O-rings, new pressure switch, new receiver drier temperature switch, new receiver drier, new Freon hoses, new expansion valve, new vacuum actuator pods, new solenoid valves and new electronic black boxes.
End of story, not sure the component tester alone does an electronic technician make.
*these are good to attach wires if you don’t solder. Also good in high fire risk environments where you don’t want to use a soldering iron. Requires a set of crimping pliers to crush down the little barrel.
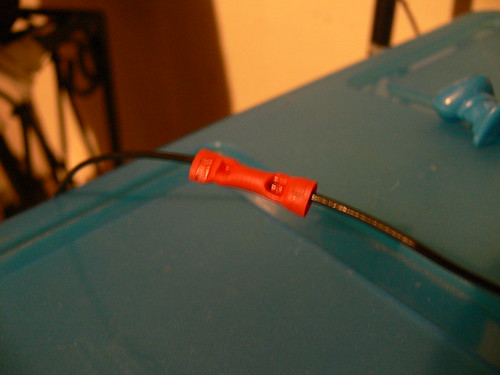

Cheap tool like this works to crimp ends.

So I finally fixed the climate controller in my car. I got really frustrated and gave up. I whipped out my credit card and started buying parts. I didn’t buy thousand dollar Mercedes parts but I ended up dropping $350 for remanufactured units. Push button controls for the heater and ac and the analog computer. I kept swapping components and the problems changed but the system was never quite bug free.
So after I put my black boxes in the system was still flakey. Sometimes the blower would come on and sometimes not. It was repeatable when it did happen which was interesting. Then sometimes it worked normally.
I started reading my owner’s manual and it turns out there is a thermal switch on the engine that turns off the blower if the engine is too cold. Cold engine switch to ground opens. I checked the diagram and indeed the car had it but I wasn’t sure where it was located. There are several electrical sensors on the engine so it was unclear what to test. I went to the Internet and found just where to look on the engine. Checked the switch and it was good. Dang. But I noticed the wire was a bit dangly that connected it to the main harness.
I tugged on it and it was just hanging. The wire had broken off and the ends were dragging a long the firewall alternately floating and grounding the connection as I drove along. This would confuse the controller.
With a solderless *crimp splice (btw a good item for fixit if you don’t want or can’t solder) joined the wires and bam my ac, heat and blower function perfectly. Sadly I caved in and spent the $350 when a $0.25 crimp wire splice might have saved it.
Since I returned the original cores to the rebuilder I’ll never know if I could have fixed it for cheap. But I guess $350 isn’t bad compared to what the Mercedes dealer would have done to me to diagnose and replace the electronics.
Sensor

Severed wire:

other end going to the harness near the receiver drier

Sad, but happy my car is in good working order. It is rare to drive in 30 yo MB with perfectly functioning AC and controls. It’s hard and expensive to repair. I’m running a tally in my head and I think I have about $700 in parts alone invested in getting HVAC working on this.
New compressor, parallel flow condenser, new Freon, new oil, new O-rings, new pressure switch, new receiver drier temperature switch, new receiver drier, new Freon hoses, new expansion valve, new vacuum actuator pods, new solenoid valves and new electronic black boxes.
End of story, not sure the component tester alone does an electronic technician make.
*these are good to attach wires if you don’t solder. Also good in high fire risk environments where you don’t want to use a soldering iron. Requires a set of crimping pliers to crush down the little barrel.


Cheap tool like this works to crimp ends.

Re: Fixit Log
So I have recently gotten this bluetooth/mp3/sd/usb/am fm car stereo from ebay. You can get these things on a variety of internet sites from China for the princely sum of $15 shipped. I'm pretty impressed with the unit. The audio sounds okay - I actually replaced a vintage Alpine IDA-x001 headunit with this thing. The Alpine sounded good but cost many times more and didn't have a way to pick up my phone. Also, I have some streaming music sources that play through BlueTooth to my phone and they cannot play on the old system. Sooo, I splurged and bought this $15 thing.

Music sounds pretty good given all the background noise in my clattery old diesel. I started using Siri and Alexa to voice control my playlists so I didn't have to fiddle with the controls while looking for a song. And I started taking calls and making calls on the thing. Wow. Technology. Well, a funny thing happened. After less than a week of taking calls, a few of my friends started asking me WTF was wrong with my phone. They said it sounded like I was underwater or way down a hole when I was talking. One old friend said "Sclass you cheap bastard get a real bluetooth set! You suck considering you are a signals and systems guy."
Funny, they sounded great on my end. I could hear everyone complaining "I cannot hear you Sclass!" on my side. I felt like I was back in Russia where we used to yell as loud as we could into the phones to get a message through. Poor man's signal to noise ratio booster. I was getting a sore throat today and I realized, heck, I need to tear thing thing apart and see what the heck is going on in there. Bluetooth speaker and microphone how hard could this be to execute on?
Here is what I found inside the $15 wonder. I'm not mad at them. It is a wonder they could sell this for $15 including shipping. So there must be nothing there...almost nothing.
In the car. Remove it from the dash.

As I said, it is one DIN high and half depth. There's only half a box. On the bench. It's tiny. Remember those old school car cassette decks. This is not one of those.

Look inside. Almost nothing there. Just a few big integrated circuits and some integrated power amp. The controls take up most of the board space.
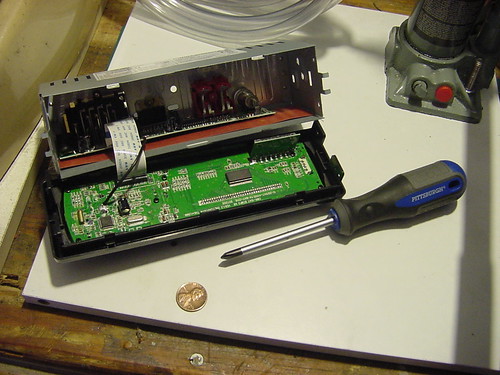
I find the microphone and remove it with my hot air gun. Nothing to be intimidated by. Hot air stations like this cost only $37 shipped from china. A must have if you want to work on modern smt electronics.
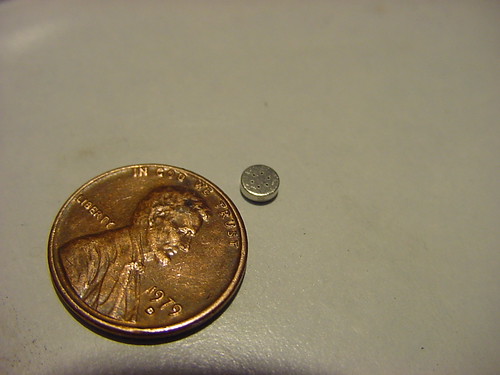

And look at that puny mic. it is so small. I've never seen one this small and it probably doesn't produce so much signal. That little cloud animation on siri was really small suggesting the amplitude of my voice was barely getting through. I'd say, "Play Beethoven" and it would say "okay, here is some Beyonce". That should have tipped me off something was wrong.
This is what a good $0.50 mic looks like as opposed to this cheap tiny little thing that probably cost them $0.01. Not to complain, they had to keep costs down but they cut the design to the point my phone calls were unintelligible.

I placed the two mics on the board for scale. Look at the difference.
Rather than go into my stash of mics (honestly I found those nice new ones after I fixed the board) I decided to look for a mic in my junk pille. I had an old Uniden cordless phone. It had a great mic in it. Just had to keep track of plus and minus polarity because it is electret.
Steal a mic from the junk phone. Desolder with solder puller. Transfer mic to car radio board and solder in.

Its all back together again and I tested it on my friends. I said "doesn't it sound great." No Sclass, it sounds normal...like a Uniden phone. Good enough! A fix!

Music sounds pretty good given all the background noise in my clattery old diesel. I started using Siri and Alexa to voice control my playlists so I didn't have to fiddle with the controls while looking for a song. And I started taking calls and making calls on the thing. Wow. Technology. Well, a funny thing happened. After less than a week of taking calls, a few of my friends started asking me WTF was wrong with my phone. They said it sounded like I was underwater or way down a hole when I was talking. One old friend said "Sclass you cheap bastard get a real bluetooth set! You suck considering you are a signals and systems guy."
Funny, they sounded great on my end. I could hear everyone complaining "I cannot hear you Sclass!" on my side. I felt like I was back in Russia where we used to yell as loud as we could into the phones to get a message through. Poor man's signal to noise ratio booster. I was getting a sore throat today and I realized, heck, I need to tear thing thing apart and see what the heck is going on in there. Bluetooth speaker and microphone how hard could this be to execute on?
Here is what I found inside the $15 wonder. I'm not mad at them. It is a wonder they could sell this for $15 including shipping. So there must be nothing there...almost nothing.
In the car. Remove it from the dash.

As I said, it is one DIN high and half depth. There's only half a box. On the bench. It's tiny. Remember those old school car cassette decks. This is not one of those.

Look inside. Almost nothing there. Just a few big integrated circuits and some integrated power amp. The controls take up most of the board space.

I find the microphone and remove it with my hot air gun. Nothing to be intimidated by. Hot air stations like this cost only $37 shipped from china. A must have if you want to work on modern smt electronics.


And look at that puny mic. it is so small. I've never seen one this small and it probably doesn't produce so much signal. That little cloud animation on siri was really small suggesting the amplitude of my voice was barely getting through. I'd say, "Play Beethoven" and it would say "okay, here is some Beyonce". That should have tipped me off something was wrong.
This is what a good $0.50 mic looks like as opposed to this cheap tiny little thing that probably cost them $0.01. Not to complain, they had to keep costs down but they cut the design to the point my phone calls were unintelligible.

I placed the two mics on the board for scale. Look at the difference.
Rather than go into my stash of mics (honestly I found those nice new ones after I fixed the board) I decided to look for a mic in my junk pille. I had an old Uniden cordless phone. It had a great mic in it. Just had to keep track of plus and minus polarity because it is electret.
Steal a mic from the junk phone. Desolder with solder puller. Transfer mic to car radio board and solder in.

Its all back together again and I tested it on my friends. I said "doesn't it sound great." No Sclass, it sounds normal...like a Uniden phone. Good enough! A fix!
-
horsewoman
- Posts: 662
- Joined: Fri Jun 07, 2019 4:11 am
Re: Fixit Log

A quick project - fixing a belt. I got this crappy belt only 6 months ago, and I totally got what I paid for. It has been disintegrating after 3 weeks of use and I have been annoyed with myself for even buying it in the first place. I could have foreseen that it would not hold up but I loved the pattern. Since I lost a considerable amount of weight a belt is vital right now. So I cut off the offending strap and sewed on a piece of strap left over from another project. I think it was originally a tension belt.
I considered going all fancy and putting some metal eyelets in but the woven material parts easily for the spike, so I saved myself the hassle.
Re: Fixit Log
Hey, nice belt. Gave me an idea to make a new camera strap for my camera. I get those neck lanyards from trade shows all the time that are made out of that really strong webbing. I think I'll sew some to the stubs of my frayed camera strap to repair it. Good one.
Just finished rebuilding a set of fuel injectors for my Mercedes. These can get expensive if you buy rebuilt units ~ $250 a set or $250 from a rebuild service. I bought a pressure test pump for my own use. $145. Some new German nozzles and needles for $150. After I rebuild my multiple diesels I think I'll be able to sell it off for a little less to another MB hobbyist. The previous owner had this done to my car 100,000 miles ago. It cost him $1000 back in 2005 to have the dealer do it.
This one is a little dubious till one considers the failure rate on the commercially produced rebuilt units. I hear the failure rate is about 20% right now since production of nozzles has moved out of Germany to China and India. Some of the rebuilt units are failures right out of the box. I was able to source new old stock German injector tips. Fuel injectors have very tight tolerances. Apparently the failures sometimes take about 10,000 miles to occur so you're well into it by the time there's a problem.
Fun stuff. We'll see how long my amateur rebuilts last. I'll probably sell this car before I put another 100,000 miles on it.

A photo to know how it all goes back together.

Checking spray pattern and release pressure (1950psi).
https://www.youtube.com/watch?v=BPgjXIhvwbM
Just finished rebuilding a set of fuel injectors for my Mercedes. These can get expensive if you buy rebuilt units ~ $250 a set or $250 from a rebuild service. I bought a pressure test pump for my own use. $145. Some new German nozzles and needles for $150. After I rebuild my multiple diesels I think I'll be able to sell it off for a little less to another MB hobbyist. The previous owner had this done to my car 100,000 miles ago. It cost him $1000 back in 2005 to have the dealer do it.
This one is a little dubious till one considers the failure rate on the commercially produced rebuilt units. I hear the failure rate is about 20% right now since production of nozzles has moved out of Germany to China and India. Some of the rebuilt units are failures right out of the box. I was able to source new old stock German injector tips. Fuel injectors have very tight tolerances. Apparently the failures sometimes take about 10,000 miles to occur so you're well into it by the time there's a problem.
Fun stuff. We'll see how long my amateur rebuilts last. I'll probably sell this car before I put another 100,000 miles on it.

A photo to know how it all goes back together.

Checking spray pattern and release pressure (1950psi).
https://www.youtube.com/watch?v=BPgjXIhvwbM
-
horsewoman
- Posts: 662
- Joined: Fri Jun 07, 2019 4:11 am
Re: Fixit Log
I needed a small light table for a quick art project today (creating a small batch of artsy business cards) so I re-repurposed a salad bowl - which begann its life as a window/door of a front loader washing machine, actually. A camping light beneath it, and voilà, a small light table! A lot easier than copying the letters from the pc monitor. I should however try to fix my printer, I suppose, but well, I like to draw 


-
jacob
- Site Admin
- Posts: 17152
- Joined: Fri Jun 28, 2013 8:38 pm
- Location: USA, Zone 5b, Koppen Dfa, Elev. 620ft, Walkscore 77
- Contact:
Re: Fixit Log
Fixed the speedometer on my neighbor's ancient stationary bike. The battery terminals were completely corroded, so I cleaned them up and put in new batteries. No bueno. Picking it apart revealed that the corrosion had worked through the copper wires connecting to the circuit board and actually detached one of them. Replacing the wires fixed the problem.
Tools used: Soldering iron, solder, PH1 and PH0 driver bits to take it apart, diagonal pliers to strip the wires, and vinegar + q-tips to clean out the corrosion.
Tools used: Soldering iron, solder, PH1 and PH0 driver bits to take it apart, diagonal pliers to strip the wires, and vinegar + q-tips to clean out the corrosion.
Re: Fixit Log
Vinegar also does wonders removing the smell of cat pee from the inside of a campervan. Granted, an unusual fixit, but a fixit nonetheless.