Fixit Log

Fixing and making things, what tools to get and what skills to learn, ...
User avatar
Sclass
Posts: 2809
Joined: Tue Jul 10, 2012 5:15 pm
Location: Orange County, CA

Re: Fixit Log

Post by Sclass »

Fixed my high tech washing machine.

Image

After eight years of trouble free use my LG digital smart washing machine started blinking the display randomly during washing. Sometimes it would totally go blank. Most of the time it made funny characters like the Predator wrist computer.

Image

Symptoms were the display would start out fine then it would start blinking out as the water filled the tub. I noticed the boards got kind of steamy inside the electronics enclosure but I didn’t think much of it because the entire board assembly (two boards, display + main controls) were dipped in polyurethane potting compound. The engineers anticipated some moisture incursion.

I fiddled with the wiring with no results. Fiddling technique is just wiggle wires one at a time and look for errors. So I decided to start looking at the digital controls. The system runs two microcontrollers. One handles the wash and spin cycles and the other multiplexes the LEDs on the display. The display has enough lights on it that it needs its own controller to efficiently light it up. There’s some current control and strobing going on to minimize connections. Basically it sweeps the entire display a few blinks at a time faster than your eye can follow it. I was able to isolate the issue to this processor and board since the water valves, motor and timers all worked well without the display.

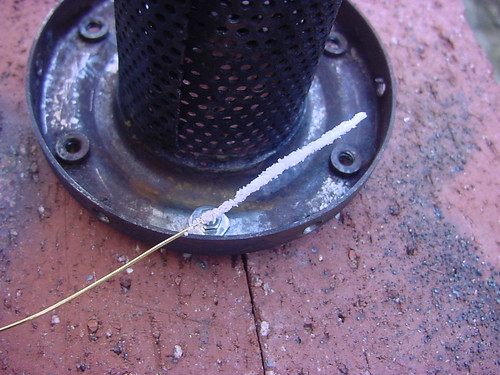
I discovered that the entire display board was dipped in urethane except for the ceramic resonator on the display driver microcontroller. I think this was intentional because the designer didn’t want the goo interfering with the resonator signal. It’s a weak high frequency pulse that can be disrupted by stray capacitance from the polyurethane around its pins. Unfortunately it was also getting a tiny amount of water vapor on the pins that was killing the resonator’s signal temporarily while filling hot water.

Once the water filled the board would defog and it would work again. It was hard to pin down with this on and off again problem.

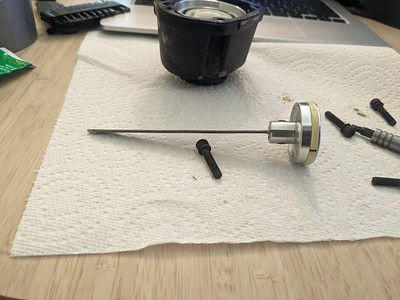
Here is a resonator. They provide the clock pulse to the microcontroller in cheap applications that don’t need high precision timing. Like my washer. It’s the little blue thing in the center of the board on the first image above.

Image

A little water around the wires ruins the output signal and the microcontroller loses its mind.

I smeared some dielectric grease over it and the problem went away. $1 fix from Walmart. Keeps the water out of the sensitive parts. Works now. No more blink outs. New boards are $250 each for the controls and the display. There is a person refurbishing them out there (send in your defective one and he sends you a repaired one) for $180. I suspect he’s sealing up the resonator and sending the board back out.

Image

Cam
Posts: 183
Joined: Tue May 25, 2021 8:21 am

Re: Fixit Log

Post by Cam »

Impressive work Sclass wow. We just replaced one of our washing machines not long ago because it was stopping repeatedly midcycle. Man I wish you lived nearby, I might have actually been able to fix it. Instead we got a new one and I dismantled the old one and recycled/reused as much as I could. Not a huge loss, but seeing this repair gives me hope for fixing a machine next time I know there's a problem in the circuitry.

User avatar
Sclass
Posts: 2809
Joined: Tue Jul 10, 2012 5:15 pm
Location: Orange County, CA

Re: Fixit Log

Post by Sclass »

Fixing old stuff with my pop riveter. Why buy new? Fix stuff with old soup cans.

More fixes using my $10 pop rivet tool. I really recommend these cheapo pop riveters from Harbor Freight. They're really great for patching stuff up with sheet metal. With a good pair of flashing shears and some old soup cans, fuel cans, sides of old appliances etc. you can make great metal patches to fix things up.

First fix is rebuilding my $300 exhaust pipe on my Honda motorcycle. I received two mufflers with the motorcycle when I bought it. One was the stock model. I like this one because it is quiet and has all the USDF approvals stamped on it for spark arresting. Till recently I had the other muffler which was a race unit lying in a pile of junk. I decided hey, it cost the prior owner $300 so why not try it. It is a lot lighter being made out of aluminum rather than steel. The problem was it was caked up with oil and carbon. I bought the motorcycle with a blown motor and rebuilt it. Prior to selling it to me the old owner had fouled up the muffler with oil and carbon residue because the motor didn't run properly up until it seized the piston. So I had to open the muffler up and clean it. I found several problems. It needed new ceramic fiber insulation. That was easy. Drill out old rivets and buy some muffler insulation online. Watch YouTube to learn how to pack it.

Worse, while disassembling to get to the silencer core I knocked off one of the captive nuts that hold the silencer mechanism together. No worries, just weld in another nut in its place. Instead of welding I decided to try propane brass braze. Propane torch, borax, brass wire. This was good because getting out my weld set takes too much time for a little job on small pieces like this. Not pretty but the nut is in.

Image
The tools. Bernzomatic torch. Brass wire.

Image
Clean it up first. Position everything.

Image
Ready to braze.

Image

Free brazing rod. Heat brass wire, dip in Borax Laundry Booster.

Image

Now get the core reinstalled with new ceramic fiber. Enter the $10 pop rivet gun. This junky tool has paid for itself so many times over.

Image

All done, looks great. Ready to install.

Image

And now for another pop rivet repair. After continuing problems on the red mower I'd been repairing in this thread I decided to buy a new used mower on craigslist. The problem with the old one is it just broke in a new way. I think the cam rocker cracked and the new blade adapter broke...the first time I used it after the repair. Dang.

So the temporary solution is to buy another mulching mower and fix the old engine/blade at my leisure. Usually when I'm at my place in Pasadena mowing I'm too busy getting the lawns mowed. I'll do small engine repair later on my downtime. Craigslist is awesome. I bought this older mower for $200. It is a nice Honda model with rear wheel drive and their hydrostatic transmission. Probably cost a lot at one time. But it's used. It has the compression of a new unit. The prior owner had it maintained at the Honda power equipment dealer in town. New plug, carburetor, valve adjustment, air filter, oil, blade, starter cord etc. He took good care of it. Hopefully it won't break like my old one (Snapper label + Honda engine).

Image

On bringing it home I discovered it had a clogged slow jet. YouTube fixed that. Just cleaned it out with a small (0.3mm) wire. Fixed the surging idle. It didn't pull very fast and that had me initially worried because it has the fancy hydrostatic transmission which is a fluid coupling between the motor and drive wheels. Turned out the maintenance guys at Honda didn't tighten the speed lever cable enough. They got away with it because the owner had a tiny lawn with no hills. My lawns are giant and sloped. It needs to pull at the specified 5mph maximum speed. Retensioned the speed control and the thing wants to jump out of my hands. I have to almost run after it.

On turning it over I noticed the prior owner hit a rock and took out the wall surrounding the blade. I'd really like this to be there because I mow over sticks, golf ball sized eucalyptus pods, and rocks. Enter the $10 pop riveter again. Blind riveter? Whatever they call it. It came with a good assortment of rivets and I bought an extra box of 1/2" x 3/16" dia just for fun. Cut a patch out of the panel of an old appliance. I think it was a print dryer - no need for those anymore. The cord fixed my air fry, the lid fixes my mower.

Image

Image

Image

Image

Just drill and pop rivet. Like sewing but with metal.

Natris
Posts: 10
Joined: Mon Feb 22, 2021 7:01 pm

Re: Fixit Log

Post by Natris »

@SClass What kind of tool do you use to cut the squares of scrap metal to size?

User avatar
Sclass
Posts: 2809
Joined: Tue Jul 10, 2012 5:15 pm
Location: Orange County, CA

Re: Fixit Log

Post by Sclass »

I use these. Cheap from Home Depot. Used for roof flashing. I think the set cost me $20.

Image

For some stuff I use one of these. Good for making holes in plates. Cutting sharp corners. Slow but precise. Also cheap. Sheet metal nibbler.

Image

Finally when I need to make precise rectangles I use this. This was expensive but I got it free. Somebody gave it to me. I rarely use it.

https://www.able-engravers.com/12-metal-shear.htm

Western Red Cedar
Posts: 1237
Joined: Tue Sep 01, 2020 2:15 pm

Re: Fixit Log

Post by Western Red Cedar »

A couple weeks ago I found someone had ripped my driver side mirror off overnight.

Image

I tend to outsource almost everything when it comes to cars, but my dad thought it would be easier to replace it. I made my first trip to the junkyard and found a replacement for the same make/model. That, in itself, was a really interesting experience.

The repair required taking the side panel of the door off, disconnecting the wire, and replacing the heading. I won't say it was easy (for me), but YouTube helped a lot.

Image

Image

Image

User avatar
Sclass
Posts: 2809
Joined: Tue Jul 10, 2012 5:15 pm
Location: Orange County, CA

Re: Fixit Log

Post by Sclass »

@wrc it gets easier and easier.

The junkyard is a fascinating place. It’s the economy of the poor. I used to go there a lot in my thirties. It helped me reset my expectations. You realize you’re really rich. I’d come into work on Monday and people would be talking about their weekend in Napa Valley and I’d say I went to pick and pull. I ate mini pastor tacos in the parking lot. There are always some enterprising ladies running a grill with the best smelling pastor at pick and pull. If I wanted alcohol I’d wander over to the San Jose flea market nearby and get a cheap beer and walk around. I’d pick up a “Thug Lyfe” T shirt to wear to work on Monday. It really brought me down to earth. Coworkers thought I was crazy.

Anyhow good to hear you’re widening your horizons.

jacob
Site Admin
Posts: 16002
Joined: Fri Jun 28, 2013 8:38 pm
Location: USA, Zone 5b, Koppen Dfa, Elev. 620ft, Walkscore 77
Contact:

Re: Fixit Log

Post by jacob »

Fixed the gas grill again. The problem is usually that spiders take up residence in the gas line where it connects to the manifold. Symptoms include a weak yellow flame and the smell of gas. Fix: Remove the spiders.

ertyu
Posts: 2921
Joined: Sun Nov 13, 2016 2:31 am

Re: Fixit Log

Post by ertyu »

I replaced the battery and thermal paste of my laptop. Was very intimidated when I first opened it up to do repairs; was very happy to discover that this time around, I could see these repairs as what they are: simple

User avatar
Sclass
Posts: 2809
Joined: Tue Jul 10, 2012 5:15 pm
Location: Orange County, CA

Re: Fixit Log

Post by Sclass »

Fixed my HP35 calculator. I had this old calculator with a dead battery. It is the first pocket scientific calculator so it has some historical value. I met some of the old guys who designed it back in 1970. I mean they designed it in 1970 and I met them in 1999. They were a bunch of really old mathematicians, electrical engineers, computer scientists and a mechanical engineer who apparently designed the buttons which were kind of a first of their kind in themselves. HP legends. The calculator was cutting edge back then.

So I had already cannibalized the power supply as a 19 year old kid in the 80s. By then the calculator was dead and obsolete. I think that's how it fell into my hands. I cannot quite remember but I likely made something useful out of the power adapter. So there is no way to charge the old nicad battery. The adapter is long gone. The nicads were leaky and dead. Sad all I thought of it was cutting up its power supply for some other project. Well, I was a 19 yo aspiring engineer and eBay wasn't going to be around for another ten years. I left the calculator in my junk box till last week. I dug it out while rummaging through my childhood "lab" last weekend. Mom and dad saved all my old stuff.

These have some collectible value so I decided to see if I could fire it up. I hooked some power to it and I got it to function after cleaning up some connections. I needed a battery now. I noticed the device was burning 70mA from my power supply so I figured that nicad batteries would be too 1970 to use for power. Lets take this into the present with Lipo and a USB charge port. No need for the old adapter. I used a TP4096 board for the charger and a 3.7V 503450 Lipo battery to make it go again. I 3D printed a battery carrier the same size as the original nicad pack and glued the new battery and charger in it. Here Is how it came out.

I like how I didn't have to modify or ruin the original unit in case I decide to sell it off on eBay.

dead unit.

Image

old battery pack.

Image

New 3D printed battery pack. Charges with USB phone charger.

Image

Image

Brass battery terminals.

Image

Working. Pi.

Image

History. When HP was a great company. This was what obsoleted the slide rule. Fun retirement activity. :D

Image

loutfard
Posts: 381
Joined: Fri Jan 13, 2023 6:14 pm

Re: Fixit Log

Post by loutfard »

I have my uncle's HP35 at home. I have a long-postponed side project of restoring that one on my list. It would make a great 75th birthday gift to a semiconductor development pioneer.

I am not super qualified, but motivated. I wouldn't mind getting even more detailed info, including perhaps a downloadable stl file for the battery casing. Also, do I assume correctly that the charger board is a TP4056, not a TP4096?

User avatar
Sclass
Posts: 2809
Joined: Tue Jul 10, 2012 5:15 pm
Location: Orange County, CA

Re: Fixit Log

Post by Sclass »

Oops! Yes it’s a TP4056.

I am happy to share the design. I will post up the STL of the battery case on Thingiverse tomorrow. I need to make a few edits to it to improve the fit. I had to file my first prototype a bit to smooth out some fitment issues.

The wiring is just straight 4056 wiring. B+ B- to the battery red and black leads. And the battery terminals are soldered to Out+ and Out-. The lower terminal is the +.

The brass terminals are made of thin brass sheet available from the hobby shop. I got mine from Lowe’s hardware I recall. It’s recessed and folded in a way to prevent shorting if you put the battery on a metal surface.

ETA - I posted the STL up on Thingiverse.

https://www.thingiverse.com/thing:6163993

loutfard
Posts: 381
Joined: Fri Jan 13, 2023 6:14 pm

Re: Fixit Log

Post by loutfard »

Much appreciated. Thank you!

User avatar
Sclass
Posts: 2809
Joined: Tue Jul 10, 2012 5:15 pm
Location: Orange County, CA

Re: Fixit Log

Post by Sclass »

Fixed my recliner sofa. One side of my sofa refused to recline a few nights ago. I turned it over and diagnosed it with my volt meter. All the power was in the right places so I narrowed it down to bad motor assembly. I removed the assembly and moved it to the other side of the sofa to try out on the wiring and buttons there. It didn't work. So I realized something had gone wrong in this linear actuator.

This device was bad. I tried opening the motor and I found out the brushes were really beat up. The commutator needed cleaning too. I did all that and it still was unreliable. Sometimes it would just stop. So I gave up and bought another for $100 online. Ouch. I installed it and it's all good.

Image

Image

I tried really hard to get the motor working but it seemed the bad brush contacts weren't the only thing. This device had a very clever limit switch circuit. The chair stops dead when you're all the way reclined or moved forward. It will only move in the direction opposite to which you were travelling when you hit the limits. I thought, okay, there is some kind of fancy controller with some switches and relays in there. But no, all it had was this. Two diodes placed across two micro switches. When you recline all the way one of the limit switches open. That bars current from flowing in the direction that will recline any further. The diode will conduct current in the opposite direction. So you can only reverse till you back up off of the limit switch. It's a really cheap and clever circuit.

After buying and replacing the assembly I decided to tear the whole thing apart. I had a bad diode. I really wish I'd have been able to fix the motor and limit switch assembly but I gave up too soon and just bought a new motor. I guess $100 isn't bad to get the sofa operational again. I would have preferred swapping out a $0.05 diode though.

Image

Jim
Posts: 81
Joined: Thu May 04, 2023 7:35 pm
Location: PNW

Re: Fixit Log

Post by Jim »

i went through a similar repair for an old vacuum a few days ago. The motor was screaming and the vacuum smelt like burning plastic so i disassmbled it. The brushes were in awful shape and the commutator was pretty fubared. I replaced the carbon brushes (I spent 20 minutes calling all the hardware stores in the area to find out who actully carries brushes anymore [hardly anyone]) and cleaned the commutator. The motor ran better after that, but the commutator was in such bad shape that i decided to buy a new one on ebay anyhow. $29 plus shipping for a new motor wasn't a bad price and now it's back together. My five year old now knows more about the inside of vacuums, and electric motors in general, than probably most adults.

Jim
Posts: 81
Joined: Thu May 04, 2023 7:35 pm
Location: PNW

Re: Fixit Log

Post by Jim »

I'm not sure how ashamed I should be of this repair I just completed. The cylinder of my pneumatic finish nailer cracked, and wouldn't cycle the driver back after driving a nail. Either operating these tools at pressures well above their limit creates untenable conditions in the interior of the tool or they fracture after failing to drive nails through too hard a material. I scoured the internet, but alas, the cylinder for my specific model is obsolete and no longer available for purchase anywhere.

Image[
Before or after?

I filled the crack in the cylinder with some duco cement and "clamped" it with a zip tie.

Image

While I waited for that to dry, I needed to straighten the driver, which had bent itself all to hell. I accomplished this with a bench vise and a cats paw.

Image
Image

Next step was a few wraps of duct tape and some zip ties. The ties needed to be strategically placed so they didn't interfere with the cylinder being reinserted into the body of the tool.

Image

At this point I was laughing pretty hard about the prospect of this actually working. WIth my confidence at an all time low I reassembled the thing and poured about half a gallon of pneumatic oil into the quick fitting and set the regulator on the air compressor to about 50. It shot nails and cycled just fine. I ran it up to 100, which is the maximum recommended PSI that the tool should be run at, and it continued to run without issue. I'm not going to claim that I'm proud of this fix, but I did entertain myself for about half an hour. When it breaks again I'll probably just do the same thing with JB weld instead of duco cement and see how that holds up.

guitarplayer
Posts: 1349
Joined: Thu Feb 27, 2020 6:43 pm
Location: Scotland

Re: Fixit Log

Post by guitarplayer »

float valve for the water tank that is above our flat is old and makes a lot of noise and vibrates when half open. It really was worrying initially without knowing the cause, then I went up and turned out no big deal other than annoying. I was already congratulating myself for spotting the issue and deciding to myself replace the valve which costs around $15 instead of calling a plumber who would surely charge more. But DW had an even more ingenious solution - a piece of synthetic stocking to act as filter. There is barely any noise now and certainly no vibration associated with the flowing water.

(sorry poor photo as it was dark up there and I was also holding the lid of the tank)

Image

User avatar
Sclass
Posts: 2809
Joined: Tue Jul 10, 2012 5:15 pm
Location: Orange County, CA

Re:

Post by Sclass »

That’s a clever fix. On resonant systems one can alternatively change the mass of the oscillator and attenuate a self resonant vibration. By moving the system resonance away from the frequency of the driving force you can reduce vibration on the cheap. Sometimes making things stiffer or adding damping or isolation is expensive compared to just strapping on more or less mass. Just a couple of more knobs to fiddle with when dealing with pesky resonances. For example I stabilized my washer drain hose from wildly shaking and slapping the wall by hanging some decorative strings of beads along its length.

Speaking of which my stupid LG electronic washer broke again. This time it was something else. The startup melody would keep playing randomly every few minutes. Really annoying. Oddly the machine still did its wash cycle. It’s just like the routine to play the wake up melody was randomly executing. I unplugged and replugged all the motherboard connectors and it stopped.

On further investigation I discovered that unplugging the wall cord would get the start melody to execute just as the power was draining out of the circuits. I suspect I had a dirty plug that was momentarily interrupting power and causing the melody routine to run. Funny when I searched online for the phantom melody problem they said change my motherboard. This would fix it because it forces you to unplug and plug everything. I did this but I didn’t have to buy a new $300 motherboard.

This overly complex machine is starting to give us problems after 8 years of use. I really worried about buying one that didn’t have a universal timer control inside like older models. Luckily the electronic design is quite robust. The last two issues were likely caused by water ingress into the cables and board. I used my $1 tube of dielectric grease again on the connector terminals before I replugged them.

My wife said it had great reviews when we bought it. Now that it has some age on it I’m seeing all the same complaints online that I’m fixing.

jacob
Site Admin
Posts: 16002
Joined: Fri Jun 28, 2013 8:38 pm
Location: USA, Zone 5b, Koppen Dfa, Elev. 620ft, Walkscore 77
Contact:

Re: Fixit Log

Post by jacob »

guitarplayer wrote:
Thu Aug 31, 2023 1:05 am
makes a lot of noise and vibrates when half open.
My bold. There's your likely problem. What you have is likely a water hammer effect resulting from the instant pressure drop (Bernoulli's law) from a half open valve that's subject to sudden flow downstream. This sends large shock waves back and forth through your pipes. If you have another valve upstream of this, try turning it down to step-down/distribute the pressure drop.

The hammer effect can be quite substantial/destructive. The first time I experienced it, I thought the house was coming apart. The problem was a toilet sink where the valve in the back wasn't turned all the way up. When opened the actual faucet too fast (not slowly), the entire water pipe would go BRRRRRRRRRRRRRTTTT tank-killer style.

User avatar
Sclass
Posts: 2809
Joined: Tue Jul 10, 2012 5:15 pm
Location: Orange County, CA

Re: Fixit Log

Post by Sclass »

Not to get too nerdy here but…,

Water hammering is more of an inertial effect caused by the mass of water not being able to instantly accelerate or decelerate. It’s like inductance in a wire that causes a fly back voltage with a time changing current. Flywheel effect.

If the valve is making a noice when it is flowing at steady state that is a DC effect. Likely a worn seal that is causing noise with a vortex shedding phenomena. There is different because there isn’t a time rate of change of current. The shedding is like blowing on the mouthpiece of a flute with a steady state flow. It is then excites a natural resonance in the pipe. If you’re unlucky nough to have the shedding frequency close to the natural resonance then you get quite a howl out of the faucet.

The distinction is AC vs.DC effect.

Not sure what @guitarlayers issue is but there is a difference in the physics.

Post Reply