Fixit Log

Fixing and making things, what tools to get and what skills to learn, ...
User avatar
Sclass
Posts: 2808
Joined: Tue Jul 10, 2012 5:15 pm
Location: Orange County, CA

Re: Fixit Log

Post by Sclass »

guitarplayer wrote:
Fri Feb 11, 2022 5:11 am

For another of those first scholarship installments, I got myself a Remington beard trimmer. It failed me about a year ago, would not charge, neither would it work plugged into a power socket. Anyone has experience with fixing such?
Yeah. I fixed my Boots rechargeable shaver a few times. My mom got it for me when I was 15 and I retired it in my 40s. The battery needed to be replaced twice along with some foils. Open up the razor. Mine had some clips that needed to be released. Opened up like a clam. Some have screws. Modern ones may be ultrasonic welded. If welded find the thinnest part near the weld and cut it with a sharp hobby knife.

Desolder the battery. Look it up on eBay and order it. Solder in. Reseal shaver with bathroom silicone. I think I showed how in this thread on a sonicaire toothbrush. Same idea.

Before eBay I’d get the batteries at the model airplane hobby shop. In the 1980s shaver shops would service your shaver. Some old guy would service and clean it. Swap foils and solder new batteries. It has gone away like watch repair shops. Maybe it’s cheap enough to buy an entirely new one now.

Once you learn to change the batteries you find the foils become the hard to source part.

guitarplayer
Posts: 1345
Joined: Thu Feb 27, 2020 6:43 pm
Location: Scotland

Re: Fixit Log

Post by guitarplayer »

Thanks @Sclass, will try this, so far I resolved to a manual trimmer a’la Rob Greenfield which is great and hard to break+provides stretching and exercise if you want to do the head, but is 30-60min job vs 5-10min with an electric one.

User avatar
mountainFrugal
Posts: 1141
Joined: Fri May 07, 2021 2:26 pm

Re: Fixit Log

Post by mountainFrugal »

Image
A simple kitchen leaky faucet fix 2 days ago. There was water all over the floor so I investigated under the sink. There are more pipes than pictured, but I narrowed down the dripping to what looked like the cold water input to the faucet. I could repeat the dripping below the sink when the faucet was on and could see the water running down the tubes. Starting at the other end, I noticed a small drip at the faucet head itself. We rarely use the faucet as a sprayer (previous owners), but the head is on a retractable length of tube you can use to spray down dishes or the sink. I pulled the head out and there was water that dumped into the sink. The faucet head had a loose connection to the tube. The seal was tight enough when the head was retracted that turning on the faucet would fill up the spout surrounding the retractable tubing eventually dripping water down the other side to under the sink. Solved! I spared you the cartoon plumber's crack.

AxelHeyst
Posts: 2169
Joined: Thu Jan 09, 2020 4:55 pm
Contact:

Re: Fixit Log

Post by AxelHeyst »

I'm selling my truck (2000 Tacoma) today. Thought I'd write up my front end repairs, perhaps interesting because I came to this with no automotive repair experience. This is all basic stuff for the mechanics on the forum I'm sure. My overall sense is that if you have the right tools, enough spare time, and can type words in to youtube, cars aren't as complicated or blackbox magical as I'd assumed they were. Having a decent space to work on them (concrete surface, not freezing or in the wind, close access to proper tools) makes an enormous difference. Also, a lot of the specialty tools you need can be rented for free from any auto parts store.

In 2020 I noticed there was slop in the steering. Mechanic diagnosed shot inner tie rods and upper ball joints, quoted me something like $800. I took it home, bought the parts myself. Upper ball joints indeed were shot. I had to buy a heavy duty presser tool to get them out. This was a big lesson for me in the importance of having the right tool; I banged on that knuckle, heated it, liquid wrenched it, swore at it, etc etc for a day and a half before calling it and buying the tool (which wasn't available for rent). It popped out in 5 min.

I went to replace the inner tie rods and saw nothing wrong with them. I noticed vertical play in the pinion where it slides in and out of the rack (hopefully I'm not screwing up terminology here). My first thought was the whole rack needed to be replaced, kind of a big deal to me and a fistful of hundreds of dollars. I DAFSd and DAFSd for a day and a half, and finally found *one* reference on *one* random taco forum about how the guide bearing on the 2000 model trucks were a roller bearing style, known to fail with the symptom being vertical play in the pinion. The fix was to buy the next model year's OEM bearing style with no moving parts, just a concave bearing surface the pinion rests in, for ~$100. Swapping the guide bearings was a 20min job.

After all this work I took it in to get an alignment. They said the lower ball joints were bad. I was pretty sure they weren't, so told them to make it point as straight as they could and let me on my way, because I had to drive from MI to CA. I couldn't tell at the time because I had it loaded with stuff, but soon found that the truck drove with noticeable slop/play in the steering - "hysteresis" in the steering, to get technical. Once I was able to look in to it, I ascertained that the rack bushings were shot by turning the truck on, sticking my head under there and reaching up and moving the steering wheel side to side. The whole rack wiggled forward and back ~1.5".

I ordered replacement bushings, rented a bushing pusher tool from auto shop, and went down to my buddy's place who has a floor jack and other auto tools. We followed these instructions, except didn't pull the sway bar because the bolts were rustwelded on, and we only had to pop the drivers side tie rod end ball joint off. Passenger TRE ball joint stayed on, no problems. No more play in the steering.

User avatar
Sclass
Posts: 2808
Joined: Tue Jul 10, 2012 5:15 pm
Location: Orange County, CA

Re: Fixit Log

Post by Sclass »

Sounds like righteous fixes to me! Plumbing and auto mechanics.

I attached another tile to my roof today. We had high winds this week. Loosened one up to the point it was dangling. There were actually two. I dropped one accidentally and it shattered into kibbles. CRASH! :shock:

Luckily I cleared the area of spectators five minutes before.

white belt
Posts: 1457
Joined: Sat May 21, 2011 12:15 am

Re: Fixit Log

Post by white belt »

Had to throw in the towel on my bicycle spoke repair and take it to a shop to get the wheel re-tensioned after exhausting other options. Lesson learned that I should've paid a lot more attention to spoke tension when truing rather than just installing the new spoke and truing the wheel.

guitarplayer
Posts: 1345
Joined: Thu Feb 27, 2020 6:43 pm
Location: Scotland

Re: Fixit Log

Post by guitarplayer »

Sclass wrote:
Fri Feb 11, 2022 8:42 am
Yeah. I fixed my Boots rechargeable shaver a few times. My mom got it for me when I was 15 and I retired it in my 40s. The battery needed to be replaced twice along with some foils. Open up the razor. Mine had some clips that needed to be released. Opened up like a clam. Some have screws. Modern ones may be ultrasonic welded. If welded find the thinnest part near the weld and cut it with a sharp hobby knife.
Mine had screws, and really bad quality ones it seems. I got three of them out but the fourth one lost any resemblance of the cross at its head.

Any ideas on how to get out a stripped screw ?

User avatar
Sclass
Posts: 2808
Joined: Tue Jul 10, 2012 5:15 pm
Location: Orange County, CA

Re: Fixit Log

Post by Sclass »

Drill the head off. Extract the leftover piece with pliers.

Reminds me I fixed the plastic remote fob key for my wife’s car yesterday. It has a tiny screw that fell out. I just replaced it with a screw I had lying around. Every time I toss something electronic I tear it apart and cannibalize the little self tapping screws among other bits. They go in a jar on my bench.

User avatar
Ego
Posts: 6393
Joined: Wed Nov 23, 2011 12:42 am

Re: Fixit Log

Post by Ego »

Last week I replaced the petcock valve at the base of the fuel tank and replaced the fuel line and filter from the petcock to the carb. No luck. In fact, it was getting worse and refused to remain running at idle. So I threw in the towel, called several mechanics and found one I liked. He picked it up. Disappointed in myself. This is a problem I should be able to solve.

User avatar
Sclass
Posts: 2808
Joined: Tue Jul 10, 2012 5:15 pm
Location: Orange County, CA

Re: Fixit Log

Post by Sclass »

No, you tried all the easy stuff. Whatever is wrong is going to be a more complex repair.

User avatar
mountainFrugal
Posts: 1141
Joined: Fri May 07, 2021 2:26 pm

Re: Fixit Log

Post by mountainFrugal »

Ego wrote:
Thu Feb 17, 2022 10:02 am
He picked it up. Disappointed in myself. This is a problem I should be able to solve.
You have learned a ton about how this works already! Enough that you will actually be able to learn from the repair by the mechanic by peppering them with questions and have them explain their thought processes about how they worked through the fix. Also, you do not know whether replacing some of the parts you already did would have been done by the mechanic anyway at a mechanics hourly rate.

User avatar
Ego
Posts: 6393
Joined: Wed Nov 23, 2011 12:42 am

Re: Fixit Log

Post by Ego »

Yeah, it's true. I learned. I may be wrong but I think maybe I was 90% there and just didn't clean the jets properly and then messed up the needle valve and bellow with the carb cleaner. We shall see.

User avatar
Sclass
Posts: 2808
Joined: Tue Jul 10, 2012 5:15 pm
Location: Orange County, CA

Re: Fixit Log

Post by Sclass »

fixed my Samsung laser printer. My laser printer stopped printing and threw a cryptic code. I looked it up and apparently it was having a fuser malfunction. I'd just bought a new extra high capacity toner cartridge so I was motivated to find a fix. I had no idea how these things work. Apparently it deposits some carbon black and nano hot glue particles on a drum and then presses them into the paper with a hot drum that melts the glue/carbon mix and sticks it to the paper. On my printer it uses an 850W 110V halogen lamp to do this.

I took the printer apart, removed the fuser assembly. Not user serviceable. Replacement fuser assembly from Samsung is $100. Had to take out a few screws to get to it. Not like changing a toner cartridge. Anyhow, got it out. Here it is. The lamp is a long skinny thing that goes down the axis of the fuser roller. It is hooked to 110V through a couple of contacts on the ends. I checked continuity from end to end with an ohm meter and it was open. Burned out light bulb in other words.

You can see the burn mark where the quartz glass is shattered a bit. It made an interesting "boing" sound when it failed. I was printing a single sheet and it did this and it never worked again. And my cartridge shows 90% toner remaining. :(

So I bought a bulb online. $4. But I had to buy a ten pack. $40. Still not in new printer territory. Especially with a new high capacity toner cartridge and duplexer option.

Installed the bulb reassembled and voila. Working printer.

One side of the bulb.

Image

Second side:

Image

Undo the little anchor screws and remove bulb. Replace. Reassemble.

Image

J_
Posts: 891
Joined: Tue Nov 01, 2011 4:12 pm
Location: Netherlands/Austria

Re: Fixit Log

Post by J_ »

Chair got new upholster:

The old fabric: to dark for what I like
Image

Using the back fabric as modell for the new fabric
Image

On the seat I only removed the fabric on the corners, because otherwise the two fabrics would be too thick
Image

new fabric measured and tools
Image

Image

Result:
Image

johnC64
Posts: 4
Joined: Fri Jun 07, 2019 8:16 am

Re: Fixit Log

Post by johnC64 »

I have a question which best fits here for all you handymen/women: I have an expensive electronic device that works with a 220V -- 12V 1-1.5A transformer. I want to be able to use it in my camping car but I want to feed it directly from the van battery because I want to minimize consumption (it will be on all the time) and transforming back a forth seems a waste to me. Would it be safe to directly connect it (via a 2A fuse) or is there some kind voltage stabilizer I could integrate?
Regards,

J_
Posts: 891
Joined: Tue Nov 01, 2011 4:12 pm
Location: Netherlands/Austria

Re: Fixit Log

Post by J_ »

I suppose that your device runs on DC, and that your transformer does not only transforms the voltage but also changes AC in DC. You can check it by close reading your transformer I think. If that's the case you can use your 12v battery as you suggest. And it yes it will be wise to fuse it.

johnC64
Posts: 4
Joined: Fri Jun 07, 2019 8:16 am

Re: Fixit Log

Post by johnC64 »

Thanks J_. Yes, it is AC to DC. An if the battery completely dries up (it is a situation I know can happen, but I am ready to risk the battery), can a diminished voltage (lets say 10V) being fed to the device break it somehow?

J_
Posts: 891
Joined: Tue Nov 01, 2011 4:12 pm
Location: Netherlands/Austria

Re: Fixit Log

Post by J_ »

The 12 volt DC devices (I use) just stop to function if the voltage drops too low. They do not have any damage.

jacob
Site Admin
Posts: 15995
Joined: Fri Jun 28, 2013 8:38 pm
Location: USA, Zone 5b, Koppen Dfa, Elev. 620ft, Walkscore 77
Contact:

Re: Fixit Log

Post by jacob »

Yes, most likely it will just start working in an erratic way (semiconductors require a min voltage to do their thing, so transistors would start sending current the wrong way, LEDs would stop working) and then stop entirely. Ideally there will be a circuit protecting against undervoltage insofar the rest of the circuit is susceptible to the problem. If the "expensive device" contains a motor (like a fan), I wouldn't do it.

I'm not sure what a voltage regulator (MOSFET) does when undervoltaged. If it tries to take more current than what it's rated for that could be a problem. 10% confidence.

I'm wondering whether a solar charge controller could be part of the circuit---would they have built in undervoltage protection?

User avatar
Sclass
Posts: 2808
Joined: Tue Jul 10, 2012 5:15 pm
Location: Orange County, CA

Re: Fixit Log

Post by Sclass »

@jacob yeah it really depends on the regulation scheme. This expensive object may knock down the 12V by a lot and use low voltage rails so it may or may not care if the voltage hits 10V or so. There is a whole branch of engineering around low dropout LDO regulation where the power supply can get dangerously low to the regulated downstream voltages. Linear regulators can be designed LDO or some switchmode (MOSFET) will be able to tolerate a lot of drawdown before they drop out since they just increase their switching duty cycle to compensate for the sagging power. As for MOSFETs if you bring down their gate source voltage you will increase your drain source resistance Ron and you'll make more heat...in general.

Hey why I'm really here is I did a fix. My wife's 2012 Accord drained its battery recently. I thought it was pandemic shutdown leaving it parked so I just charged it up. It took a charge then went completely flat in three days. Uh oh. Not good. So while I was waiting around at the doctor's today I decided I'd better figure out what was causing this parasitic draw.

There are two ways to diagnose this. Since I had free wifi I typed in Accord 2012 parasitic draw and got back a ton of websites and videos telling me where to look. Another way was to go home, charge the battery, disconnect one terminal and put an ammeter (digital voltmeter on Amps mode) in series with the open line and observe the draw. Pull fuses one by one and see if the extra current (usually in excess of 40mA) goes away. Trace that circuit for a short or an errant device that is on that shouldn't be on.

Okay, so enough with formal diagnostics. Google says the most likely place for a parasitic draw is the Karr add on alarm system that the dealer installs on the car and screws an extra $800 out of you for and tacks it on your loan. Kind of like the lifetime wax coating. There is this silly box of electronics they originally put on the car to make it easy for a salesman to open doors without actually carrying 100 sets of keys. They convert this "system" with a shorting jumper to a custom alarm and charge the customer $600-1000 dollars for it.

My friend got one of these accidentally and the dealer demanded she bring the car back because she hadn't paid for the "jumper" wire that made it an alarm system. She told them to buzz off. I always wondered how all this worked.

Basically it's a little cheapo alarm they hack into your wiring harness to arm with your door locks, honk the horn and disconnect the ignition when tripped. It's a toy. Worse it fails several years in and it makes the real computer in the car think somebody is trying to open the doors and it makes the computer wake up out of sleep state thus drawing more electrical power for your battery. All this happens when the cars is parked in your garage at night and it drains your battery.

So I pulled it out. Unplugged the entire thing and tossed it in the junk box. The ignition cut had to be reconnected but there were plenty of youtube videos showing that. Just a splice. I kept saying "idiots idiots idiots" as I took this thing apart but I realize they're brilliant. They're rich. They sell the system to dealerships for $200. It looks like $10 worth of hardware. Then the dealership recoups their costs and makes a profit selling the thing to the new car buyer.

The idiot was the last owner of our car. He bought the add on alarm and didn't even realize the 2012 Accord comes with an alarm! They really interfered with each other too which confused the hell out of us since we bought the car.

Anyway, don't be a sucker and buy the Karr alarm system from the new car dealer.

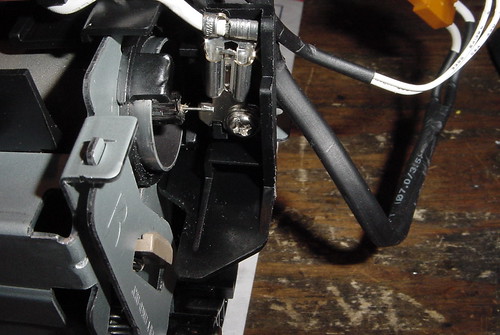
Here is the POS I ripped out. Shameless yet brilliant at the same time.

Image

ETA - just did a parasitic current draw test. Digital voltmeter on milliamperes, meter set up for current, place meter inline (break connection) with negative terminal of battery. Negative because it is cleaner, but positive will work too. Result 13mA which is very low. That’s good meaning my car isn’t drawing much on the battery. I looked over the Karr circuit and it looks like when the mems vibration sensor is triggered the onboard microcontroller fires a relay that turns on something…I still haven’t figured out what. May not have been connected but the magnetic coil was most certainly activating erroneously. It was enough to drain my battery.

Most people know how to use a digital volt meter to measure voltage and resistance. Here’s a good reference for measuring current using a cheap digital volt meter. If you own a digital voltmeter it’s good to know how to measure voltage, resistance and current as part of your bag of tricks. Never hook voltage across the current inputs or you’ll burn the internal (replaceable) fuse.

http://www.nissantechnicianinfo.mobi/ht ... _Draw.html
Last edited by Sclass on Mon Mar 07, 2022 12:06 pm, edited 1 time in total.

Post Reply