DIY Single axis USB controller

Fixing and making things, what tools to get and what skills to learn, ...
jacob
Site Admin
Posts: 16002
Joined: Fri Jun 28, 2013 8:38 pm
Location: USA, Zone 5b, Koppen Dfa, Elev. 620ft, Walkscore 77
Contact:

Re: DIY Single axis USB controller

Post by jacob »

Sclass wrote:
Wed Apr 12, 2023 6:26 pm
I was going to say you’ve done the hardest part. You have the thing on the table running. Embedded people like to say getting an LED to blink is half of the problem. This is no small feat because it means you have a working board, interface, compiler, boot loader, clock source and more working when you just do that.
Agreed. When I reread the thread, you actually gave me the solution very early on (the joystick library), but I didn't have the domain-knowledge context yet to grok its utility. There was a gap in my understanding between what I could learn from "arduino for dummies" and "all the functions are described on the wiki / catalog / aliexpress / github" and so I wasn't able to connect them. This gap seems weirdly common in complex applied fields. (Also with ERE)

Anyhoo, the resistor example works too now. Next interesting problem is that AnalogRead will split the input into 1024 digital values. Moving the stick or rudder I will only use about 20% of the full range of the potentiometers to fly the plane. This gives me a resolution of -100;+100ish. I hope this is enough ... otherwise I need other solutions, like gears, pulleys, or levers (just like in the original planes). I'm working on the mechanics of a two-axis stick. To be continued...

User avatar
Sclass
Posts: 2810
Joined: Tue Jul 10, 2012 5:15 pm
Location: Orange County, CA

Re: DIY Single axis USB controller

Post by Sclass »

Getting started is half of the battle. Glad to hear you’re seeing results. That’s the beauty of Arduino. You can get things up fast.

What you’re basically seeing is you’re blessed with a 10bit adc and the old school rudder spec was written around 8bit tech.

You’ll need to dumb down Leonardo by shifting and rescaling in code. It can be done a number of ways like ignoring the 2 least significant bits, using a compiler directive to build for 8 bit or writing in a formula that divides by 4 and offsets by -100. The chip atmega32u4 is fast enough to do this for every sample without your hand or eye knowing it. Arduino will just compile it transparently as a two left bit shifts and a subtraction which will be low overhead.

The interesting part is when you put in enough math per sample to the point where it gets perceptible. It’s free to write formulas so just type them in and make the Leonardo do the work for now.

ETA - I meant two right shifts…my dyslexia. :lol:

Have fun!

jacob
Site Admin
Posts: 16002
Joined: Fri Jun 28, 2013 8:38 pm
Location: USA, Zone 5b, Koppen Dfa, Elev. 620ft, Walkscore 77
Contact:

Re: DIY Single axis USB controller

Post by jacob »

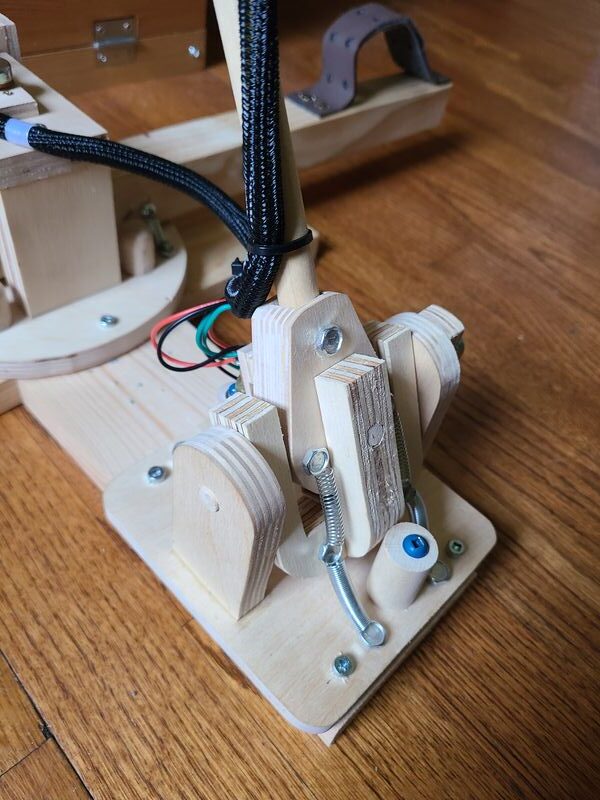
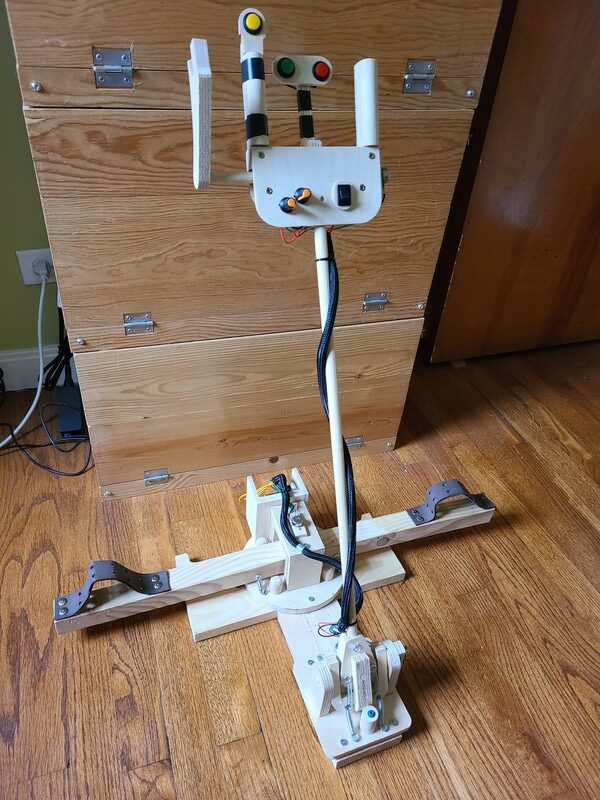
We've come a long way since the OP of this thread. Once the very many various pieces of the puzzle coalesced, it seemed like the sky was the limit (pun, ha!), so I kept adding until I had a fully functional cockpit... or at least enough controls to fly single-engine fighters on full realism, so here we are:

Image

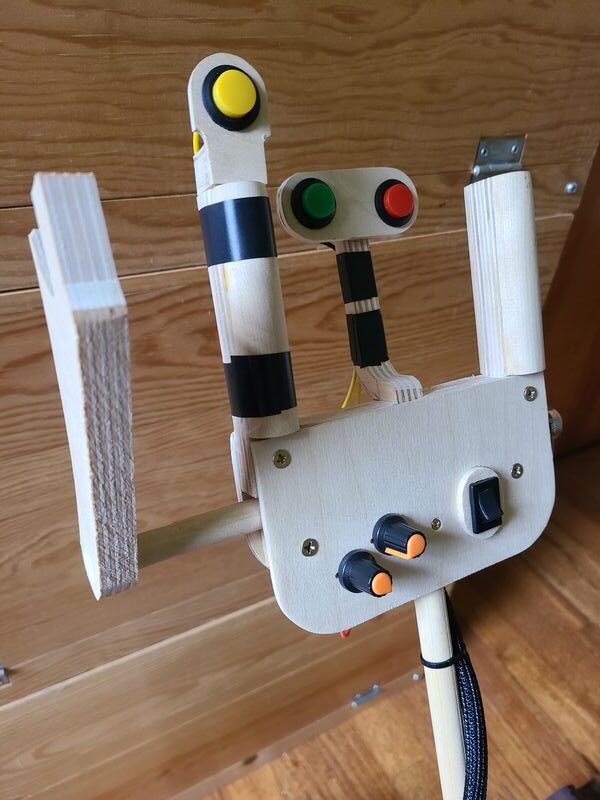
It has 6 axes (pitch, roll, yaw, throttle, mixture, and radiator) and 4 switches (fire guns, reload, blip switch, and engine start/stop). For those who are interested in such things, WWI planes were basically underpowered flying kites that were often more dangerous to the pilot than the enemy.

They were rarely trimmed and the pilot had to deal with the engine (typically around 100-150HP). Early planes did not have a throttle. Instead they had a blip switch (yellow button) that cut the power to the spark plugs to take the motor from 100% down to 0% in short bursts. The problem was that the engine would keep churning leading to flooding the engine if blipped for more than a few seconds at a time. So try landing with that :)

Later on throttles were invented. That's the handle on the left. In some places this was actually on the yoke... an early version of HOTAS! Going into thinner air, there's less oxygen which also requires injecting less fuel. That's what the mixture control is for. Also in a dive, the airflow might cool the engine too much, so there's also a control for the radiator (other orange potmeter) to keep the engine alive when going downhill fast.

I just took it for its maiden flights in a Fokker E.III and an Albatros D.II respectively. It's a very different experience from the Thrustmaster Warthog setup I've been using. It's far more gymnastic. I may have to go to the Rheinbeck aerodrome in NY or the Air Force museum in Dayton to get a better idea of whether it's realistic. I based it off of some youtube videos.

The stick gimball was first part I made. That was pretty easy. (Easier than making clocks.)

Image

The yoke was last part I made. This was hard because it wasn't as mechanically obvious and it had to fit the hands. I design stuff on post-it notes. Then scroll saw it out. It's very much using a handtool mentality... which was also still the case in WW1. Kludges upon kludges. I really need to become more comfortable with some kind of CAD. One of the most frustrating things about this method is having to remake parts.

Image

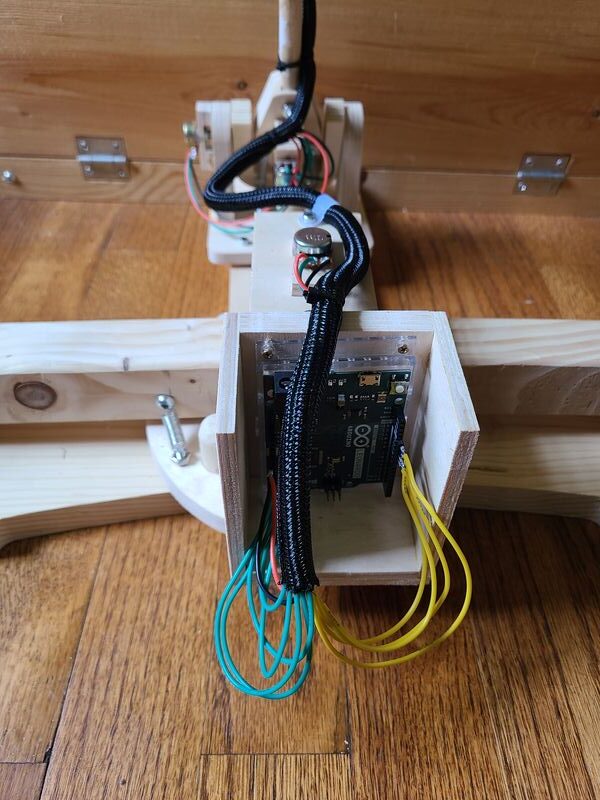
The brain of the operation is an Arduino Leonardo using the MHieronymos library above. I had to do some programming. I figured out how to made the Arduino appear as two separate controllers. One for the stick and one for the engine. They still show up as "Arduino Leonardo" (x2) in the device manager and I haven't figured out how to rename the axes .. for example mixture/radiator is just set up as X/Y on a second joystick, which is not very elegant.

Image

The other problem is that after I added the yoke to the stick, the springs, which center the stick, became too weak to hold it up. They still provide enough feedback to feel the center, but obviously not pretty. I know have a much better understanding of why some engineering solutions elicit a "Why the #$@#$ did they design it like that?" Answer: "They didn't. Rather, this was a later fix to solve some unforeseen problem". There are several of such SNAFUs in this project. I'm also sure there are several issues here that make real engineers cringe. For example, I know nothing about "wire management"... indeed how to wire it didn't occur to me before I started doing it and realized that I had nowhere to route them except on top.

Overall, I learned a ton. I'm somewhat inspired to build another cockpit for a more modern plane. I've already falling victim to what is apparently a common problem for people who start building "pits". I haven't started the game in weeks.

jacob
Site Admin
Posts: 16002
Joined: Fri Jun 28, 2013 8:38 pm
Location: USA, Zone 5b, Koppen Dfa, Elev. 620ft, Walkscore 77
Contact:

Re: DIY Single axis USB controller

Post by jacob »

One of the nifty things about having access to the microcontroller layer is the ability to make "pseudo-switches". For example, the black switch is an on-off switch that I use to start and stop the engine. Whereas the game uses the same keypress ("E") to both start and stop the engine. However, it was possible to program the digitalinput to create a 500 millisecond button press each time the on-off switch goes either on or off.

Likewise, it would also be possible to hardcode response curves and deadcenters. Indeed, my first attempt actually autocalibrated the axes based on lowest and highest measured values.

PS: I'm sure there are technically correct terms for these things. I just don't know what they are :-P

sky
Posts: 1726
Joined: Tue Jan 04, 2011 2:20 am

Re: DIY Single axis USB controller

Post by sky »

Which button fires the machine gun?

jacob
Site Admin
Posts: 16002
Joined: Fri Jun 28, 2013 8:38 pm
Location: USA, Zone 5b, Koppen Dfa, Elev. 620ft, Walkscore 77
Contact:

Re: DIY Single axis USB controller

Post by jacob »

The red one. Initially I wanted to make my own trigger that would fire when pushed and reload when pulled way back but then realized that would further complicate the yoke---the throttle was tricky enough, so I punted and used two buttons instead. The green button reloads.

User avatar
mountainFrugal
Posts: 1144
Joined: Fri May 07, 2021 2:26 pm

Re: DIY Single axis USB controller

Post by mountainFrugal »

Really cool project @jacob! How many rounds do you get per reload? How many total can the plane carry? Do the sims also model if the bullet hits the propeller?

From wikipedia:
The propeller blades were reinforced with tape to hold the wood together if hit, and it relied on the fact that the odds of any single round hitting a blade below 5%, so if short bursts were used, it offered a temporary expedient even if it was not an ideal solution.
Never mind: Updated questions... answered most of my own questions by looking at your first post and googling the Rise of Flight game website.

jacob
Site Admin
Posts: 16002
Joined: Fri Jun 28, 2013 8:38 pm
Location: USA, Zone 5b, Koppen Dfa, Elev. 620ft, Walkscore 77
Contact:

Re: DIY Single axis USB controller

Post by jacob »

@mF - IIRC up to some 700 rounds which with my lack of accuracy will down 0-2 planes. I only have about 20^H^H45 hours of game flying time. This is probably about as much as the typical WWI pilot. IIRC the average lifespan of a pilot was 11 days.

These planes were mostly canvas on top of a skeleton, so bullets will go straight through with little damage, hence the rule to aim for "meat & machine". I'm not sure propeller (self)hits are simulated---I've never seen that happen---but it may be that I've just not flown planes were it's a problem. The most spectacular hits are shooting off a few struts which can cause the wing(s) to rip off. As far as I know, the damage models are accurate. It's not just a simulated "box".

There were four solutions to not shooting off your own prop. Put the prop behind the pilot. Some early British Airco designs were like that. Problem being that bad landings would noseplant the plane which was usually fatal to the pilot. (Other designs are capable of pulling off emergency landings on any surface that is reasonably level and free of obstructions --- any landing you can walk away from is a good landing.) Other than that inconvenience, the unobstructed field of view is spectacular. Mount the gun elsewhere, typically on top of the wing, which would be highly inconvenient when reloading as it required the pilot to stand up. (Not a problem since seat belts only came later in the war.)
The next solution was some Frenchman (I forget his name) mounting wedges behind the prop blades to deflect any bullet that might hit them. This worked. When Germans tried to replicate the solution from a captured plane, they found that it didn't work on account of the German using steel bullets and not copper. The Germans(*) thus invented the synchronized gear that blocked the gun from firing when a blade was in the way. This was first installed on the E3 which led to the so-called Fokker Scourge.

(*) Actually, I think Fokker was Dutch.

I haven't counted how many bullets exist in a mag or belt. The bigger problem is jamming which happens often. The reload button also conveniently charges the gun.

User avatar
Sclass
Posts: 2810
Joined: Tue Jul 10, 2012 5:15 pm
Location: Orange County, CA

Re: DIY Single axis USB controller

Post by Sclass »

Wow Jacob. Nice work.

I always wanted to learn how to fly a plane but I’m terrified of dying. Simulation looks like an interesting avenue to take. Cheaper too. There was that nut case who stole a plane in the Pacific Northwest a few years ago. People balked at the disaster but I was impressed that he learned how to fly well enough on a simulator to fly a twin engine commuter plane away. Flight sim is powerful.

jacob
Site Admin
Posts: 16002
Joined: Fri Jun 28, 2013 8:38 pm
Location: USA, Zone 5b, Koppen Dfa, Elev. 620ft, Walkscore 77
Contact:

Re: DIY Single axis USB controller

Post by jacob »

Sclass wrote:
Mon Jun 26, 2023 10:09 pm
I always wanted to learn how to fly a plane but I’m terrified of dying. Simulation looks like an interesting avenue to take. Cheaper too.
While it can be cheap, it's the most expensive kind of "gaming" there is. The modern model seems to be to give the game away for free or almost free and then sell the individual planes as DLCs. The trend is to make the virtual cockpit as complete as possible, so lots of people crawling around declassified cockpits taking measurements. Some even convert pixel counts off of pictures.

Flightsim manuals (for jets) used to be around a 100 pages. Now they're 600+ with the first 150 dedicated to just starting the engine/systems and getting you on the runway. @seanconn flies/plays BMS, which is the most technically advanced of them all, so he could probably tell you more.

Then of course comes the hardware. Check out https://thewarthogproject.com/ or https://www.737diysim.com/ It's possible to DIY something fairly accurate for a few thousand bucks + it's an excuse to learn a bunch of fabrication skills. Otherwise, it's kinda hard to justify from an ERE perspective although maybe not as hard as burning real jet fuel. I've noticed that several pit builders sell components and plans---much like other makers---but I don't know what the business side of that looks like both in terms of ROI and permits/liabilities/tax for selling hardware. It's a very niche hobby that barely has commercial support. Strangely, other than Thrustmaster most commercial hardware manufacturers seem to be in Europe, Russia, and China. Somehow flightsims aren't that big in the US.

The two current games with the most eye-candy are DCS and MSFS. You can find plenty of examples on youtube. They're practically indistinguishable from [a movie of] reality on a good (~$1500+) computer. Unfortunately, I use an old office PC from 2017 (so it's ROF and FSX for me) ... but even that is vastly better than it was in 1995 when I more or less left the scene.

sky
Posts: 1726
Joined: Tue Jan 04, 2011 2:20 am

Re: DIY Single axis USB controller

Post by sky »

You could build your own drone and program a flight characteristic similar to the aircraft type of your choosing.

User avatar
Sclass
Posts: 2810
Joined: Tue Jul 10, 2012 5:15 pm
Location: Orange County, CA

Re: DIY Single axis USB controller

Post by Sclass »

One of my old neighbors had the enviable job of working on this for most of his career. He got to learn how to fly vehicles from combat helicopters to spacecraft over his career. Sounded like a lot of fun if you didn’t mind working a government job.

https://www.nasa.gov/ames/vms

jacob
Site Admin
Posts: 16002
Joined: Fri Jun 28, 2013 8:38 pm
Location: USA, Zone 5b, Koppen Dfa, Elev. 620ft, Walkscore 77
Contact:

Re: DIY Single axis USB controller

Post by jacob »

Wrapped the handles with twine and made the stick 2.5" shorter. I also doubled up the roll springs, which wasn't enough to self-center the stick but enough to provide a bit more tactile feedback.

Next hurdle ...

Replacing the Leonardo with a Micro ... or a clone... if I can find one. The Micro Pro won't work because I need 6 analog inputs and that one only has 4. It would also be nice to make an enclosed box and have the USB jack available as an insert on the side instead of the current "open rat nest design". Hmmm...

Scott 2
Posts: 2859
Joined: Sun Feb 12, 2012 10:34 pm

Re: DIY Single axis USB controller

Post by Scott 2 »

Would an RC Airplane offer opportunity to take these flight skills into real life, w/o burning jet fuel? I've seen guys flying them occasionally. It looks challenging.

jacob
Site Admin
Posts: 16002
Joined: Fri Jun 28, 2013 8:38 pm
Location: USA, Zone 5b, Koppen Dfa, Elev. 620ft, Walkscore 77
Contact:

Re: DIY Single axis USB controller

Post by jacob »

Scott 2 wrote:
Thu Jun 29, 2023 9:47 am
Would an RC Airplane offer opportunity to take these flight skills into real life, w/o burning jet fuel? I've seen guys flying them occasionally. It looks challenging.
It's different. Beyond having fewer controls than a real plane, consider the aerodynamics. Doubling the length of the plane, quadruples the wing area, but increases the weight by a factor eight. A half-size model thus has half the wingload (4/8) and thus requires more (~sqrt(2)) speed for the same lift. (This is part of why RC models need to zip around relative to their length) In short, a scale model will have very different flight characteristics. (Same reason why a human-sized ant would collapse under its own weight.) Conversely, even at the retail level modern flight sims have very accurate physics modelling. These days a sim is far closer to a real plane (90-95% accurate) than an RC plane. This is different from 30-40 years ago when retail flight sims were still in their infancy.

Add: That's not to say that I'm uninterested in RC planes, but it would be a different hobby.

Scott 2
Posts: 2859
Joined: Sun Feb 12, 2012 10:34 pm

Re: DIY Single axis USB controller

Post by Scott 2 »

That makes sense.

Spending more time in local forest preserves, I've been surprised at the resources allocated to model aircraft. Both by hobbiests and the government. It's on par with providing space for disc golf or kayaking.

jacob
Site Admin
Posts: 16002
Joined: Fri Jun 28, 2013 8:38 pm
Location: USA, Zone 5b, Koppen Dfa, Elev. 620ft, Walkscore 77
Contact:

Re: DIY Single axis USB controller

Post by jacob »

I've already cannibalized the Leonardo, because I'm going back to "The Mun" (Kerbal Space Program). This time I want to go in style, so I'm building an old school NASA launch board. This should be easier in terms of wood-design, because it will basically require nothing but a box, but more interesting in terms of wiring up and programming various inputs and outputs. Unlike the stick, the focus is on different buttons (safety, launch, abort, reaction control systems, ...) as well as output types (altitude, fuel, oxygen, ... ) like analog gauges and 7 segment leds. This will be on the learning curve towards a more modern (jet) simpit.

Meanwhile, I learned about analog multiplexers. This will solve the critical ($$) problem of needing an Arduino with 6 analog inputs. A 4051IC will turn up to 8 analog inputs into 1 analog input at the cost of a bit of code and 3 digital outputs of which I have plenty. Also, now I'm definitely eyeing a 3D printer. Some of this stuff, like M3 standoffs, is too small for the scroll saw and too annoying to have to buy.

If only this kind of magic had been commonly available 30 years ago---also impressed with how much active involvement there is between the game developers and the modders/makers for some of these games.

User avatar
Sclass
Posts: 2810
Joined: Tue Jul 10, 2012 5:15 pm
Location: Orange County, CA

Re: DIY Single axis USB controller

Post by Sclass »

Hey that’s cool you’re having fun with this. Multiplexing is fun. I used the DG408 and DG409 for things like this too. I forgot why one was better than the other. Maybe the 4051 didn’t spec channel to channel offset or on resistance as tightly. Cannot recall. I do remember I preferred that over the 40xx tech.

Just a tip, analog muxing can be done by locally sampling with an ADC at the transducer and then serially (digitally) transmitted back to your Arduino. It sounds more complex but it can be done with a simple i2c function in your code and a bunch of identical node boards with a single channel ADC + i2c address jumpers. Advantages are digital transmission that isn’t sensitive to interference, simpler hardware, easily replicated across a platform, more I/o addresses, uses two pins on Arduino. Think of it like a digital network with a bunch of identical analog nodes at the ends. Like a little internet. The wiring is also simpler because you daisy chain your network over a two wire interface. Just a suggestion. Sparkfun probably sells addressable i2c adc “nodes” that you can sprinkle around your project or you can build and replicate your own. Kind of rubber stamping hardware everywhere you need analog conversion.

jacob
Site Admin
Posts: 16002
Joined: Fri Jun 28, 2013 8:38 pm
Location: USA, Zone 5b, Koppen Dfa, Elev. 620ft, Walkscore 77
Contact:

Re: DIY Single axis USB controller

Post by jacob »

jacob wrote:
Wed Jul 05, 2023 11:24 am
I've already cannibalized the Leonardo, because I'm going back to "The Mun" (Kerbal Space Program). This time I want to go in style, so I'm building an old school NASA launch board.
Halfway there now having understood the ingredients after unit-testing. Only a few potential SNAFUs left. Now "all" that remains is putting together the recipe. (See https://www.youtube.com/watch?v=REFwqTQ7k24 for the ingredient/recipe metaphor)

Unlike the 1-way controller project above (controller->game only), KSP offers 2-way interactions (game->controller, think displays), which means more to learn. And more wires! I really need a wiring method of some sorts to get this under control.

For those who don't know, KSP simulates a space program on a fictional planet ranging from early NASA to SpaceX and beyond using materially realistic physics. Nevermind the fiction! What's important is the level of both professional and amateur support for the realism. It's a sandbox for planning and executing orbital mechanics for those who think that part of the human experience constitutes fun. I do, having calculated transfer orbits with pencil and paper back in the mid 1990s.

Some pictures...

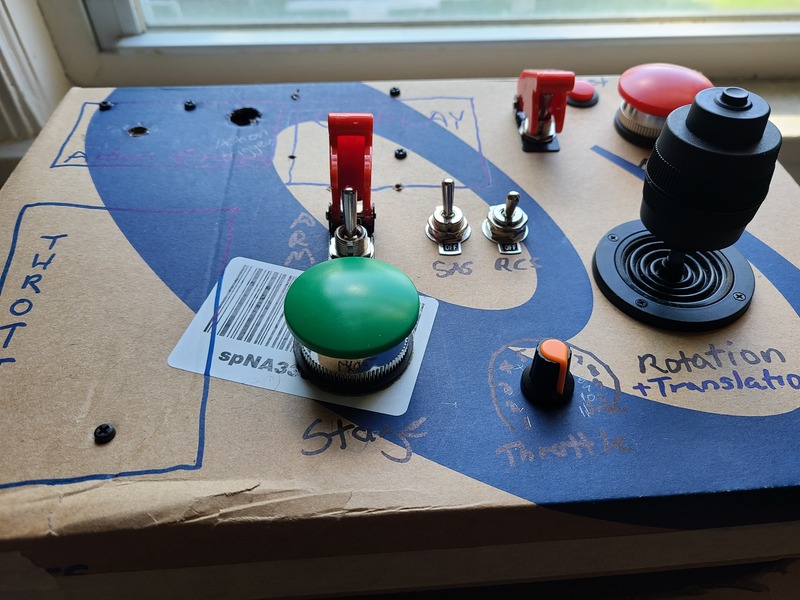
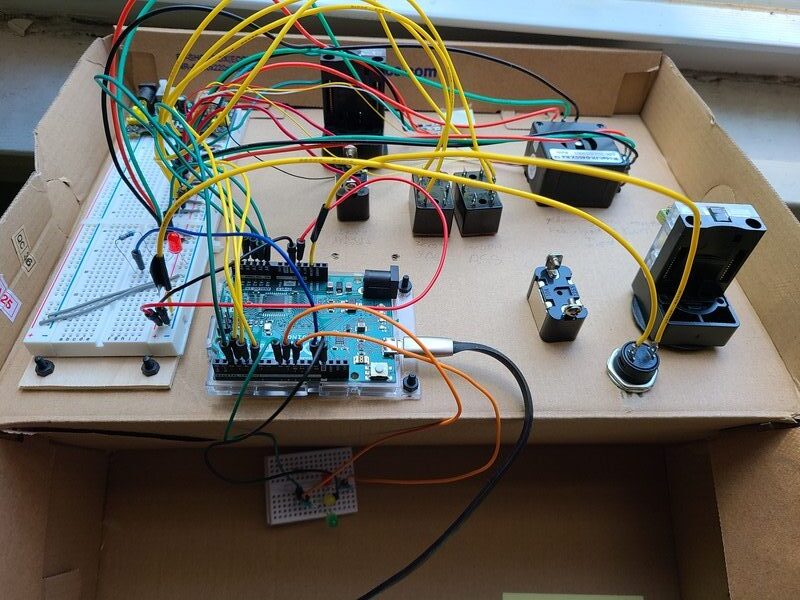
The design part is tricky. Looking at the internet, there are many cool designs. Here's mine, which is not that cool. It's a shoebox. Things to learn to spice it up would be how to cut aluminum and make screen prints. I could build it out of wood, but I don't think the buttons would fit the aesthetics.
Image
Using a shoebox has the advantage of being quick to build. However, looking at the underside, it's not like one can move things around that easily. Most likely moving a button around would require rebuilding in another shoebox.
These controls are enough to launch and control a rocket into orbit. The fanciest part here is the 3-stage arming of the launch button and the 3-axis controller that does rotation AND translation when the button is pressed for a total of 6 axes in space. (The early part of calibrating the "reaction control system" to the stick led to a few launches that looked very much like the rockets in the 1950s spinning out of control into the distance :geek: Fortunately, my astronauts are not only very brave but also stupid.)
Image

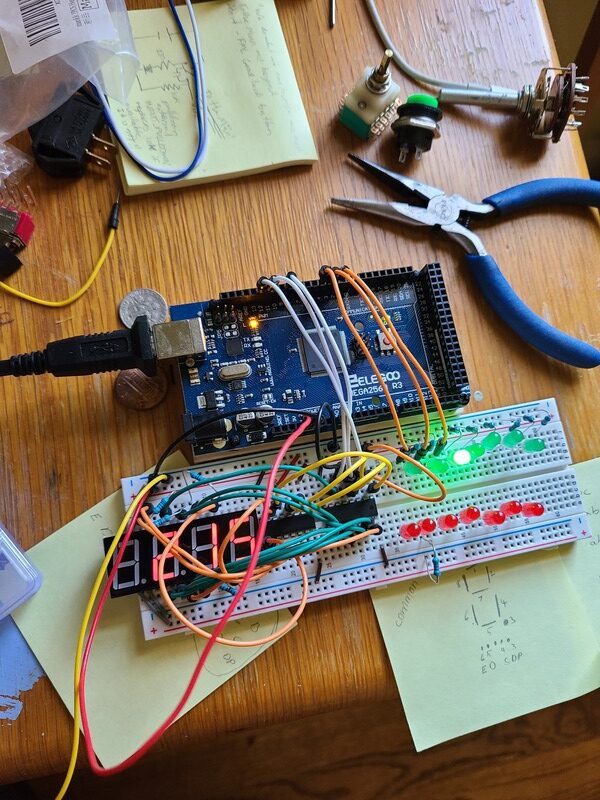
The coolest thing is the ability for the game to control output. @Anesau sent me their arduino mega starter kit, which included a 7-segment display and some 74HC595 shift registers. This was absolutely the most difficult thing to program and get right. (I did not use a library. Each of the 32 LED-segments is controlled by two chained shift registers with the Arduino flipping individual bits. The way that works is that you flip the voltage on the "latch" pin. The you use a second "clock" pin flipping it back and forth between 0 and 1 to sync up with the actual "data" pin that sends 0 or 1 depending on whether you want the shift register outputs to be high or low. Once all the data is sent, the latch pin is flipped again and if everything went right, the correct output pins go high or low as they need to. One register (8 outputs can control one digit), the other one(*) controls which of the 4 to light up. Then I just cycle really fast making it look like they're all lit. Here it displays the vertical velocity of the rocket (215m/s). (The green LED is part of earlier testing and shows that the rocket is going faster than 150m/s) I somehow find the ability to build something like this to be enormously cool. What will those nerds think of next?
(*) Being a common cathode display, this register actually acts as a current sink. I worried about that one but no magical smoke appeared when I switched it on. I could not figure out a way to do it otherwise with the components I had at hand.
Image
Of course after doing all that I found a $2 plug-in display that contains everything I need. This replaces the original plan of controlling two 4-digits with 3 shift registers :-P

Something similar is possible in reverse. Instead of individual wires from each button, I can send 8 of them into a 74HC165 and have only 3 wires go back to the Arduino. This is not done yet, but should be similar. One thing that seems useful here is a set of 10 buttons for the SAS autopilot (prograde, retrograde, normal, antinormal, radial, antiradial, target, antitarget, maneuver, ...)

Ultimately, it would be cool to design a controller so that the only thing that needs to be handled from the computer are the maneuver calculations and everything else is displayed and executed on the controller, e.g. "time to burn", "delta-v", etc.

PS: Once again I found myself struggling with the wiring.
User avatar
Sclass
Posts: 2810
Joined: Tue Jul 10, 2012 5:15 pm
Location: Orange County, CA

Re: DIY Single axis USB controller

Post by Sclass »

Hey you’ve really come far since the first post. Congrats!

Like the cardboard rapid prototyping process. I’ll have to steal this one for something.

There are some easy tricks like using a keypad matrix and some code to save inputs and outputs for both the LEDs and the switches. I designed a couple of products with three digit seven segment displays (showing my age) and IIRC my design had 8 digital lines for the display digits and three mux selects for the display grounds. It’s kind of a crossbar multiplexer of sorts. Use a timer to light off one digit at a time for a few mS to trick the y eye. You can get rid of a lot of that discrete logic with a few lines of code. (Look up table for digit to display encoding or big switch case statement)

However…if you aren’t going for the vintage look I would just go straight for one of these OLED serial displays and i2c all your i/o to that with two wires. The world has gone serial as one of my mentors said twenty years ago. i2c is a new feather in your cap that you’ll love once you realize the power of its scalability and simplification of wiring. There also are a ton of i2c button multiplexers out there for this kind of thing.

Oh yeah, now I remember. One of the 7 segment devices used a LED controller made by Toshiba. I prototyped a multiplexer using digital I/o but marketing balked at how my “1” was eight times brighter than my “8”. So we went with something like this in the production unit. You save a lot of I/O and you get brightness balancing. Wiring (circuit board) gets simplified. In short the world has gone serial.

https://toshiba.semicon-storage.com/inf ... ?did=63291

Keep hacking.

Post Reply