Make Stuff Log

Fixing and making things, what tools to get and what skills to learn, ...
jacob
Site Admin
Posts: 16003
Joined: Fri Jun 28, 2013 8:38 pm
Location: USA, Zone 5b, Koppen Dfa, Elev. 620ft, Walkscore 77
Contact:

Re: Make Stuff Log

Post by jacob »

It is done and it works! Now witness the power of this fully armed and operational ... homemade World War 1 flight controller.

It is mostly made out of scrap plywood and hardware from Harbor Freight. It's currently powered by an Ardiuno Leornardo, but once I replace that with an Arduino Pro Micro, the total cost of materials should be under $20. This is crazy considering how much even cheap game controllers cost. More interestingly, this is a completely different experience that using hardware that was designed for a desktop. Flying is an altogether more "gymnastic" experience given how large the "throw" is on this thing.

I'll post more details in viewtopic.php?t=12429

Image

Biscuits and Gravy
Posts: 246
Joined: Thu Aug 06, 2020 1:38 pm

Re: Make Stuff Log

Post by Biscuits and Gravy »

Image
@Suo made our wedding bands out of maple and walnut. <3

jacob
Site Admin
Posts: 16003
Joined: Fri Jun 28, 2013 8:38 pm
Location: USA, Zone 5b, Koppen Dfa, Elev. 620ft, Walkscore 77
Contact:

Re: Make Stuff Log

Post by jacob »

Inspired by this https://www.dutchcrafters.com/Amish-Rec ... nds/p/3382 , I bought $25 worth of 1x4 SPH dimensional lumber, pocket-holed this table top together, stained it, and gave it three layers of poly. The original table (and chairs) were acquired for free, but the original table top was becoming unsightly. Actually, the seat covers could use a bit of cleaning/replacement too. The beige racks behind the table is where we grow greens over the winter.

Image

Image

I don't know about the original, but the pegged dowels on my version are fake^H^H^H^Hdecorative. In retrospect, I could have made them slightly bigger.

Jim
Posts: 81
Joined: Thu May 04, 2023 7:35 pm
Location: PNW

Re: Make Stuff Log

Post by Jim »

It took me longer to develop the computer literacy required to post images to an internet forum than it did for me to build this fence (out of the pre-existing fence), but here it is. The condition of the old fence was similar to the one you can spot behind the swingset.

Image

This photo was taken right after we moved in. There's now considerably less yard and more garden, but this picture makes it easier to see the fence itself.

AxelHeyst
Posts: 2172
Joined: Thu Jan 09, 2020 4:55 pm
Contact:

Re: Make Stuff Log

Post by AxelHeyst »

I found a source of free salvaged 2x4's in town. A metal shop just moved into a place that used to fabricate wooden trusses. There is a mountain of wooden trusses in the back yard that the owner just wants gone. Whenever I'm in town with the trailer I spend an hour cutting trusses down small enough to fit and haul them back, where I process them into lengths. Offcuts get used for campfires and the metal pieces go to the dump (any ideas what to use them for?).

I want more outdoor chairs. I noticed that some of the small rectangular trussed I'd grabbed were about the right size to make a chair out of...

Image

Image

This might be the first thing I've ever built without making a 3d model of it first.

The main weakness is probably the top rear horizontal piece. It could use an a35 (lbracket) or similar.

AxelHeyst
Posts: 2172
Joined: Thu Jan 09, 2020 4:55 pm
Contact:

Re: Make Stuff Log

Post by AxelHeyst »

This morning @theanimal said "Hey lets bust out some more of those chairs."

By early afternoon we'd made three more.

Image

ertyu
Posts: 2921
Joined: Sun Nov 13, 2016 2:31 am

Re: Make Stuff Log

Post by ertyu »

I'm curious, given the weather where you are (fairly dry), does outdoor wooden furniture need to be varnished or painted if one wants it to last a long time?

jacob
Site Admin
Posts: 16003
Joined: Fri Jun 28, 2013 8:38 pm
Location: USA, Zone 5b, Koppen Dfa, Elev. 620ft, Walkscore 77
Contact:

Re: Make Stuff Log

Post by jacob »

AxelHeyst wrote:
Wed Oct 04, 2023 5:16 pm
This might be the first thing I've ever built without making a 3d model of it first.
Ha! Blender-brain? Note that the interwebs are full of 2x4 furniture designs and now that you have a source, you might as well use their designs to build everything. There's even a book series. See https://www.amazon.com/s?k=2x4+furniture&i=stripbooks

I actually "made" DW and my mother build our outdoor furniture (the red ones in our backyard) during a visit just to prove how easy it was. They managed with extremely minimal supervision. Building a 2x4 piece of furniture would be a good "skill" to add to the skillathon just to prove to oneself that it can be done.
AxelHeyst wrote:
Wed Oct 04, 2023 5:16 pm
The main weakness is probably the top rear horizontal piece. It could use an a35 (lbracket) or similar.
ffj introduced me to Kreg Jigs. Get one! It'll make it look less like it was built in a construction zone. I now make most of my woodwork with pocket holes w/o glue. This makes it possible to take it apart easily and use for other projects.

AxelHeyst
Posts: 2172
Joined: Thu Jan 09, 2020 4:55 pm
Contact:

Re: Make Stuff Log

Post by AxelHeyst »

@ertyu - its the dryness plus the sun that demolishes wood here. Paint tends to crack and flake off before too long, leaving bare wood exposed. Varnish breaks down quickly as well. So far I've been having better results with oils on various outdoor wood projects- either boiled linseed oil or tung oil. These chairs aren't oiled yet but they will be. I'll also keep them out of the sun for most of the year - it's only pleasant to sit in the sun here a couple months out of the year anyway. Otherwise they'll be in shade, which is the only real solution for longevity of materials that aren't metal, cementitious, glass, or earth.

@jacob - Yeah! I'd love to crank through a bunch of those 2x4 designs. My 2x4 source may have dried up as the guy isn't getting back to me anymore, but if I get a new load I'll look in to it.

I do have a kreg jig - it's great! I use it often. Because of the salvaged square trusses I was using for this the gusset/bash plates were in the way of using the kreg jig for that back piece, and every other joint was an exercise in creative bespoke screwing angles ( 8-) ) to avoid splitting. If all the lumber were in normal off the shelf shape the kreg jig would be the no brainer.

User avatar
Sclass
Posts: 2810
Joined: Tue Jul 10, 2012 5:15 pm
Location: Orange County, CA

Re: Make Stuff Log

Post by Sclass »

Made a 3D printed electronics enclosure with a clear site glass. Cutting a circular window of clear material to fit tightly into a 3D printed part is a good use of CNC. It was suggested to me by the end user to make the window from 3D printed PETG clear filament but I don't think he would have been happy with the clarity of the window.

I also needed to keep the smooth top and bottom surface of the plexiglass. The window needed a little shoulder on it to set the correct depth in the black plastic shell. I've made little windows on a lathe but it takes a long time to polish out the tool marks on the face of disk. This time I was able to make this in a few minutes.

Image

I needed a way to look at this circuit's indicator lights while it was running. I had a cap which I 3D printed. I reprinted it with a hole hogged out of the top. I machinced a window on my CNC machine to drop into the hole. This was mostly a test of FreeCAD and FreeCAD Path to generate Gcode. Worked very well. I strongly recommend this tool for the upcoming CNC router builds. It's free and powerful. Very few bugs and easy to learn.

FreeCAD.
Image

Machine from acrylic sheet. The beautiful thing is I can now make many identical parts as demand grows.

Image

Wasn't sure whether to put this in the CNC thread, or make stuff thread. So here it is. I made this.

User avatar
Sclass
Posts: 2810
Joined: Tue Jul 10, 2012 5:15 pm
Location: Orange County, CA

Re: Make Stuff Log

Post by Sclass »

Did some more CNC work. The emblem on my HP 15c is looking really tired. The chrome wore off and I tried to repaint it with a silver paint pen. This really looked bad. It's like fake chrome spray paint in a can. It just isn't chrome. So I'm headed down the path of remaking the badge and plating it. I created this NC file and milled these out of a piece of bare printed circuit board. It has a copper layer on top.

This was kind of a challenge in precision machining. Everything is very small. I'm cutting with a 30 deg V bit graver. So the deeper I penetrate, the wider the cut. This can be problematic especially on the hole in the "P".

Took a few tries and tweaking of the CAM files and I got to here. Now I need to figure out how to do electroless plating. Not sure how that is done. I'll hit the internet tonight. I want to put a thin layer of chrome or nickel on the metallic top. Then I'll figure out how to paint the valleys black.

Work was done exclusively in Freecad Path. Very good software. The week I invested in learning how to use it is starting to pay dividends.

Image

Image

Image

suomalainen
Posts: 988
Joined: Sat Oct 18, 2014 12:49 pm

Re: Make Stuff Log

Post by suomalainen »

@gravy and I made a playhouse for the kids. Rearranged some existing fencing and added some purchased 2x4s and 1x5 cedar planks and two clear roof panels. Took a total of a few hours over a single weekend.

Image

User avatar
Sclass
Posts: 2810
Joined: Tue Jul 10, 2012 5:15 pm
Location: Orange County, CA

Re: Make Stuff Log

Post by Sclass »

Many attempts later...,

getting to aluminum was hard. Phenolic is a lot easier to machine cleanly. I really wanted a silver top like the original. So I was either stuck with plating the copper on the FR2 circuit board or I needed to figure out how to engrave aluminum. I've never done this kind of thing on aluminum before but I figured these blank dog tags I bought online would engrave because people engrave their dog's name on them. And here it is. I can't wait to get down to the hobby shop and get some black paint to fill in the letters.

I think this is going to come out nice.

Image

eta - paint

Image

Some fixes. Backlash compensation adjusted by 0.015mm. Makes a visible difference on circular arcs where machine changes direction in the middle of a contour. Played with outer boundary and went too far. Working on array machining for production.

Image

eta x2 - latest work in the shop. I learned how to use the array tool in FreeCAD and I'm making multiples in one go. I experimented with using baby oil as my cutting fluid. It is better in that it doesn't get flung away as much. Since this engraving takes over an hour it's important for me to lube it once and walk away. Dripping on light oil every five minutes was exhausting. My bit appears to be getting slightly dull. It is still sharp enough to cut but under the microscope I can see a blunted edge. It makes all the difference when cutting these small letters with a sharp edge instead of a burred edge. Looking good. I'll change a bit tomorrow. I think it's time to stop and mount this on my calculator.

Image

User avatar
Sclass
Posts: 2810
Joined: Tue Jul 10, 2012 5:15 pm
Location: Orange County, CA

Re: Make Stuff Log

Post by Sclass »

Made new handles for my Wenger Swiss Army knife. I have dozens of these small Swiss Army knives I bought from a TSA seizure auction. I like these 85 mm models because they are easy to carry while still maintaining some of the utility of the standard 91 mm Victorinox knives. My philosophy is the best Swiss Army knife is the one you are carrying when you need it.

Wenger went bankrupt a few years ago and it is nearly impossible to get scales for the knives. Worse, the knives look the same externally but have three different rivet styles that make for three different handle styles. The emblems aren’t terribly durable and the knives start looking beat up after years of EDC.

I had this one that was sold through LL Bean in the 1980s. It had a locking blade which I like. I never could afford one. LL Bean marked their models up a bit. This TSA knife has seen better days. The scales were cracked up. The emblem was abraded away. Although it was 100% functional I hate looking at it.

So I printed up these scales. The interesting part of the project is I designed them in FreeCAD using their calibrated photo import. You take a photo of something you want to reverse engineer and you get a scaled transparency to trace over. It’s great for locating holes precisely in a model without using calipers. Kind of a poor man’s digitizer. I noticed Fusion360 has this too. It’s really useful for making accessories that fit precisely to some existing thing. You just take a photo, import, scale using a known dimension of the original and start modeling.

Here are my results. Came out great. This is the second attempt. The first one had a 5% error because I wasn’t very skilled at calibrating the photo first go round.

Image

Image

I had fire red still loaded up in the printer from the pepper mill repair.

Image

Image

Image

Image

jacob
Site Admin
Posts: 16003
Joined: Fri Jun 28, 2013 8:38 pm
Location: USA, Zone 5b, Koppen Dfa, Elev. 620ft, Walkscore 77
Contact:

Re: Make Stuff Log

Post by jacob »

Sclass wrote:
Mon Nov 27, 2023 5:46 pm
The interesting part of the project is I designed them in FreeCAD using their calibrated photo import. You take a photo of something you want to reverse engineer and you get a scaled transparency to trace over. It’s great for locating holes precisely in a model without using calipers. Kind of a poor man’s digitizer. I noticed Fusion360 has this too. It’s really useful for making accessories that fit precisely to some existing thing. You just take a photo, import, scale using a known dimension of the original and start modeling.
So if somebody were to take a picture of an aircraft instrument panel, they could easily more or less replicate it w/o having to eyeball it or manually count the pixels?

I'm asking for a friend 8-)

User avatar
Sclass
Posts: 2810
Joined: Tue Jul 10, 2012 5:15 pm
Location: Orange County, CA

Re: Make Stuff Log

Post by Sclass »

Yes, exactly. You basically photograph, import, trace then generate tool paths for CNC or 3D printing. It’s great for locating objects. No ruler required. It’s a poor man’s digitizer.

I couldn’t stop and I made this handle for another knife with dead scales. I dated the knife and it was pre 1975. It had a beat up logo inlaid logo “Zurich” on it with some lions. One lion was missing his head. Given I don’t know how to repair metal inlays I just 3D printed new handles and didn’t look back. The knife was obviously someone’s tourist souvenir from the 1970s. Lost to TSA.

Here is the updated knife. I decided to go with a Maltese cross. The Swiss cross is kind of disarming and that is good because people don’t get all scared of a Swiss Army knife. Swiss Army knives go where scary knives get blocked. You kind of come off as MacGyver and not Rambo. I thought I’d go edgier. Neutrality is for wimps. :lol: It took less than one minute to create the design in cad and emboss it into the model.

Image

Image

User avatar
Sclass
Posts: 2810
Joined: Tue Jul 10, 2012 5:15 pm
Location: Orange County, CA

Re: Make Stuff Log

Post by Sclass »

Made a hot knife.

I needed a hot knife. They’re kind of expensive considering what they are. I decided to make a knife tip for my harbor freight soldering iron. I use this one for plastic welding among other things. I had a tired exacto blade ready for the trash. I’ve become very skilled at resharpening my exacto knives so this one has lasted a couple of years. It’s funny how we toss dead ones when they can be honed up quickly and cheaply.

Anyhow, one nail scrap and one tired blade. Brazed together with brass wire.

Image

Image

Image

Improved my brazing skills modestly this go round. I tried borax flux and then a sprinkle of boric acid (roach and ant killer). I was having trouble getting the brass to flow and stick to the steel. What I found out is my technique was bad. I heated up the metal to dull red and melted some balls of brass on the joint. Then I heated with the torch to get the brass to flow in. This is wrong. I’d heat the brass and it just wouldn’t flow properly till the steel was Orange hot. It just wouldn’t flow no matter how hot I torched away at it.

The proper technique is to get the metal cherry red first then add the brass and flux. If you add the brass too early you boil off the zinc and lose the advantage of eutectic alloying. The melt point goes up and you need too much heat to flow the brass which is now copper. You can see the copper and brass on my blade. It’s all from the same brass wire but the copper spots were overheated.

Image

jacob
Site Admin
Posts: 16003
Joined: Fri Jun 28, 2013 8:38 pm
Location: USA, Zone 5b, Koppen Dfa, Elev. 620ft, Walkscore 77
Contact:

Re: Make Stuff Log

Post by jacob »

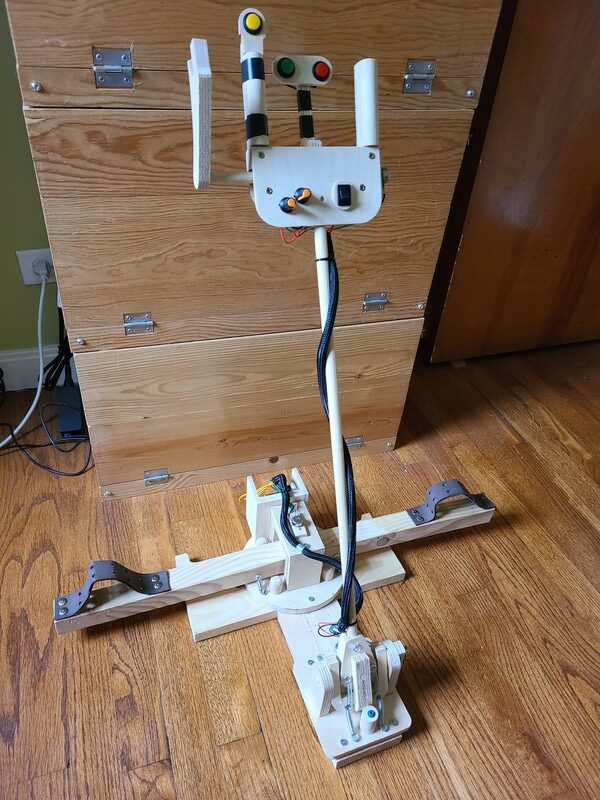
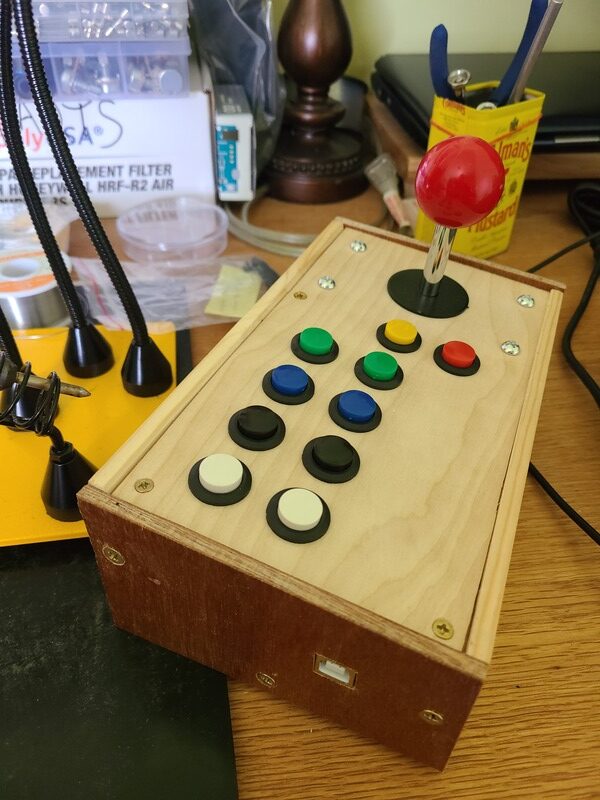
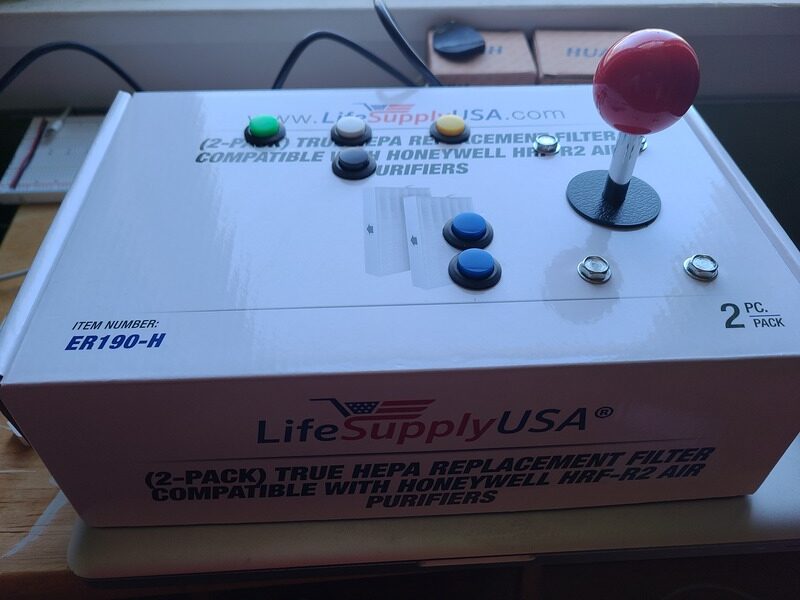
Tying up some loose ends I figured I could (and therefore would) make an arcade controller to bring the project in this thread to full circle. The box originated in the 
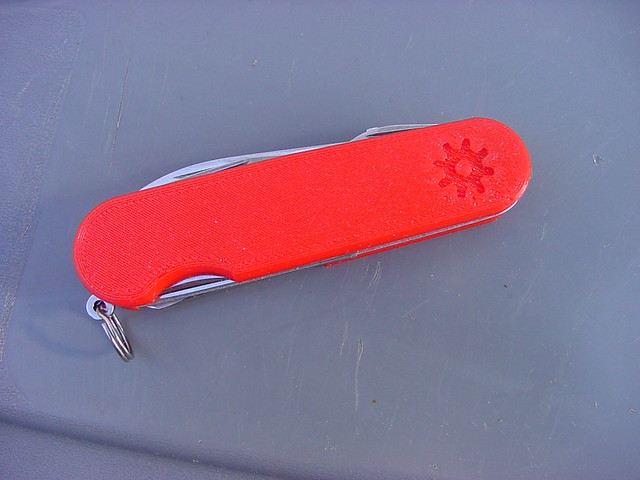
AQI project. Some parts were surplus (buttons) and some were misguided "first effort" from first attempts (the zero delay encoder) at this project/direction. Here's to closing the loops!

Most ingredients were already on-hand (the buttons and the "zero delay usb encoder" (the circuit board, google it)). All I needed to buy was the stick. Technically, I maybe/coulda made my own. Blade switch sticks were not unusual back in the 1980s.

Image

Pro tip! To install buttons, etc. into a shoe box, I use a Forstner drillbit that's 1/8 smaller than the diameter of the button. For example, my buttons are 5/8OD (outer diameter), so I drill 1/2 and push the buttons trough as the cardboard gives in/for the threading. This solution holds for quite a while. To install in wood (or metal) use the exact diameter, ie. 5/8".

Image

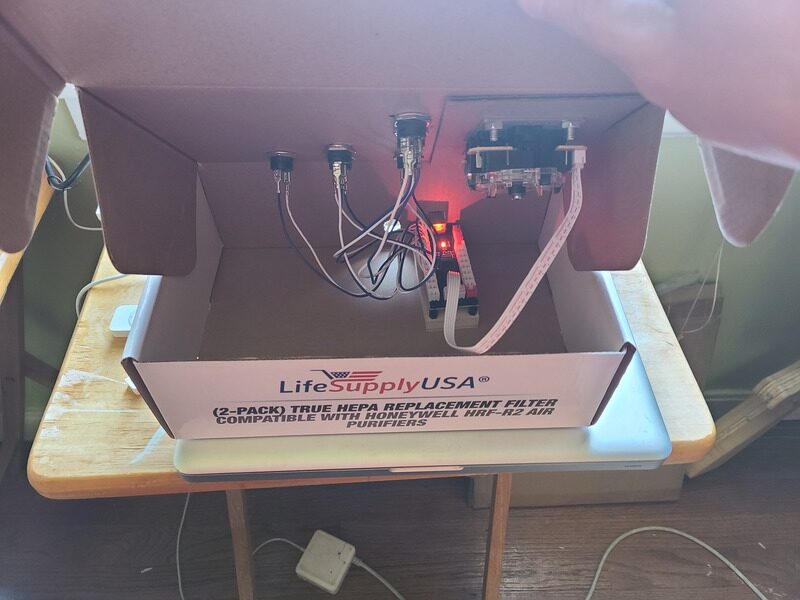
As you see, it's pretty simple. No soldering required. For an actual non-cardboard final design box, my preferred design-method is to put the circuit boards upside down on the top. Here it would sit to the left. This didn't happen here, but it did happen there.

Note how I put the PCB on standoffs on top of a piece of plywood. What's worked for me is to buy some M3 plastic standoffs and then use a tap&die set from Harbor Freight to tap into the plywood. Tapping perpendicularly into plywood is easy and it holds. (Conversely, going along the plys does not work! I tried.) So I drill some holes and use the tap, here M3x0.5. I recommend going slightly smaller than "metal" before tapping. No need to go 1/2 forward--1/4 back to clear for wood. Better to just push ahead all the way through.

However, given all this is non-conductive cardboard, you don't need to if you're just going to ghetto it/okay with letting it all hang loose inside the box.

Also note how I reinforced the stick mounting with an extra piece of cardboard. The stick is attached to the top of the cardboard box using a $5 nut/bolt set from harbor freight.

On the software side, Win10 immediately recognized this contraption as a generic (HID controller) USB stick. The zero delay encoder is very common (google MAME/JAMMA) and widely supported by software after 2015ish. I can now enjoy a couple of games from my younger years, specifically https://store.steampowered.com/app/3208 ... d_Edition/ and https://store.steampowered.com/app/2622 ... Guns_Gold/

Presented as a $25 alternative to the zipstick generation (if you know what that is, you're older than 45)... before WASD became a thing.

Also, the red knob screws on. It's an M6 thread in case you want to replace it with something else. (Tap 6mm into your own design, maybe something turned on lathe?) In any case, I highly recommend afixing it with some BLUE Loctite once installed. Otherwise, it gets annoying very quickly.

Add: Everything here is momentary on-off contacts including the stick ... (on) ... so it's possibly to substitute in whatever you want or have.
Add2: I use a power drill with very light pressure to make the holes perfectly round. A box cutter/knife probably works too.

jacob
Site Admin
Posts: 16003
Joined: Fri Jun 28, 2013 8:38 pm
Location: USA, Zone 5b, Koppen Dfa, Elev. 620ft, Walkscore 77
Contact:

Re: Make Stuff Log

Post by jacob »

I put the arcade controller in a wooden box. Other than being useful for WASD-type games, it will also double as a button box. Since the stick is a digital joystick, maybe it can also be assigned to forward/back/left/right views.

Image

Jim
Posts: 81
Joined: Thu May 04, 2023 7:35 pm
Location: PNW

Re: Make Stuff Log

Post by Jim »

@sclass, your hp logo endeavor is giving me existential vertigo about where my life is headed. What's it like up there, packing a lifetime of ingenuity and brilliance into the revitalization of a bygone corporate logo mounted on a 25 cent obsolete calculation machine? I'm having a difficult time reconciling my adoration and profound respect with my feelings of electrostatic revulsion. Help! Are we Father McKenzie or Lao-Tze? How do we tell the difference? Are you aware of the perfection of the irony of this masterstroke, or is this a red flag signalling the pitfalls of some heretofore undiscovered spectral compulsion of the rarest order? Do these conditions exist in a secret synchrony, like must a synthesis of quantum physics and relativity?

Post Reply