
That is really nice! I like how the design really took advantage of the printer’s capabilities. Cutting that shape on any other tool would have taken a lot of setups. 3D printers have become so affordable the only excuse not to have one is they take up space on the bench top.
The Bambulabs printers are awesome. They’re a great value and they’ve really reset the market’s expectations.
I’m still using an old Ender 3 I got in 2019 to do production parts for my side gig. It’s so easy to just hit print and then you have perfect replicas of some part designed once many years ago. Customers on eBay are completely satisfied with the quality given the expectation of a 3D printed part. Once I started selling my parts the printers paid for themselves.
Come to think of it, if you lost that lock knob, others have lost theirs too. You have a product that is easy to manufacture and easy to mail. That lock looks like one used in a civilized zone.
Fixit Log
Re: Fixit Log
Hi bos, very well done! On my DW bicycle that knob is missing too. Can I order one to be sent by mail? You can pm me for my adress and how we can pay for it.
Re: Fixit Log
Fixed a second Waterpik.
Got back from Thanksgiving and my wife’s Waterpik shut down. Flatline. I immediately suspected thermal fuse. It was warm to the touch. Got it torn down. I found some issues.
Fuse was good. Motor was jammed. I disassembled the motor and pump assembly and cleaned it out. Lubed the motor and it ran again. (Food grade grease and mineral oil only). I thought I was done.

Put it all back together. No go. The motor ran but the pump didn’t pump. I tore into it again and found a couple of hairs jammed in the check valve. Wife trims her bangs over the sink. The hairs end up in her Waterpik. Disassembled that and cleaned it up.

No go. The motor made this whirring sound and didn’t pump water. I figured okay, the gear is stripped. Right about here my wife says it’s Black Friday and she’ll just get another. They’re on sale for $50. $50? No, I’m going to fix this.
I slept on it and decided hey why not try a stripped gear repair. The gear was helical so it would be challenging to 3D print. I tore into it this morning. Gears are good. Turns out the motor mount has elliptical mount holes meaning the position of the motor has some adjustability. I thought this was impossible given the manufacturing headache it must create by requiring the assembler to have some mechanical skills. Also it takes longer to put together if the design tolerances need tweaking. But it is what it is. The two motor mount screws set the distance between the gears and this is where the slipping came from. I adjusted and all is good. Basically I caused this issue by just blindly putting it back together last night.

Working Waterpik. This one is about ten years old. It had multiple issues like a jammed motor, hairs on the check valve and my bad assembly skills. Yet it has held up surprisingly well considering it’s age. There is a power resistor in the rectifier board that is all black but it still seems to function. It was full of black algae that I had to wash out. The the piston and gear teeth show almost no wear. It is surprisingly durable inside considering it is mostly plastic. My wife uses this three times a day after meals so it gets a lot of use.
All fixed. Feels good to have kept $50 in my pocket. I was so close to saying “just buy a new one”. I even tossed it in the trash can last night thinking it was done. Time to go out and celebrate.

Got back from Thanksgiving and my wife’s Waterpik shut down. Flatline. I immediately suspected thermal fuse. It was warm to the touch. Got it torn down. I found some issues.
Fuse was good. Motor was jammed. I disassembled the motor and pump assembly and cleaned it out. Lubed the motor and it ran again. (Food grade grease and mineral oil only). I thought I was done.
Put it all back together. No go. The motor ran but the pump didn’t pump. I tore into it again and found a couple of hairs jammed in the check valve. Wife trims her bangs over the sink. The hairs end up in her Waterpik. Disassembled that and cleaned it up.
No go. The motor made this whirring sound and didn’t pump water. I figured okay, the gear is stripped. Right about here my wife says it’s Black Friday and she’ll just get another. They’re on sale for $50. $50? No, I’m going to fix this.
I slept on it and decided hey why not try a stripped gear repair. The gear was helical so it would be challenging to 3D print. I tore into it this morning. Gears are good. Turns out the motor mount has elliptical mount holes meaning the position of the motor has some adjustability. I thought this was impossible given the manufacturing headache it must create by requiring the assembler to have some mechanical skills. Also it takes longer to put together if the design tolerances need tweaking. But it is what it is. The two motor mount screws set the distance between the gears and this is where the slipping came from. I adjusted and all is good. Basically I caused this issue by just blindly putting it back together last night.
Working Waterpik. This one is about ten years old. It had multiple issues like a jammed motor, hairs on the check valve and my bad assembly skills. Yet it has held up surprisingly well considering it’s age. There is a power resistor in the rectifier board that is all black but it still seems to function. It was full of black algae that I had to wash out. The the piston and gear teeth show almost no wear. It is surprisingly durable inside considering it is mostly plastic. My wife uses this three times a day after meals so it gets a lot of use.
All fixed. Feels good to have kept $50 in my pocket. I was so close to saying “just buy a new one”. I even tossed it in the trash can last night thinking it was done. Time to go out and celebrate.
Re: Fixit Log
I agree! That said, I think having some handyman projects or DIY needs in your life is essential to really make a 3D printer worthwhile—along with a bit of the ERE mindset. From what I’ve seen online, many people primarily use their printers to churn out toys or decorative items with limited functionality. On the other hand, for highly functional items that are widely used (like a hook), mass-produced versions are often cheaper and more efficient. I think 3D printers really shine in that sweet spot between custom solutions and mid-to-low-market items.Sclass wrote: ↑Mon Nov 25, 2024 5:32 pmThat is really nice! I like how the design really took advantage of the printer’s capabilities. Cutting that shape on any other tool would have taken a lot of setups. 3D printers have become so affordable the only excuse not to have one is they take up space on the bench top.
Hey @J_ ! Thank you for your interest. Around Christmas, I’ll be in the Netherlands, so I’d be happy to deliver it personally in exchange for a cup of tea. If you’re out of the country, I can, of course, send it to you instead. I’ll send you a PM
Re: Fixit Log
That’s a great Christmas present, especially the (possible) meeting with you again. I pm my adress and timing.
Thanks!
Re: Fixit Log
@Sclass: Wow. I would have given up so much sooner. It's cool that you got it fixed.
I don't have pictures but I learned how to replace outlets this week...The majority of them in my house had quit working and I called maintenance, One of them showed me how to replace an outlet, and they left me with a bag of new ones. I did a little more Google research and replaced a bunch, was super proud of myself haha, particularly when it worked and I started getting power back around the house. Also found two...burned the hell up...outlets in the bedroom, which was sketch. I hadn't used those in months because I usually charge my stuff in the living room, but they were pretty sketchy.
I haven't finished putting covers back on the outlets for now, waiting for maintenance to come back and check to see if I did them right before doing that.
But....Super satisfying to do and have it work. And also that I didn't accidentally electrocute myself or set my house on fire (at least thus far).
Re: Fixit Log
@Violets:
Good for you for taking initiative! However, multiple outlets not functioning, inclusive of a couple visibly "fried", is quite possibly indicative of a problem that may not be resolved simply by replacing the receptacles. The fried receptacles are indicative of arcing which may lead to a fire. Your landlord should hire a licensed electrician, not just some guy working maintenance, to take a look at your system.
Good for you for taking initiative! However, multiple outlets not functioning, inclusive of a couple visibly "fried", is quite possibly indicative of a problem that may not be resolved simply by replacing the receptacles. The fried receptacles are indicative of arcing which may lead to a fire. Your landlord should hire a licensed electrician, not just some guy working maintenance, to take a look at your system.
Re: Fixit Log
Yeah. Like I warn in all these fixits involving mains voltage. “Don’t electrocute yourself.”
Turn off the power at the fuse box. I’m actually pretty shocked that the maintenance guy just gave you outlets and said it was ok to mess with the wiring. That’s really bad property management practice. It could create some really big legal problems.
That being said I change sockets and light switches all the time on my own. We have these Decora switches that just fall apart after a few years. When I’m too lazy to turn off the power I wear thick rubber gloves and I’m very careful about tool placement. My old screwdrivers have some nice arc welds to remind me of what happens when you short the wires.
ETA - forgot to mention eye protection is a necessity when working with mains wiring. A good arc can throw tiny bits of molten metal flying in your face. Jacob always mentions the use of a non contact voltage detector pen. This is cheap insurance to quickly check if the wires are not hot before you go mucking about in there.
-
guitarplayer
- Posts: 1674
- Joined: Thu Feb 27, 2020 6:43 pm
- Location: Scotland
Re: Fixit Log
I am such a noob here but what the hell.
I had an old mouse from work that got decommissioned as the scroll wheel stopped working. Inspired by @bos' mouse adventures, I decided to fix it. First I thought it had been all hanging on plastic hooks, but then discovered a screw.
Screw hidden under the QR code sticker

Screw removed

Mid layer taken off

Because originally I had been trying to open it just by leverage, a bit of plastic chipped slightly. It still serves its function and is hidden under the outer layer so no worries.

DW40 to the rescue

The mouse works like new now!
I had an old mouse from work that got decommissioned as the scroll wheel stopped working. Inspired by @bos' mouse adventures, I decided to fix it. First I thought it had been all hanging on plastic hooks, but then discovered a screw.
Screw hidden under the QR code sticker
Screw removed
Mid layer taken off
Because originally I had been trying to open it just by leverage, a bit of plastic chipped slightly. It still serves its function and is hidden under the outer layer so no worries.
DW40 to the rescue
The mouse works like new now!
Re: Fixit Log
Let's go @guitarplayer! Nice one. Not sure if you did, but I can recommend to remove the tangled hairs around the rod between the scroll wheel. It will make it scroll even smoother.
Re: Fixit Log
Installed a tie rod end.
My wife complained the car was making a clunk noise when she made turns. I took it for a drive and sure enough on uphill climbs with left turns it clunked. I could feel the clunk under the floorboard. This can be a number of things like control arm bushings, ball joints, tie rod ends or sway bar mounts. It took me a few minutes to find the culprit. The technique is get a partner in the car to swing the wheel back and forth while you observe the steering system for play. I immediately homed in on the clunking sound on a tie rod end and it had about a millimeter of slop in it.
It must have catastrophically failed internally because it was fine a week ago when I drove the car. I bought a new tie rod end for $17 at Autozone and installed it. Noise is gone. I had to do a quick alignment job since installing rod ends messes up the alignment setting. No big deal. I think I saved a few hundred dollars. Mostly because alignment shops will insist on changing all four tie rod ends. I was able to get away with one. I think we accidentally ran over some road debris and it cut the boot and then got contaminated with sand. The nylon insert was cracked up and falling out.
New rod end. Completely quiet in turns now.

Had to do an alignment. Just toe in set to 1mm.

I drove out for pho noodles in Little Saigon. I’ll be able to do this a few times with the money I saved.
My wife complained the car was making a clunk noise when she made turns. I took it for a drive and sure enough on uphill climbs with left turns it clunked. I could feel the clunk under the floorboard. This can be a number of things like control arm bushings, ball joints, tie rod ends or sway bar mounts. It took me a few minutes to find the culprit. The technique is get a partner in the car to swing the wheel back and forth while you observe the steering system for play. I immediately homed in on the clunking sound on a tie rod end and it had about a millimeter of slop in it.
It must have catastrophically failed internally because it was fine a week ago when I drove the car. I bought a new tie rod end for $17 at Autozone and installed it. Noise is gone. I had to do a quick alignment job since installing rod ends messes up the alignment setting. No big deal. I think I saved a few hundred dollars. Mostly because alignment shops will insist on changing all four tie rod ends. I was able to get away with one. I think we accidentally ran over some road debris and it cut the boot and then got contaminated with sand. The nylon insert was cracked up and falling out.
New rod end. Completely quiet in turns now.
Had to do an alignment. Just toe in set to 1mm.
I drove out for pho noodles in Little Saigon. I’ll be able to do this a few times with the money I saved.
Re: Fixit Log
Brazed lock linkage for car door lock.
I tried to lock my car at Autozone last night. Remote control door locks failed. I have these retrofit kits I put on my old Mercedes that updates the locks to radio controlled locks like on modern cars. It’s an inexpensive Chinese kit that has linear motors, radio transmitter receiver pairs, linkages and some hookup wire. They work quite well but the big problem is the one size fits all linkages that you’re supposed to adapt to your existing door lock mechanisms are cheap. Every three years they get loose and I have to open my door panel and tighten up the screws holding the China motors to the Mercedes mechanical locks. On one of my other cars I did a fix to a similar system by replacing the screw clamps that loosen with solid brazed linkages that I formed out of steel rods. I decided to do the same to my S-class because I’m sick of opening the door panel every three years. This is a thing when you keep a car fifteen years.
Here is the slipping linkage in the door. It is basically the junction of three actuating rods between the Mercedes master control switch, the locking plunger and the China linear motor.

Here is the linkage on the table. The DIY screw clamp in the middle is the one size fits all solution sold with the kit. It is a really stupid design because it eventually slips no matter how much superglue and threadlocker I put on it. The shock from opening the door eventually works the screws loose. I guess it is a good design for a quick and dirty way to mate existing lock links with the retrofit kit. Also peopl likely don’t keep a car long enough for it to matter.

I need to get rid of this.

Custom bend up a new linkage from steel rods salvaged from my neighbor’s presidential campaign sign discarded in the trash. I need to braze on a washer to the end so I can permanently fix it to the linkage junction. No more grub screws. Brass wire + cheap torch + borax laundry booster = strong steel to steel connection. Not quite welding but superior to glue. I didn’t have the energy to get my welder out and set up my shield gas regulator so I just torch brazed the steel. Roman era tech.

And here is the result. A permanent connection between the loop and the rod made with brass “glue”. Sufficient strength for a lock link. This junction will be able to take a lot of impact since the lock motors basically bump your car locks open.

Compare it to my original DIY creation. It looks close enough.

Final linkage without silly grub screw clamps. There is nothing to come undone on this one. Unless the brazed joint fatigues. It is quite strong.
Before:
After:

Big improvement over the old way with the screw on clamp.
Okay so that worked out well. I put it all back together and the door locks function again. I hope this will last longer than three years. While I was putting the trim plates back on the door I noticed the power seat switch cover was cracked very badly.
This beauty plate is unobtainable. The junkyard cars all have cracked up trim plates on this seat switch. I decided to try to restore mine. First I thought glue and fiberglass for the cracks. Then I realized I could do some plastic welding with the leftover brass wire from the brazing on the lock linkage.
Trim plate with cracks. There is also some plastic missing around a critical screw hole on the left. I decided to melt in some wire “staples” using my diy plastic welder made from a cheap soldering iron and a nail head. I just heat the wires and press them into the plastic as it melts.

Like this. I learned this trick off a YouTube video about how to fix broken plastic.

This should add some strength to the cracked plastic. I tried glue in the past but it fell apart eventually.

I cut up some old ABS pieces from a dead 2G phone. I was able to use these chips to melt and fill the missing pieces of the plate around the screw. Since the existing switch holes got filled in I used my DIY hot knife (soldering iron + old razor knife) to recut the kidney shaped holes for the switch shaft.

Final repair result. Not pretty but I think it’ll hold together. The ugly parts will be all covered up.


Screw hole reconstructed. I molded new plastic and wire around the screw hole.

And it’s done. Locks work. Power seat switch looks good. Not bad for a forty year old car.

That’s it. I smell like smoke and melted plastic. Time to reward myself with a Biriyani.
I tried to lock my car at Autozone last night. Remote control door locks failed. I have these retrofit kits I put on my old Mercedes that updates the locks to radio controlled locks like on modern cars. It’s an inexpensive Chinese kit that has linear motors, radio transmitter receiver pairs, linkages and some hookup wire. They work quite well but the big problem is the one size fits all linkages that you’re supposed to adapt to your existing door lock mechanisms are cheap. Every three years they get loose and I have to open my door panel and tighten up the screws holding the China motors to the Mercedes mechanical locks. On one of my other cars I did a fix to a similar system by replacing the screw clamps that loosen with solid brazed linkages that I formed out of steel rods. I decided to do the same to my S-class because I’m sick of opening the door panel every three years. This is a thing when you keep a car fifteen years.
Here is the slipping linkage in the door. It is basically the junction of three actuating rods between the Mercedes master control switch, the locking plunger and the China linear motor.
Here is the linkage on the table. The DIY screw clamp in the middle is the one size fits all solution sold with the kit. It is a really stupid design because it eventually slips no matter how much superglue and threadlocker I put on it. The shock from opening the door eventually works the screws loose. I guess it is a good design for a quick and dirty way to mate existing lock links with the retrofit kit. Also peopl likely don’t keep a car long enough for it to matter.
I need to get rid of this.
Custom bend up a new linkage from steel rods salvaged from my neighbor’s presidential campaign sign discarded in the trash. I need to braze on a washer to the end so I can permanently fix it to the linkage junction. No more grub screws. Brass wire + cheap torch + borax laundry booster = strong steel to steel connection. Not quite welding but superior to glue. I didn’t have the energy to get my welder out and set up my shield gas regulator so I just torch brazed the steel. Roman era tech.
And here is the result. A permanent connection between the loop and the rod made with brass “glue”. Sufficient strength for a lock link. This junction will be able to take a lot of impact since the lock motors basically bump your car locks open.
Compare it to my original DIY creation. It looks close enough.
Final linkage without silly grub screw clamps. There is nothing to come undone on this one. Unless the brazed joint fatigues. It is quite strong.
Before:
After:
Big improvement over the old way with the screw on clamp.
Okay so that worked out well. I put it all back together and the door locks function again. I hope this will last longer than three years. While I was putting the trim plates back on the door I noticed the power seat switch cover was cracked very badly.
This beauty plate is unobtainable. The junkyard cars all have cracked up trim plates on this seat switch. I decided to try to restore mine. First I thought glue and fiberglass for the cracks. Then I realized I could do some plastic welding with the leftover brass wire from the brazing on the lock linkage.
Trim plate with cracks. There is also some plastic missing around a critical screw hole on the left. I decided to melt in some wire “staples” using my diy plastic welder made from a cheap soldering iron and a nail head. I just heat the wires and press them into the plastic as it melts.
Like this. I learned this trick off a YouTube video about how to fix broken plastic.
This should add some strength to the cracked plastic. I tried glue in the past but it fell apart eventually.
I cut up some old ABS pieces from a dead 2G phone. I was able to use these chips to melt and fill the missing pieces of the plate around the screw. Since the existing switch holes got filled in I used my DIY hot knife (soldering iron + old razor knife) to recut the kidney shaped holes for the switch shaft.
Final repair result. Not pretty but I think it’ll hold together. The ugly parts will be all covered up.
Screw hole reconstructed. I molded new plastic and wire around the screw hole.
And it’s done. Locks work. Power seat switch looks good. Not bad for a forty year old car.
That’s it. I smell like smoke and melted plastic. Time to reward myself with a Biriyani.
Re: Fixit Log
@Sclass: I just added another use for my borax purchased for making laundry detergent: welding!
I love checking up on this thread to see the car projects and others you undertake. It's a good motivation to keep up with my own car maintenance and reminds me of my dad taking on every project to keep our 80s/90s Subarus running
I love checking up on this thread to see the car projects and others you undertake. It's a good motivation to keep up with my own car maintenance and reminds me of my dad taking on every project to keep our 80s/90s Subarus running
Re: Fixit Log
Yeah I really like sharing the brazing hack here. Mostly because it is done with inexpensive minimalist techniques. It’s a powerful technique that doesn’t require all the special equipment for true welding. The torch is a Bernzomatic TS8000. It can get things like nails and bolts up to red hot temperatures which are sufficiently high for brass brazing. The torch comes in a kit with a gas tank for $65 at Home Depot.
I haven’t experimented with silver solder yet, but I think I can make silver solder that will melt at a similar temperature. Silver solder wicks into joints better. I’ve seen silver solder jobs on steel that were as strong as the steel itself - that is when you bent the parts the steel would bend before the soldered joint would break. From what I’ve seen on YouTube you can make your own silver solder by mixing old silver spoons and dimes with waste cartridge brass chips. You don’t need much to make a bond since it primarily fills the gaps between the bonded material. I found some old baby spoons in my mom’s house (I guess I was born with a silver spoon ) that I plan to melt down and alloy with my dad’s old shell casings. Apparently you can use borax laundry booster for flux or boric acid roach killer. I only wheel out my welder for jobs that require high strength or high temperature resistance.
These hard soldering and brazing techniques are really great for minimalist metal repairs.
ETA - just fixed another blown capacitor in my garage door opener. Kinda shocked that my old capacitor only lasted two years. Either it is cheap quality or my Genie is so old it is over stressing the capacitor. $20 later and my garage door is opening again.
I haven’t experimented with silver solder yet, but I think I can make silver solder that will melt at a similar temperature. Silver solder wicks into joints better. I’ve seen silver solder jobs on steel that were as strong as the steel itself - that is when you bent the parts the steel would bend before the soldered joint would break. From what I’ve seen on YouTube you can make your own silver solder by mixing old silver spoons and dimes with waste cartridge brass chips. You don’t need much to make a bond since it primarily fills the gaps between the bonded material. I found some old baby spoons in my mom’s house (I guess I was born with a silver spoon
These hard soldering and brazing techniques are really great for minimalist metal repairs.
ETA - just fixed another blown capacitor in my garage door opener. Kinda shocked that my old capacitor only lasted two years. Either it is cheap quality or my Genie is so old it is over stressing the capacitor. $20 later and my garage door is opening again.
Re: Fixit Log
Wow, that's cool to hear about the silver solder technique! I've been getting to practice soldering at the bike shop I'm working at, it's a fun process, I think I could get into doing light metal work more.
Re: Fixit Log
I have a quick fix here:
My electric water kettle broke a few months ago. I decided to open it and see if I can somehow fix it.
The bottom was fixed with special screws, similar to these:
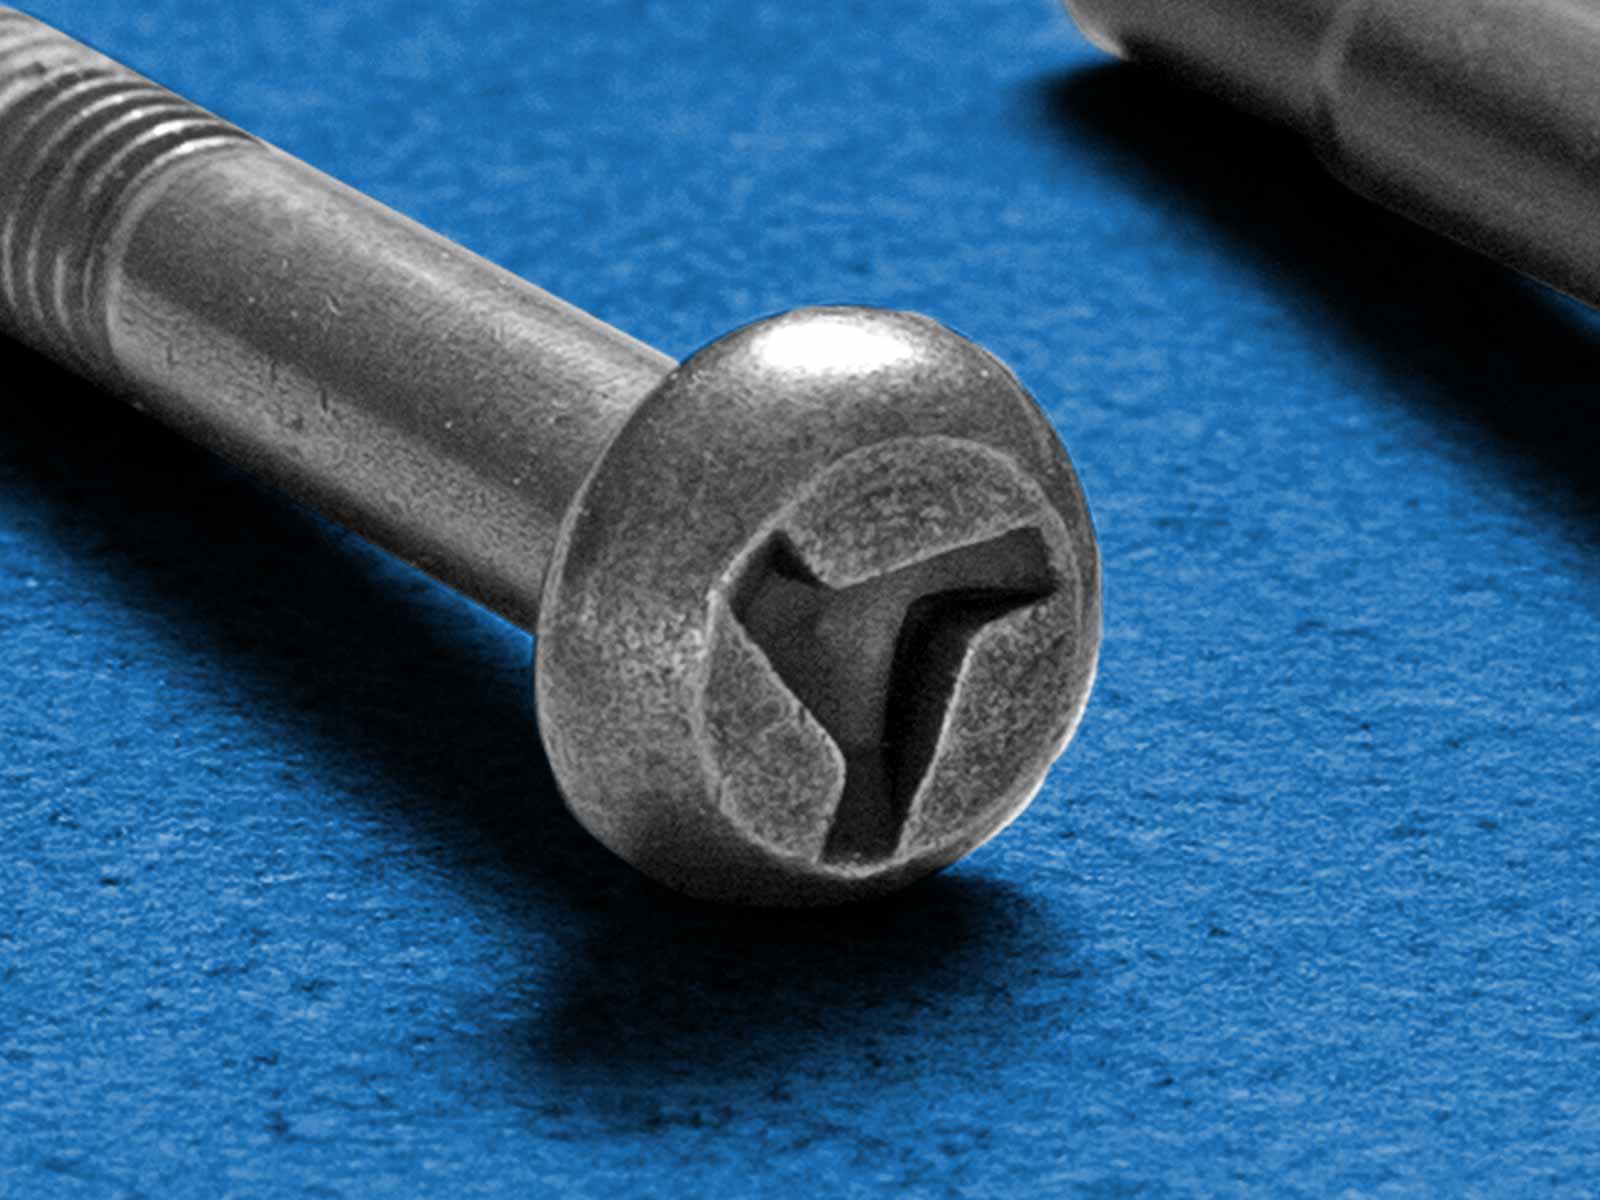
but I could open them with a normal screw driver and some force.
Once it was open, the problem was pretty clear:

One of the two connections broke, probably due to thermomechanical fatigue.
I soldered it with a big ugly weld using a pretty cheap soldering iron:

It is not pretty, but it works. I used the kettle now for a few months, already and did not have any problems with it, so far. Saved me about 35€.
My electric water kettle broke a few months ago. I decided to open it and see if I can somehow fix it.
The bottom was fixed with special screws, similar to these:
but I could open them with a normal screw driver and some force.
Once it was open, the problem was pretty clear:
One of the two connections broke, probably due to thermomechanical fatigue.
I soldered it with a big ugly weld using a pretty cheap soldering iron:
It is not pretty, but it works. I used the kettle now for a few months, already and did not have any problems with it, so far. Saved me about 35€.
Re: Fixit Log
Won't that place heat up too much and the solder melt and drip off? Or is that not how this works. Asking out of ignorance here
Re: Fixit Log
I made it pretty thick so that it would not heat up. The weld before was much thinner, so I would think that this will be all right.
Re: Fixit Log
Good fix. Saved a kettle from the landfill.
I don’t think the solder will melt. It’s connected to something made of copper which is then connected to something plastic. The conductivity of the copper is really good so if the design doesn’t melt the plastic it won’t melt the solder either. Just a wild guess by looking at it.
I don’t think the solder will melt. It’s connected to something made of copper which is then connected to something plastic. The conductivity of the copper is really good so if the design doesn’t melt the plastic it won’t melt the solder either. Just a wild guess by looking at it.