I built a pulse welding attachment for my TIG welding machine. I bought a really cheap TIG machine that didn't have pulse welding control. Pulsing is basically turning your torch on and almost off to regulate the thermal energy going into your weld. The idea is the heat flux is very high at the weld but if you cut the power right after the weld pool becomes molten you stop heating before the heat flows away into the bulk of the part. It's kind of a race between how fast you can dump heat into a small point on a plate of steel and how fast it diffuses away into the plate.
There are some benefits like less heat diffusion into the overall body of the part. Heat only gets to the weld zone. Melting and freezing becomes very regular and localized. Also it makes a novice welder look like he has some skills that in reality take many years to develop. It's a cheat button for making consistent "stack of dimes" welds. Old school welders call it a cheat to just lay down a filler wire and pulse over it but I would like to try it out. I never mastered real torch dexterity and I probably never will. And I'm a sucker for cheat buttons.
Any how enough of that theory. My cheapo welder doesn't have pulsing. I didn't feel like paying the extra $100 on my $134 welder to get this feature. I figured if I wanted it I could build it. All I needed to build is a mechanical finger that would hit the arc switch on the torch at 1Hz with a 30% duty cycle. 300mS on, 700mS off. Over and over again like a metronome. This is easy to build using a 555, Arduino or a bare bones microcontroller setup. I have all three lying around in my junk boxes. But all of those require engineering - circuit design, five lines of code, a PCB layout.
The thought here was to do this project with off the shelf modules that are prebuilt. All that is required is hooking it up with wire. So there needs to be a connection to the welder and torch. Those are GN type connectors. A signal or pulse source - I bought a prebuilt one with with a programmable duty cycle and frequency. A relay to switch to put in series with the arc start switch. All this stuff is available prebuilt and cheap online. I wanted it to be battery powered so I used a battery salvaged from a disposable vape device I found on the ground. I used a little USB to lithium battery charger module for charging. A 3.7V to 5V boost module to bump the battery voltage up to something the pulse source and relay could handle (5v). The idea is to show that DIY electronics can be really approachable without intense hardware or software skill requirements.
That easy. Click click click order stuff on ebay and wait a few weeks for it to arrive from china. $6 for everything including shipping. So I repeat, yes you could build this...but the idea was to order a bunch of premade stuff and just wire it together. No design, no code, no PCB. It's painless DIY electronics.
And here it is. I call it my mechanical thumb. It is wired in series with my arc start button on my torch so when I press the start button it interrupts the connection every one second for 700mS or whatever duration I set. It uses the upslope and downslope on the welder to regulate the ramp up and ramp down of the arc following the relay opening the button circuit.
I'll post up some photos of welds I make later in the low cost welding section. This hack is kind of a crutch. Novice welders can just lay a filler wire down in the gap to be welded and turn on the pulsing torch and the action of the pulses combined with the translation of the hand will create a "stack of dimes" weld. No necessarily stronger or better than manual welding but easier since it requires less manual dexterity and muscle memory. Real welders use a combination of torch translation, pedal control of current and dabbing rhythm with the filler rod to create this effect - a skill that takes many hours to build up.
The modules. $6 worth. Starting clockwise from the top - the connections for the welder, a 5V relay, a square wave generator board, a voltage booster, lithium ion vape battery, on/off switch and usb battery charger. Note all prebuilt and wired with simple wiring. All you have to pay attention to is positive, negative, input and output.

Since I'm going to be welding with this I wanted a sturdy box. I 3D printed this three piece enclosure to hold all the modules. Baby CAD design using Tinkercad.
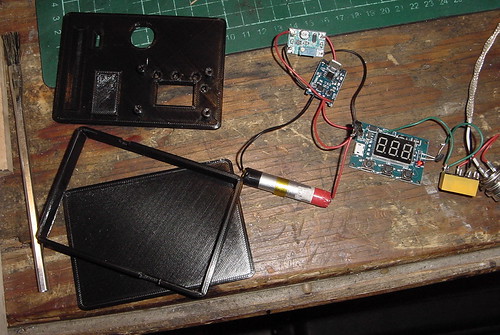
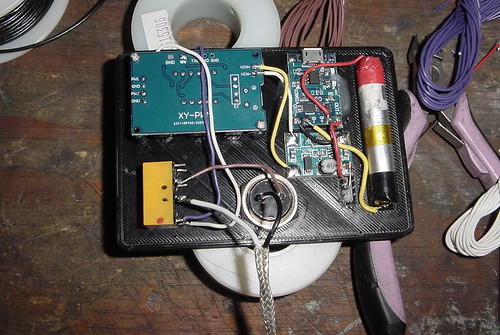
All the items fastened to the box and glued or screwed down.

Wired up! Just connect up the modules. Just like dot to dot. I rewired it with shorter connections for neatness.
Glue the enclosure together. Hopefully this lasts a long time and I don't have to tear into it. The battery is rechargeable so ideally this is sealed for good.

Finished unit. Ready for pulse welding. I'll post up my welds later in the minimalist welding section.


