3D-printer projects?

Fixing and making things, what tools to get and what skills to learn, ...
horsewoman
Posts: 659
Joined: Fri Jun 07, 2019 4:11 am

3D-printer projects?

Post by horsewoman »

Whenever @sclass posts one of his printed goodies I get urges to buy a 3D-printer myself :lol:
I love the idea of this gadget but (know thyself and all that) I have a veritable graveyard of gadgets I loved the idea of but never really used and never resold.

So are there any good resources that would be of help to decide if a 3D printer would be a good thing for me or another candidate for my "Room of hidden things" (that's a Harry Potter reference, for all you muggles).

My imagination falls short in this regard. What projects can one do in day to day life (besides repairing sewing machines)?

UK-with-kids
Posts: 228
Joined: Tue Oct 09, 2018 4:55 am
Location: Oxbridge, UK

Re: 3D-printer projects?

Post by UK-with-kids »

I often wonder about this too. E.g. I need some specific but obsolete curtain hooks for my caravan and I can only switch my slow cooker on and off with a pair of pliers because the plastic dial broke.

It can't make sense for everybody to have their own 3D printer though, surely? It doesn't exactly pass the daily use test.

User avatar
Sclass
Posts: 2804
Joined: Tue Jul 10, 2012 5:15 pm
Location: Orange County, CA

Re: 3D-printer projects?

Post by Sclass »

I keep telling people here, at $200 for a Creality Ender 3 (sometimes on sale for $180) there is no reason to not buy one. Except that it may become a member of the room of hidden things. I understand the problem. My garage is full of such items.

To get around this problem I generally wait till I actually have a big project that needs a tool before I get it. That way it gets at least one significant use. For the 3d printer it was the restoration of my truck. I needed a vent for the AC unit that simply wasn’t available. It was such a great improvement to the truck that if I’d quit printing after I was done I’d be happy. It helped that the printer was only $200. I’d already spent $500 rebuilding the AC system and the 1959 style vents were all that I needed to finish a “period correct” restoration. Had I paid professionals to install a custom AC into this ancient vehicle it would have cost thousands. So the printer was just a drop in the bucket.

Posted here : viewtopic.php?f=3&t=4111&hilit=3d+printing&start=80

In terms of resources I looked at http://www.thingiverse.com to see what other people printed. I initially was disappointed because I found a lot of the designs useless and childish. But as time went on whenever something broke around the house I’d often search thingiverse and find that somebody actually designed a replacement part to fix the item. So I would now suggest searching for specific parts you may need or may have needed in the past.

Then there is the constant flow of things you just need around the house. Like I needed a drawer pull for my kitchen drawer one day and I just made one. Or, the little clip that retains our hood support on our Honda Accord broke and I didn’t want to order one. Or, I got bored and decided to make raviolis a few months ago but I didn’t want to leave the house to buy a ravioli mold. Or a blind person needed a fixture to center his Qi charger under his iPhone reliably. Or I notice a knob has been missing on some old gadget for awhile. Those uses steadily trickle in. It took about 1 year to use up a $20 roll (1kg) of plastic doing jobs like this.

Another tip is just asking myself before I go out to buy a cheap item I need “can I print this”. Considering the small amount of filament needed (printed parts often use less plastic than commercial items since they can be hollow) and the cost of driving into town I do better downloading something from thingiverse and printing. This has been handy in the pandemic because I limit trips out.

Before purchasing, watching YouTube often left me wondering if the purchase of a 3d printer would be a waste. There are many videos but my response to each was “why would you make that?” For me personally printing odd vases, planters, pencil cups and anime cosplay items was uninteresting. So I would rely more on my steady flow of needs to just come in naturally. I’m sure the farm can benefit from some printed parts.

Good luck. If you do get one I can suggest some good setup and use videos that helped smooth out the startup issues.

basuragomi
Posts: 419
Joined: Tue Oct 15, 2019 3:13 pm

Re: 3D-printer projects?

Post by basuragomi »

I use my public library 3D printer. Since I only print once or twice a year it saves space, their printers are pretty good quality Ultimakers, and they only charge for material costs.

For functional prints, I've printed little guards to prevent my metal bed frame scraping the wall, snap-caps to test firearm functionality, and my favourite print so far, a self-closing axe blade guard that can be taken off or removed with one hand:

Image

I cut and filed down the machine screw end after taking this photo. The whole thing cost me C$2 to print. I can PM the files/openSCAD code upon request.

I have way too many half-baked 3D print projects that will hopefully see the light of day in the future.

Gilberto de Piento
Posts: 1948
Joined: Tue Nov 12, 2013 10:23 pm

Re: 3D-printer projects?

Post by Gilberto de Piento »

A membership at a maker space can be another way to access 3d printers and other tools without owning them.

User avatar
Sclass
Posts: 2804
Joined: Tue Jul 10, 2012 5:15 pm
Location: Orange County, CA

Re: 3D-printer projects?

Post by Sclass »

That’s a beautiful part. The library is a nice inexpensive option.

My 3d snap caps quickly self destructed. I think I printed them in the wrong direction.

User avatar
Sclass
Posts: 2804
Joined: Tue Jul 10, 2012 5:15 pm
Location: Orange County, CA

Re: 3D-printer projects?

Post by Sclass »

In case anyone is thinking of buying an inexpensive 3d printer. Just got a message from http://www.creality3d.shop

Ender 3 printers are on sale for $155. Coupon code: Crazyender3usa

jacob
Site Admin
Posts: 15969
Joined: Fri Jun 28, 2013 8:38 pm
Location: USA, Zone 5b, Koppen Dfa, Elev. 620ft, Walkscore 77
Contact:

Re: 3D-printer projects?

Post by jacob »

@Sclass - Question: If you had to buy another creality printer now, which one would you pick? Will note that used creality printers are <$100 less on ebay. Any risk of buying a lemon? Tuning issues?

enigmaT120
Posts: 1240
Joined: Thu Feb 12, 2015 2:14 pm
Location: Falls City, OR

Re: 3D-printer projects?

Post by enigmaT120 »

I thought I was going to have to find one to make a new part for my lawnmower, a control lever that engages the self propulsion. The mower was given to me. Sears was taking forever to ship the part but they finally did and I have it. It was only 8 bucks. So no printer for me yet!

Sclass, what make is your '59 truck? I have a '58 Chevy Napco 4WD I need to restore.

User avatar
Sclass
Posts: 2804
Joined: Tue Jul 10, 2012 5:15 pm
Location: Orange County, CA

Re: 3D-printer projects?

Post by Sclass »

I would buy an Ender 3. I haven’t exceeded the limits of my machine yet and it is the best deal around. I do own the Ender 3 pro but I think the difference was mostly a more expensive power supply and a magnetic build plate which can be added later.

I would be very careful of a used unit especially at the price offered for new. A bent lead screw, damaged/dirty rail, worn wheels, wonky stepper, worn extruder and tired build plate will run you in circles. I figured I’d learn how to make the printer go first then learn how to fix it after I break it. Secondly the printer has changed in subtle ways over the last few years. Early models had tolerancing bugs that needed to be ironed out with shims and hardware(that you can print). Like early generations bound up because of misalignment and constraints.

A good startup video for Ender 3 is here. Care of assembly (basically tramming) makes all the difference in the world when trying to maximize precision. I’ve set up a lot of CNC and pick and place systems and this guy condenses all the critical adjustments into one video. How you tighten and true your gantry is critical.

https://youtu.be/me8Qrwh907Q


My truck is a 1965 Ford F100 stepside. The AC unit is a transplant off a 59 Cadillac. Junkyard stripped unit. Back in 59 the AC was an option that the dealer installed. So this kit was simply stripped out of a wreck and bolted into the truck. When I got the truck (it is actually the second time I’ve owned it in the last thirty years) I actually identified it from the custom AC when I spotted it on Craigslist a year ago. So when I replaced everything with a modern AC evaporator, condenser, lines, compressor and controller it was really important to me to preserve the 59 look.

User avatar
Sclass
Posts: 2804
Joined: Tue Jul 10, 2012 5:15 pm
Location: Orange County, CA

Re: 3D-printer projects?

Post by Sclass »

Some inspiration. This week I used the printer on a few projects. Here were two of the more interesting.

I had a motor mount on my Mercedes that wore out. Basically two pieces of steel isolated by a doughnut of rubber. The replacement costs $100. I was highly motivated to repair my old one. So here it is, the outer shell which is connected to the car and the inner metal tube which is connected to the engine. Rubber between the two coaxial parts is rotted away. I first had to remove it with a rasp.

Image

Image

The idea was to replace the inner rubber lining with polyurethane glue. This tube costs $5. I've used this material to repair shoes in the past. Black rubber. Very sticky. Used for roof repair.

Image

Quickly modeled these up in Tinkercad. I wanted to make a jig that would hold the glue in the part and center the internal piece at the same time. This took about twenty minutes to design and about five minutes to print. Used about $0.15 of filament.

Image

Image

Image

Image

Image

The tube part is to push the glue into the part like a piston to get rid of air bubbles. I later decided...always the case...that I should have made two disk parts, and used the caulk gun to injection mold the part through a hole with gating while clamping the two ends with a c-clamp. But these thoughts always come after I've finished. Here it is after filling the gap with glue and packing it down with the ring piston. Once the glue was down there was no turning back. I really regretted not going all out and making an injection mold jig using two of the disk shapes but hah...if we could do any of this stuff more than once it will always come out better.

Image

Time will tell if they hold up under use. This glue is used by other mechanics online to make these mounts so I figure it was worth a try.

Here is another. I bought one of those big packs of socket extensions with wobble heads at Harbor Freight this week. I didn't have a way to organize them and I didn't want to make another bag because my bench is getting crowded with bags of tools. So I designed a wall rack up in Tinkercad. Tinkercad is easy and takes about an hour to learn how to make this. I'm really at the bottom of the learning curve but without much work you can turn out useful parts. I think I spent 20 minutes to design this. This is just made up of some basic shapes like cylinders, blocks, spheres and ellipses. The cool part is I wanted one for 1/4" drive and one for 3/8" drive. So I designed the small one and then just blew it up to make the big one by dragging. Took ten seconds to design the second one. This part took 4 hours to print and uses $1 of filament. It is mostly hollow.

Image

Image

Image

3d printing is really good for this kind of stuff. Rapid design. Low strength requirements. Cheap material.

User avatar
Sclass
Posts: 2804
Joined: Tue Jul 10, 2012 5:15 pm
Location: Orange County, CA

Re: 3D-printer projects?

Post by Sclass »

One of my diesel cars is burning a bit of oil through the PCV system. I decided I'd like to get an oil catch can to separate the vapor from the recirculated gas so I don't foul up my pistons. The fouling got really bad recently and the car started to misfire. I cleaned it up with chemicals but I decided I needed to put in place a separator so I wouldn't have to do this cleanup job again. This is a problem on older cars. Positive feedback - the more coking on the rings, the more ring blowby, which deposits more coking on the rings which results in more blowby. Its been getting bad a few years and now it is past the point of neglect. I decided to do something.

Typically you can buy an oil separator online for $20 - $150. They look like this.
Image

I decided I could recycle an old salsa bottle to do basically the same thing. I needed to plumb two 1/2" pipes at right angles into it and seal the joints. The idea is oil and oil vapor go in and mostly dry gas comes out for recirculation and combustion.

Found a Salsa bottle. Soaked off the label.
Image

Image

I designed this part in Tinkercad. Printed it on my 3d printer in PLA.
Image

Image

Image

Image

Image

All stuffed with stainless steel pot scrubber to help condense oil. Nice clear glass bottle so I can see when I need to empty the waste oil. This unit is basically made with junk. $0.70 of filament. Some scraps of electrical conduit. Steel filled epoxy. Silicone sealer. Two o-ring seals from a cheap Harbor Freight o-ring kit. Some sheet metal screws to hold the part down to the jar lid, also from Harbor Freight Tools. Took about 3 hours to print. An hour to seal.

I can hear the grumbling already "but PLA cannot take high temperature." Right, one thing I've noticed about PLA stuff I've made for under hood applications is that they initially get soft but they harden up and get very resistant to temperature over time. They kind of temper themselves after getting exposed to heat if they aren't mechanically stressed during the process. I made a hood latch that has survived very well at temperatures above 60 deg C. This time I preheated my part to 75 deg C with a heat gun slowly to do the same thing. I noticed on subsequent heat cycles it doesn't get soft. Its a gamble and I still have to try it out on the car, but I think (hope) it'll last. I still haven't learned to use higher temp filaments so I'm limited do making parts that don't get exposed to much heat. Hopefully my heat treating trick will work. It seems to do well under a heat gun.

User avatar
Sclass
Posts: 2804
Joined: Tue Jul 10, 2012 5:15 pm
Location: Orange County, CA

Re: 3D-printer projects?

Post by Sclass »

Very interesting result on the oil separator. The first time I used it the white PLA got a bit soft and the metal tubes spread apart a bit. The unit didn’t come apart though. It was hot to the touch after a spirited drive. I’d say > 60 deg C.

I let it cool. It became rigid again. The next few times I drove out it no longer got soft. It can take heat and it is very strong. It hasn’t really shrunk either. The tubes are quite parallel anymore but they are still 100% functional. Quite impressive for a low temperature filament. I had the same experience with a hood latch I made that gets quite hot.

horsewoman
Posts: 659
Joined: Fri Jun 07, 2019 4:11 am

Re: 3D-printer projects?

Post by horsewoman »

This fix earns you some serious McGyver points in my book!
I'm still in negotiations with DH for bench space in his work shop for a printer....

User avatar
Sclass
Posts: 2804
Joined: Tue Jul 10, 2012 5:15 pm
Location: Orange County, CA

Re: 3D-printer projects?

Post by Sclass »

Some updates. Here is my motor mount. I finally demolded it today. came out really nice. My tube of glue will probably dry up by the time I need it again but it only cost me $5 compared to $100 for the new motor mount. So economically I guess it worked out. We'll see how it lasts on the car.

Image

Here is a shot of the oil separator install. The elastic stress of the blue hoses permanently separated the metal tubes on top but the white plastic has since hardened and the melt point has dramatically increased. I tried squeezing the tubes together yesterday after getting them good and hot and they will no longer move. Somehow heat cycling pushes up the melt temperature of this PLA. I didn't do it enough the first time with the heat gun but the car managed to do it naturally. Interesting. This cheapo filament doesn't shrink as much as the Creality PLA when heated. It is different in some respects - less shine and more flexible at room temp.

Image

New project. I lost the button on my climate control unit in the same car. Actually it self destructed. Fresh air vent is the button I press most often. It died. I can get one for $20 on ebay with shipping but I figured a few minutes in front of Tinkercad and I'll have a replacement. It won't look as good but I just want function at this point. 40 year old car. 40 year old plastic.

Image

Design. Not original but done for easy printing. $0.10 of filament. 15 min print time.

Image

There we go. A button is better than no button. And at ten cents I am not complaining. I think I should have loaded some black filament in retrospect. Oh well, at least the back light will shine through the button so I can find it in the dark.

Image

@horsewoman - if you want to sell your husband on the printer, take a look at some of the prints on Thingiverse and YouTube for workshops. Theyre really good for making jigs and tooling fixtures.

jacob
Site Admin
Posts: 15969
Joined: Fri Jun 28, 2013 8:38 pm
Location: USA, Zone 5b, Koppen Dfa, Elev. 620ft, Walkscore 77
Contact:

Re: 3D-printer projects?

Post by jacob »

What about lids to food containers? Usually the lid is the first to fail while the container is fine, and I hate to throwing out it out. Is filament food grade?

User avatar
Sclass
Posts: 2804
Joined: Tue Jul 10, 2012 5:15 pm
Location: Orange County, CA

Re: 3D-printer projects?

Post by Sclass »

Depends on the filament.

PLA is pretty brittle. I can see making a jar lid but not something like a Tupperware lid. I’ve noticed my prints have pinhole leaks. My oil separator is weeping a bit even though it is only under a psi of pressure. I’m going to make a lid for my coffee mill soon.

Perhaps a food grade TPU? I have no experience here. Looks like a good material to make elastic bumpers and seals.

https://www.treatstock.com/material/tpu

User avatar
Sclass
Posts: 2804
Joined: Tue Jul 10, 2012 5:15 pm
Location: Orange County, CA

Re: 3D-printer projects?

Post by Sclass »

I recently bought a Husqvarna Viking 6440 sewing machine. I restored it and it works well. It took another couple of days in the shop to figure out some more subtle and elusive issues but eventually I figured it all out. Right now it doesn't have the accessory box. I have the outer carrying case but the internal box that fits under the arm was missing among other things. It's kind of a nice thing to have to keep the bobbins and notions tidy.

The bobbins are Husqvarna only and it only came with one. So I designed one in 3d cad and printed a handfull. The bobbins cost over $1 each in metal but I spent about $0.04 ea of filament to make my own. I just didn't feel like spending any more money on this machine. I have $40 invested in it as of now.

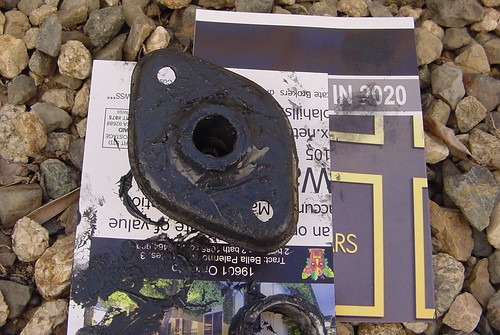
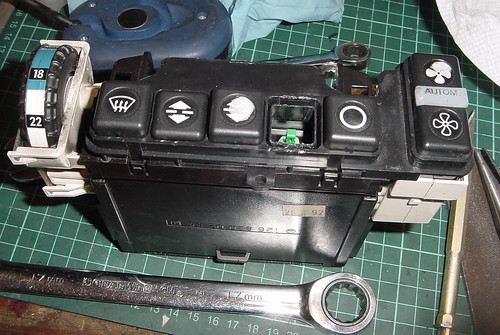
Checking ebay, the official accessory box costs anywhere from $25 and up plus shipping. Some idiots want $100 for a box that is made of 40 year old plastic that will crumble apart on arrival. This is what it looks like.

Image

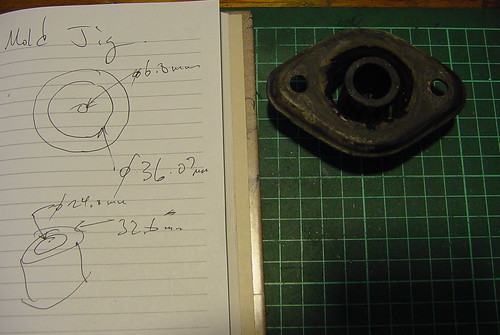
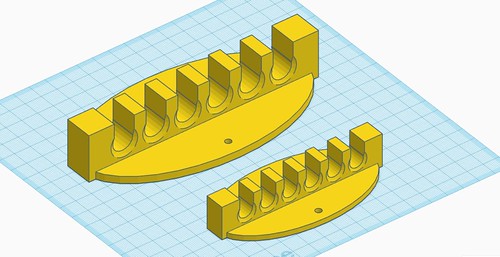
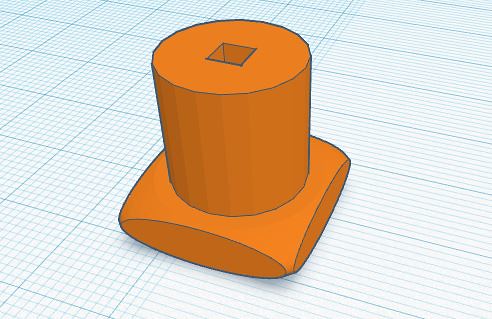
Fits under the arm of the machine and the outer machine carrying case fits over the whole thing. I wish it came with this box but it looks easy enough to make on the 3d printer. It took under an hour to design this. My own twist on the old design. I figured it would be easier to print. It took 22 hours and used 200g of PLA filament. This cost me about $5 not counting electricity.

Image

Here is some detail of the hidden bobbin carrier that fits under the sewing arm. The beautiful cutouts literally take minutes to carve out of the model using Tinkercad. They're just simple spheres and cylinders.

Image

Here it is installed under the machine. There is a slot for the owner's manual up front.

Image

Image

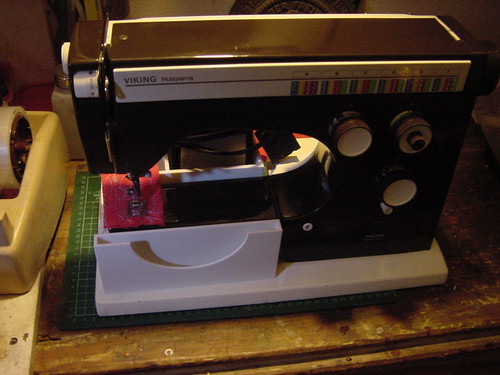
Out back there is a holder for Husqvarna's giant foot pedal control. Keeps that tidy and together with the machine. You don't want to get these separated. The foot pedals for these old machines are getting hard to find even on ebay.

Image

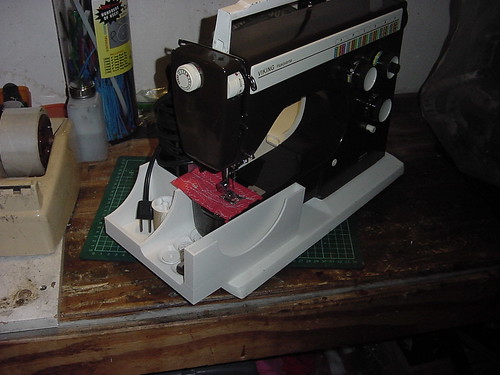
The whole thing fits under this tidy case that clips over the top of the machine. I'm really happy with the outcome. Of course if I printed it again I could make it a bit better but realistically this will perform the job.

Image

This is kind of my drug hit that keeps me going. I never gave a lot of thought to what I'd do once I didn't have a job. I rehearsed my resignation mentally for years but I never rehearsed the eight years that would follow it.

I've met a lot of real retirees over the years and seen their crisis as they went from 65 to 75. A few neighbors in my old home town would make little steam engines with scraps of metal in their garages. Beautiful things. They were retired engineers. I didn't understand what they were trying to do at the time...it seemed like killing time. The projects had to be cheap and time consuming. I'm afraid I'm there now. I ran so hard to finish early and I now act like a 70 year old in my workshop. But I'm only 51. For the first time in my life I'm actually afraid of acting older than I actually am.

Just thinking out loud. What else would I do for direction? I'm like an engineering engine that isn't hooked to anything anymore. If I keep spinning with no load I may just self destruct.

COVID has made this all more difficult. My regular routines have really been cut off the last eight months.

Hey, just thinking out loud. Retirement. Hmmm. I'm wondering if I managed to escape the slaughterhouse and just wandered off into the woods without a plan just to wander aimlessly for an extra twenty years.

Scott 2
Posts: 2849
Joined: Sun Feb 12, 2012 10:34 pm

Re: 3D-printer projects?

Post by Scott 2 »

I think considering the pandemic and fire, you deserve a little more slack. Most everyone is struggling right now. Coping via 3d printing projects is an extremely constructive strategy.

7Wannabe5
Posts: 9415
Joined: Fri Oct 18, 2013 9:03 am

Re: 3D-printer projects?

Post by 7Wannabe5 »

@Sclass:

I was semi-planning to ask you for help with design of solar powered permaculture robots made out of salvage someday.

Post Reply