I think EGO's design is brilliant. I agree that the lower restraints are unnecessary for pull ups. Maybe needed for circus act type of gymnastics.
The strain on the door frame is inversely proportional to the angle of the vertical support from the wall. the Closer to the wall, the lower the strain.
DIY take-apart pullup stand

Re: DIY take-apart pullup stand
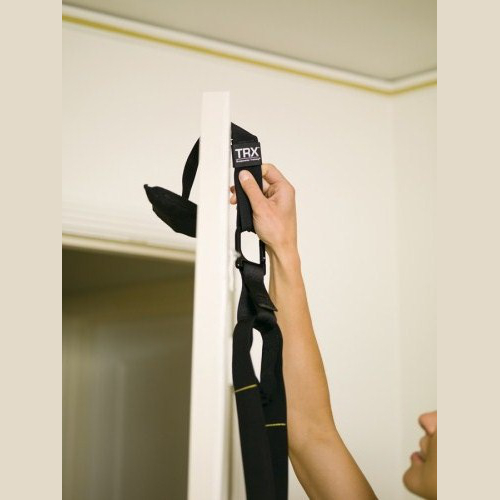
No need to connect anything permanently to the door. You can simply attach something to the nylon webbing, string it over the top of the door then close the door. TRX sells their own version but there is no need to buy as they are easy to make.SilverElephant wrote:But what to do if you can't screw hooks into the other side of the door? The only door strong enough to hold this is my apartment door. Any kind of fixation mechanism for the rope will ensure I have to replace the whole frame when I move out.
I do kipping pullups so I would need the bottom support or (I believe) it would sway. That is also why I think Jacob may be right about damaging the wall or person doing the pullups. I weigh only 160lbs / 73kilos and generate a heck of a lot force, enough to shake the fixed pullup rack at the gym. Strict pullups might be a different story.
-
SilverElephant
- Posts: 130
- Joined: Mon Jul 22, 2013 12:40 pm
Re: DIY take-apart pullup stand
They even sell them in Germany. But as you said, I can see they're easy to make. Though don't they make the hinges bear the whole load?Ego wrote:No need to connect anything permanently to the door. You can simply attach something to the nylon webbing, string it over the top of the door then close the door. TRX sells their own version but there is no need to buy as they are easy to make.
-
SilverElephant
- Posts: 130
- Joined: Mon Jul 22, 2013 12:40 pm
Re: DIY take-apart pullup stand
I ended up going for the iron pipes. Everything else involved doorframes or bolting something to the plaster ceiling, and I wasn't willing to deal with the landlord concerning potential damage.
Sturdy, folds up, can be potentially disassembled for transport into a bunch of pipes no longer than 1 m and has a total build-up time from the three-piece teardown of just over one minute, which I assume will become less with practice. Holds a 74 kg guy for pullups, no problem. No issues with tipping if I don't go nuts. The only downside was the total cost of the pieces, coming in at just under 100 €. Considering the retail equivalent was 200 €, I'm still pleased, especially since the store versions couldn't be disassembled.
Sturdy, folds up, can be potentially disassembled for transport into a bunch of pipes no longer than 1 m and has a total build-up time from the three-piece teardown of just over one minute, which I assume will become less with practice. Holds a 74 kg guy for pullups, no problem. No issues with tipping if I don't go nuts. The only downside was the total cost of the pieces, coming in at just under 100 €. Considering the retail equivalent was 200 €, I'm still pleased, especially since the store versions couldn't be disassembled.
Re: DIY take-apart pullup stand
Nice.
Got a photo of it?
Got a photo of it?
Re: DIY take-apart pullup stand
In my experience with exercise equipment, there's a good chance you can sell it for half of what you spent, even five or ten years from now. Your total cost to own it will be pretty low.
How many pull ups did you do?
How many pull ups did you do?
-
SilverElephant
- Posts: 130
- Joined: Mon Jul 22, 2013 12:40 pm
Re: DIY take-apart pullup stand
Here you go.
I didn't get too many in. The first idea was to integrate them into the burpee routine, but I'm currently at 8x12 burpees, and being totally untrained pullup-wise I only managed to do the two first sets complete with pullups, then I gave up halfway through the third and just did the pushup-burpees. Hopefully this will improve with time.


I didn't get too many in. The first idea was to integrate them into the burpee routine, but I'm currently at 8x12 burpees, and being totally untrained pullup-wise I only managed to do the two first sets complete with pullups, then I gave up halfway through the third and just did the pushup-burpees. Hopefully this will improve with time.
Re: DIY take-apart pullup stand
pull ups are also much harder than burpees
-
jacob
- Site Admin
- Posts: 15996
- Joined: Fri Jun 28, 2013 8:38 pm
- Location: USA, Zone 5b, Koppen Dfa, Elev. 620ft, Walkscore 77
- Contact:
Re: DIY take-apart pullup stand
I just put one together out of three 2x4's and 2x4 piece of ply-wood. I had all the wood already, so no shopping needed. Otherwise $15-20. I had the rings already.
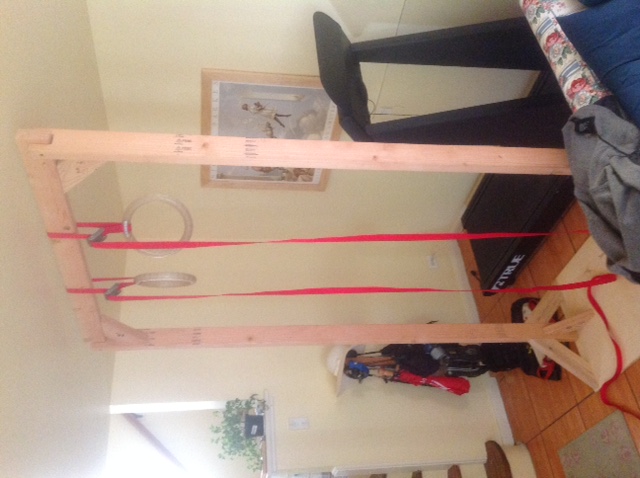
This is version 2. Version 1 used a water pipe for the top bar but it wasn't very long so I could only do narrow grip pull-ups. I didn't want to go and buy a new pipe and the pipe itself didn't lend any structural integrity, so I used wood instead. It's built all the way to the ceiling. My ceilings are only 7'9" so I need all the space I can get.

The whole thing is put together with pocketholes w/o glue. Each leg has 12 screws going into the ply-wood. It's pretty fast to take-down, which is necessary, if it ever has to leave the room. Also, I can reuse a lot of the wood for other projects should I get tired of having this monstrosity in my living room.
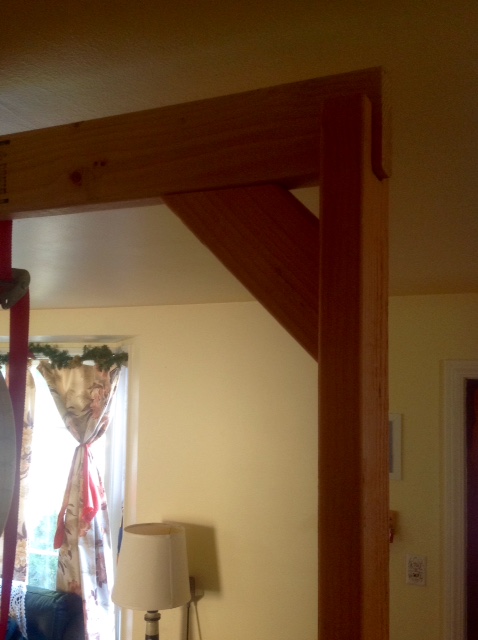
Ghetto-joints. Pretty fast and solid enough.
The base is only 2' front-back so it won't work for kipping or anything where the force goes too far out of vertical, but it's good enough for all dead-hang activity, push-ups, pull-ups, dips, rows, ...
If I had to do it again, I would have made a longer base out of 2x4s for the bottom instead of plywood, but I used what I had. And now I'm out of 2x4s ...
This is version 2. Version 1 used a water pipe for the top bar but it wasn't very long so I could only do narrow grip pull-ups. I didn't want to go and buy a new pipe and the pipe itself didn't lend any structural integrity, so I used wood instead. It's built all the way to the ceiling. My ceilings are only 7'9" so I need all the space I can get.
The whole thing is put together with pocketholes w/o glue. Each leg has 12 screws going into the ply-wood. It's pretty fast to take-down, which is necessary, if it ever has to leave the room. Also, I can reuse a lot of the wood for other projects should I get tired of having this monstrosity in my living room.
Ghetto-joints. Pretty fast and solid enough.
The base is only 2' front-back so it won't work for kipping or anything where the force goes too far out of vertical, but it's good enough for all dead-hang activity, push-ups, pull-ups, dips, rows, ...
If I had to do it again, I would have made a longer base out of 2x4s for the bottom instead of plywood, but I used what I had. And now I'm out of 2x4s ...
Re: DIY take-apart pullup stand
That looks functional, rings are much easier on the wrists and elbows.
I suppose your wife is accustomed to things like this. "Oh, there's a wood tower in the living room now, OK...". You're a lucky man.
I suppose your wife is accustomed to things like this. "Oh, there's a wood tower in the living room now, OK...". You're a lucky man.
-
SilverElephant
- Posts: 130
- Joined: Mon Jul 22, 2013 12:40 pm
Re: DIY take-apart pullup stand
Definitely looks more professional than mine. How fast can you take it apart/put it together? My living room being my only room, I really do have to take it apart after each use, so being able to do that in under one minute was a requirement.
-
jacob
- Site Admin
- Posts: 15996
- Joined: Fri Jun 28, 2013 8:38 pm
- Location: USA, Zone 5b, Koppen Dfa, Elev. 620ft, Walkscore 77
- Contact:
Re: DIY take-apart pullup stand
@SE - Mine looks pretty ghetto up close. Very little care was taken in building it. I'd have to remove a total of 30 screws to break it down, so a few minutes with an electric driver. It's not really meant to go up and down all the time. If that was part of the design, I would have built it differently: Either bolts ($$) or wedged mortise and tenon joints (time). I used what I had in the basement and that put some constraints on the design.
Re: DIY take-apart pullup stand
Is that...jacob wrote:
Is that an actual treadmill or did you salvage a very lifelike lifesize cardboard cutout of a treadmill somewhere?
-
jacob
- Site Admin
- Posts: 15996
- Joined: Fri Jun 28, 2013 8:38 pm
- Location: USA, Zone 5b, Koppen Dfa, Elev. 620ft, Walkscore 77
- Contact:
Re: DIY take-apart pullup stand
@FBeyer - It IS an actual treadmill. We did, of course, not purchase it. We're "storing" it for a friend who needed extra space in their storage unit for the infinite duration.
Re: DIY take-apart pullup stand
That looks nicely built. Not sure if you've tried the design below for your base, but it's a lot easier to build than what you have there. You can also use plywood cutouts in the shape of triangles. I did this for a bird feeder stand in my yard.

-
jacob
- Site Admin
- Posts: 15996
- Joined: Fri Jun 28, 2013 8:38 pm
- Location: USA, Zone 5b, Koppen Dfa, Elev. 620ft, Walkscore 77
- Contact:
Re: DIY take-apart pullup stand
@cmonkey - I have that design on the short clothes stand behind the pull-up station. You can't really see it in the picture because it's covered in clutter. However, it's best to avoid having too many beams cluttering up the center (where the person is). Ideally, I would have turned my diagonal outwards so the stand looked more like a pagoda. However, this would have reduced the space for the person to about 31" instead of the 45" I have now.