the soybean processing and culture thread

Fixing and making things, what tools to get and what skills to learn, ...
User avatar
Alphaville
Posts: 3611
Joined: Thu Oct 03, 2019 10:50 am
Location: Quarantined

Re: the soybean processing and culture thread

Post by Alphaville »

ok here are the notes for my experiment so far.

SOY YOGURT MASH
pre-fermentation phase

it is based on this: https://www.wikihow.com/Ferment-Beans (also linked previously) but with a "yogurty" frame of mind. as stated before, i didn't wanna make soymilk first and then ferment cuz angtft.

so my method incorporates my own objections/ modifications to the above recipe, which i'll note:

1. i rinsed then soaked a pound (454g) of soybeans for about 20h. i used 3 pints (6cups ~1.5l) and the soaked beans emerged from the surface overnight, so i added more water to cover fully. next time i'll directly use 4pt = 8 cups = ~2l. so regardless of unit basically a 4 to 1 weight ratio water to beans should work for the soak.

unlike the instructions i did not however throw out any water. i kept all the liquid, foam included. source says "You can change out the water periodically to eliminate some of the starches in the beans" but we've established per @white belt's find that *there are no starches in soybeans*. then you'be eliminating sugars, which... is what cultures eat! i don't want them to be on a low-calorie diet, i want them to grow and thrive, so the whole muck stays for full nutrition.

2. per my instapot instructions, i pressured-cooked on high for 20m, then allowed slow release. i did not add salt or herbs or anything. beans tasted great! mild and naturally sweet and totally edible. i might add a bit of salt next time and see, just 1 tsp or so.

3. i want a yogurt approximation, not "chunky beans," so i ran the cooked results through the food processor in batches. i got a purée with tiny chunks of bean. in the future i could give them the blender treatment for supersmooth texture. but i don't have a blender :D

i also considered that my moderately hard water could have made the beans firmer. i usually cook my beans with a bit of sodium bicarbonate (1/2 tsp for 1lb beans) for softer texture, so this is a consideration for future iterations.

4. i moved the mash to my fermenting instapot insert, then boiled (reboiled?) in there. while this is done with milk to unfold proteins, i did it here to kill any possible bugs from the food processor. then left cooling overnight like i do for yogurt, to make sure i dont accidentally cook the inoculum.

5 earlier this morning inoculated with 1/4 cup FORAGER UNSWEETENED PLAIN GREEK YOGURT. which is not made from soy but from coconut milk, cashew, etc., plus cucurbitaceae seed protein (watermelon, pumpkin) and... other things. it claims to have a number of active live cultures (classic yogurt ones) plus lactobacillus plantarum which is the one that creates sauerkraut, pickles, etc. it was a tasty and fairly tart yogurt with 7g protein for a tiny cup. i'd consider buying it for consumption if i weren't a diy-er.

for good measure i added another 1/4 cup from my *sour whey* (leftover from strained "greek" yogurt). this has a bit of milk protein but no caseine, so i expect no fibers/gumminess or anything (if it's really caseine fiber that causes gumminess, this is speculation... whey is just "cleaner"). really this was just for backup plus an element of serendipity from ongoing wild fermentation.

6 have it now in the yogurt setting for 8h. since all the natural soy sugars are preserved in the water, growth should pick up fairly quickly. i will taste at the end of this preset period. hoping for sour notes. 🤞

User avatar
Alphaville
Posts: 3611
Joined: Thu Oct 03, 2019 10:50 am
Location: Quarantined

Re: the soybean processing and culture thread

Post by Alphaville »

hah! it's... tarted up! a bit lemony! not sure if i should stop now or if i should rewarm... another 4 hours or something.

one thing i noticed is the mash soaked in the whole water like a dough, and then it puffed up a little, like a dough too, and had a slightly yeasty smell when i lifted the lid but it was just a moment...

should i remove and let it cool? should i go on? the original recipe had it out for several days.

i guess i'll keep it warm for another 4 hours for these reasons:
  • the soy is a mash with particles and not a solution, i should allow for deeper fermentation to work through the solid bodies.
  • bean sugars are tougher than mere lactose. i can digest lactose no problem, but the raffinose in the soy... i need it gone.
ok! 4 more hours to let it rip. i will let it further work while it cools in the pot overnight, which... goes doen from war to room temperature. at that point it should get super-sour. fingers crossed for no yeast colonization! although if it happens.. who knows? :D

J_
Posts: 883
Joined: Tue Nov 01, 2011 4:12 pm
Location: Netherlands/Austria

Re: the soybean processing and culture thread

Post by J_ »

Nice report Alphaville, just like you I am curios about your results!

User avatar
Alphaville
Posts: 3611
Joined: Thu Oct 03, 2019 10:50 am
Location: Quarantined

Re: the soybean processing and culture thread

Post by Alphaville »

woke up this morning to find the pot at room temperature. a strong sour smell coming from it. maybe a bit yeasty too. but--ah! a reddish color on parts of the surface, like a crescent shape. mold bloom? which kind? i put the pot in the fridge for later and went to browse the web for microscopes :lol:

i'll scoop out some samples and inspect later with a magnifier glass. i don't think i'll get a microscope just yet, but the mold is interesting... sure it's likely not good for eating, but it's still interesting... i'll try to read more about mold on fermented beans if i can find something.

--

eta: here's one place to start... https://www.culturesforhealth.com/learn ... ents-mold/

User avatar
Alphaville
Posts: 3611
Joined: Thu Oct 03, 2019 10:50 am
Location: Quarantined

Re: the soybean processing and culture thread

Post by Alphaville »

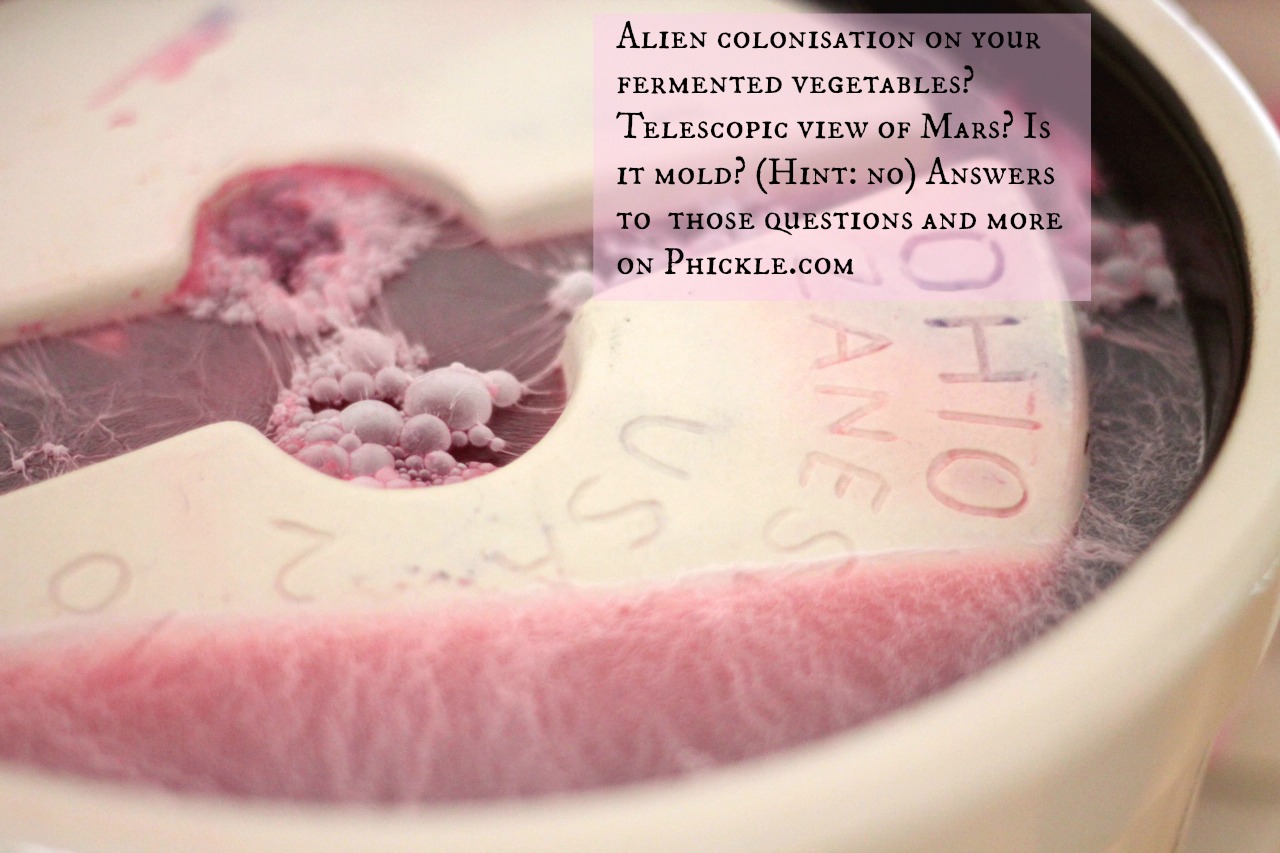
ok i don't have a microscope but it looks like the soy did develop a coating of kahm yeast. i could smell yeast anyway. upclose it looked both nasty and appetizing, like a white foam-like tissue with purplish edges. berries and cream? :lol: i might post photos later if i have the time.

🔬

so i just scooped out the whole half top of it and threw it away. then tasted from the unyeasted bottom of the pot... and... it was not bad. kind of appetizing actually, with a very tart flavor, lemony but not tongue-curdling. the soy mash had taken on a uniform structure, a bit puffy. anyway when i tasted the bottom of the pot (yeast free) my body said "more" not "blech" and so i just kept eating... about 3/4 cup?

🧫

then i stopped as a precaution and threw away the rest because once scraped off the kahm yeast sort of gets everywhere. not sure the effect this will have on my intestines. but it feels good right now in my stomach, the lemony burn. anyway, down the hatch it went and now i wait 🚽 ⚰️ :lol:


--

if i survive (hah!) i think i'll spend some time familiarizing myself with the varieties of vegan yogurt to see what is it i'm supposed to taste. then i'll have to get a hold of some natto to include additional parameters of taste spectrum.

meanwhile i'll continue with the regular programming of fermented milk...

User avatar
Alphaville
Posts: 3611
Joined: Thu Oct 03, 2019 10:50 am
Location: Quarantined

Re: the soybean processing and culture thread

Post by Alphaville »

so i survived, did great in fact, no digestive disturbance of any sort, everything a-ok.

i like it when beans ferment outside me instead of inside me :lol:

so i'll keep pursuing this vegetable fermentation line. not necessarily as "yogurt". maybe time for me to revisit sandor katz and other authors.

--

also, i really want a microscope now :(

User avatar
Alphaville
Posts: 3611
Joined: Thu Oct 03, 2019 10:50 am
Location: Quarantined

Re: the soybean processing and culture thread

Post by Alphaville »

so i just had half a container of "forager greek style plant yogurt" for breakfast.

https://www.foragerproject.com/product/ ... ek-yogurt/

the nutrition in the large can is slightly more due to size: there 2.5 portions of 10g carbs 11g fat and 8g protein each.

since i ate half a can, that would be 13g carbs 14g fat 10g protein.

the flavor was okay but a bit "empty"--a little tart but not much else. texture was sort of pudding-like, but not creamy, and a bit of a chalky finish. it's basically coconut milk and cashew milk, fortified with plant protein powder, and thickened with gum, agar, and tapioca. it has very little fiber, calcium, no vitamins... just a bit of iron. also i don't appreciate the empty starches. it was very low sugar, but starches are just chains of sugar, so... the sugar is coming,

the price of the thing as $6, or $3 per person. ok for a breakfast on the road, but not for daily consumption. for $6 i could buy a dozen very fine pastured eggs with a lot more nutrition in them--of course i'd have to cook them. but eh.

ultimately the thing wasn't really satisfying, and now it feels like my belly is stuffed with a bunch of water. halfway through eating i added 1/4 cup frozen blueberries for taste, and didn't drink anything with it.

frankly i think my fermented whole soybean was better than this, in spite of the defects. for one thing it felt good in my stomach, and it had lots of fiber instead of tapioca. but now i have a reference of what's... "desirable" in this sort of product, and can use as a benchmark to beat.

my plan for the next soy trial is to add salt and more water, which maybe will help tame the kahm yeast.

User avatar
Alphaville
Posts: 3611
Joined: Thu Oct 03, 2019 10:50 am
Location: Quarantined

Re: the soybean processing and culture thread

Post by Alphaville »

kahm yeast photos, not color balanced: first was under incandescent, second under led light. so, same product. my eyes see the color as in-between these 2 warm/cool extremes.

general view, notice the reddish "crust" on parts of the surface. edges are redder, inner parts whiter:
Image
you can see where i removed top layer with a spoon to expose the interior of the mash

up close:
Image
that is a weird structure and i want a microscope. here it looks purplish due to bluer light, and the yellow mash looks white.

eta: some cool stuff on kahm yeast:
https://escarpmentlabs.com/blogs/resour ... ferment-on
https://nationalpost.com/entertainment/ ... f-microbes
https://multicultured.org/kahm-yeast-kahm/

hahahahaha!

Image
http://phickle.com/the-wrath-of-kahm/

basuragomi
Posts: 419
Joined: Tue Oct 15, 2019 3:13 pm

Re: the soybean processing and culture thread

Post by basuragomi »

Tofu from soybeans

I made some tofu, to a) verify that calcium acetate can be used as a coagulant and b) investigate the cost-efficiency of doing so.

1) Soak and blend the soybeans. I used an immersion blender which made some scary sounds. Soybeans are hard!
Image

2) Cook the mash. This stuff sticks to everything, it's a real pain to clean.
Image

3) Strain out soy milk. I used a fine cheesecloth in a single step, but I think it would have been better to use a two-stage process (ricer then cheesecloth). Fresh soy milk is really beany, not really suitable for drinking IMO. But I don't really drink anything besides water.
Image

This is the residual pulp (okara) that I froze in soap moulds. Whether or not I ever do this again depends entirely on how edible this stuff is.
Image

4) Reheat soy milk and add coagulant. For 450g soybeans I added a total of 2,321g water included soaking and coagulant brine. I added 4.0 g of home-made calcium acetate (eggshells + vinegar, see my journal for that experiment) dissolved in 100 g of hot water. I added everything in two stages, but one recipe said to add it in four stages with stirring in between. I'm not sure if it's better to do everything at once or split it out. Soy does not curdle at all like milk and the chemical used apparently determines the curd size - so maybe many additions gives a finer-grained curd? I think adding everything at once and letting it sit would be the best way to go.
Image

Here's what the curds looked like. There's no such thing as a clean break like what you'd get with milk and rennet.

Image

5) Ladle curds into a mould. I used an old tofu tub with drain holes punched in the bottom, lined with fine cheesecloth.
Image

6) Press. I filled the top tub with water and stuck a can of beans on top for additional weight, then let it sit for half an hour, pouring out the whey several times. I would recommend using a very large cheesecloth relative to the mould, heavier weight, and longer pressing time in the future. This is the soy whey that was expelled:
Image

Apparently it can be fermented into a drink. I dried it and it ended up being about 4-5% solids by mass. It tasted pretty gross, like nutritional yeast mixed with PVA glue.

7) Cut and eat! I didn't press long or hard enough so it was fairly soft but still kept a decent edge after cutting.
Image

Ending stats:
450g soybeans
324g losses beans->soymilk (I'm assuming it's mostly water from heating and sticking)
1,424g soymilk
460g tofu out (I drank 138g of the soymilk)
1,023g pulp
286g losses soymilk->tofu (I'm assuming it's mostly water)
540g whey, ~25g dried
If pulp and tofu are the same moisture content (estimating ~70% wet basis), then about 31% of the dry bean mass was converted to tofu. The remainder reports to the pulp.

Cost-wise, this is barely cheaper than commercially-available tofu. Maybe worth it if I can get bulk soybeans. Eating soybeans straight up (like kongjabang) is way easier. If the pulp/okara is any good to eat then maybe it's worth doing. Anyone have good recipes?

User avatar
Alphaville
Posts: 3611
Joined: Thu Oct 03, 2019 10:50 am
Location: Quarantined

Re: the soybean processing and culture thread

Post by Alphaville »

basuragomi wrote:
Sun May 30, 2021 1:44 pm
wow!!!

applause, applause...

white belt
Posts: 1457
Joined: Sat May 21, 2011 12:15 am

Re: the soybean processing and culture thread

Post by white belt »

basuragomi wrote:
Sun May 30, 2021 1:44 pm
Cost-wise, this is barely cheaper than commercially-available tofu. Maybe worth it if I can get bulk soybeans. Eating soybeans straight up (like kongjabang) is way easier. If the pulp/okara is any good to eat then maybe it's worth doing. Anyone have good recipes?
You can use the pulp/okara to make tempeh. It’s apparently how fermentation for tempeh originated and is covered towards the end of this video: https://m.youtube.com/watch?v=OxG_S0Q-bAg

I think tempeh may be an ideal option as a meat substitute due to the combination of DIY processing ease, somewhat similar form factor to meat, and the fact that the fermentation makes it more digestible so it’s easier to eat in large quantities.

I’m attempting a roasted soybean recipe so I’ll report the results tomorrow. The advantage of roasting soybeans is they can be stored at room temperature for awhile (1-2 weeks at least but could do longer if you roast them longer). I also like the crunchy nut form factor because it’s easy to add to salads, rice, or a variety of other dishes without the need to make a soup/stew.

Down the line I plan on trying to make tempeh. The video linked above shows a few different methods. I like that it can be made in large quantities and frozen for future use. It seem like less work than making tofu because you just need to cook the beans and then put them in container with mycelium to make the tempeh. Of course the tempeh will then have to be cooked again when it is consumed.

Tempeh recipes: https://youtu.be/C83M_i_oOXQ

User avatar
Alphaville
Posts: 3611
Joined: Thu Oct 03, 2019 10:50 am
Location: Quarantined

Re: the soybean processing and culture thread

Post by Alphaville »

🤯

is that all it takes? wow!
white belt wrote:
Sun May 30, 2021 4:11 pm
I think tempeh may be an ideal option as a meat substitute due to the combination of DIY processing ease, somewhat similar form factor to meat, and the fact that the fermentation makes it more digestible so it’s easier to eat in large quantities.
yup, it's the tastiest soy product there is.

we don't get banana leaves here, but corn husks for tamales are everywhere--same difference.

o man... tempeh tamales! that'd be insane!

me operating how i do i'd just make one large brick though. why add labor.

white belt
Posts: 1457
Joined: Sat May 21, 2011 12:15 am

Re: the soybean processing and culture thread

Post by white belt »

My roasted soybean recipe was a success. I followed a combination of Youtube videos but the basic process went like this:

1. Soak soybeans for 12-24 hours
2. Strain, rinse, and pat dry soybeans to remove excess water
3. Mix soybeans in bowl with seasoning of choice (I just used Frank's Hot Sauce, but you can literally use anything you want)
4. Spread soybeans in single layer onto baking sheet
5. Bake at 350 degrees for 30 minutes, taking the soybeans out every 10 minutes or so to mix them up
6. Remove from oven and let cool

They seemed adequately roasted to me after 30 min, but feel free to keep them in the oven longer if you want to remove even more moisture and/or be able to keep them longer unrefrigerated. One Youtube video recommended up to 1-1.5 hours in the oven if you want to take them backpacking.

The flavor and texture is very similar to peanuts IMO, so you can really use any kind of seasoning you normally like on nuts or snacks.

Up next I'll be trying to locate some Tempeh to follow a vegan taco recipe (stores I checked were sold out today).

white belt
Posts: 1457
Joined: Sat May 21, 2011 12:15 am

Re: the soybean processing and culture thread

Post by white belt »

I bought some Lightlife brand Tempeh from the store. $5-6 a lb makes it more expensive than ground beef but I wanted to taste it before attempting to make my own. I used a packet of taco seasoning that’s been in my cupboard forever and fried it up like I would with ground beef or turkey. The texture is quite similar and flavor is a bit more bland, but I didn’t notice any bitter flavor just some subtle nuttiness. I think it’s perfectly usable as a meat substitute in dishes that have lots of other ingredients (e.g. I think in tacos most people would say it tastes similar to ground beef/turkey).

The next step is to purchase some tempeh starter and make my own. The 7lb soybean bag I bought from Amazon came out to $2.50 a lb, but I can get it down to $2.15 a pound of I buy a 20lb bag from Amazon. If I can source source bulk soybeans locally then I’m sure I could get it even cheaper than $2 a lb.

Edit: What I can’t figure it is why the nutrition of the Lightlife Brand Tempeh has half of the fat per serving (5 grams vs 10 grams) that tempeh normally has. The ingredients list soybeans and brown rice, but the carbs are low enough that there isn’t enough added to make a significant different on protein or fat. There must be some processing they do to reduce the fat in the soybeans. I think it might be from dehulling?

white belt
Posts: 1457
Joined: Sat May 21, 2011 12:15 am

Re: the soybean processing and culture thread

Post by white belt »

I found bulk soybeans at my local hippie grocery store for $2 a lb. I guess Whole Foods is too corporate now since they don't even do the bring your own container to fill up on bulk grains/nuts/seeds here. Running the numbers, 1lb of raw soybeans (160g of protein) makes roughly 2lbs of finished tempeh, so cost per gram of protein comes out to about $.01. That compares to store bought tempeh at $5 a lb which comes out to $.05 per gram of protein, roughly the same as 93/7 ground meat that is listed at $5 a lb.

For reference, the whey protein powder I bought from Bulk Supplements comes in at $.02 per gram of protein, the casein powder also comes in around the same at $.02. Homemade greek yogurt made from a $3 gallon of milk comes out to about $.03 per gram of protein and large eggs at $3 a dozen come out to $.04 per gram of protein.

User avatar
Alphaville
Posts: 3611
Joined: Thu Oct 03, 2019 10:50 am
Location: Quarantined

Re: the soybean processing and culture thread

Post by Alphaville »

white belt wrote:
Thu Jun 03, 2021 8:23 pm
I found bulk soybeans at my local hippie grocery store for $2 a lb. I guess Whole Foods is too corporate now since they don't even do the bring your own container to fill up on bulk grains/nuts/seeds here.
brilliant. next thing ask about bulk shopping for the 25lb bags they use to fill the bins--there should be a further discount.

my whole food has bins too, they just don't carry soybeans.

white belt
Posts: 1457
Joined: Sat May 21, 2011 12:15 am

Re: the soybean processing and culture thread

Post by white belt »

Alphaville wrote:
Thu Jun 03, 2021 9:19 pm
brilliant. next thing ask about bulk shopping for the 25lb bags they use to fill the bins--there should be a further discount.

my whole food has bins too, they just don't carry soybeans.
Ok I will have to give that a try. For now I'm still working through my current 7lb bag and refining my process.

To clarify, I found the soybeans at MOM's Organic Market which is a Whole Foods competitor on the east coast. I'll probably go there for bulk steel cut oats as well since they had good prices on those. I forgot to check their rice prices.

User avatar
Alphaville
Posts: 3611
Joined: Thu Oct 03, 2019 10:50 am
Location: Quarantined

Re: the soybean processing and culture thread

Post by Alphaville »

yah i shopped at moms a few times in maryland, and i think i recall they had case discounts--maybe i misremember. im more of a food co-op person, so, real hippie lol. but yeah, moms was a nice medium size shop with good deals, really nicely kept, well run, just not near where i lived.

white belt
Posts: 1457
Joined: Sat May 21, 2011 12:15 am

Re: the soybean processing and culture thread

Post by white belt »

First attempt at making homemade tempeh was not successful.

I followed these instructions: https://veganlovlie.com/how-to-make-tempeh-easy-method/

I have an instapot so I cooked the soybeans in a pressure cooker. After cooking, I drained the water and dumped the beans on some paper towel to cool and absorb extra moisture. The instructions recommend heating the beans on low to evaporate the excess moisture, but I figured the paper towels would do the trick.

I mixed everything together and put it in 2 quart sized plastic bags like the instructions said. It did seem like the rhizopus was spreading across the beans on the first day, but after a few days I noticed some dark wet spots on the beans and excess moisture in the bag. I assumed that was just a natural result of the mycelium fermenting the beans, so I allowed it to continue to ferment for a few more days. Today I checked the bags and noticed small fruit flies had somehow gotten into the bag through the tiny holes I had poked for air. The bags were also starting to smell, so at that point I decided to chalk things up as a loss and try again.

So from this I have come to 2 conclusions:

1. It is critical to evaporate the excess moisture from the cooked beans prior to adding the rhizopus to start the fermentation. I think the excess moisture might have led to some other types of mold taking hold and the smell that attracted the flies. Next time I will turn my instapot to the saute function after draining the water from the cooked beans.

2. To mitigate the insect problem, I think I might opt for mason jars with screened lids, which should allow air in for the rhizopus without allowing any insects in. I also know from growing mushrooms that one can speed the colonization process by knocking the contents around a few times a day, because this allows the mycelium to spread over the entire substrate faster. So I theorize that this should work for tempeh as well. In fact, since rhizopus is mycelium, all of the same mushroom growing rules should apply. I do wonder if sterilization is necessary since it isn't mentioned in the tempeh instructions I've found anywhere but is essential for growing other forms of mushrooms. Traditionally, tempeh was grown in banana leafs in a tropical environment, so I theorize that the rhizopus mold colonizes soybeans faster than anything else can which would explain why sterilization isn't necessary.

white belt
Posts: 1457
Joined: Sat May 21, 2011 12:15 am

Re: the soybean processing and culture thread

Post by white belt »

I have finally achieved success on the 4th attempt at making homemade tempeh. My first few times were all giving me the same issue; the tempeh would turn gray/black right away when it's supposed to remain white for at least the first 24-48 hours. I finally tried some different tempeh starter, this time from an Indonesian company called Raprima, and on the first attempt it was a huge success. So I guess the issue was the starter after all.

Here is a pic of the tempeh after 24 hours of fermentation (the dark spots are actually just the air holes poked in the bag):
Image

I would like a bit more fuzziness, so I'm experimenting with letting one of the bags ferment for another 12 hours. The first bag I fried up with some seasoning and will be using it as ground beef replacement in my lunches this week. I will report back with how the fermentation develops on the 2nd bag.

Here are some lessons I've learned since my first post:

-Evaporating excess moisture is indeed critical to getting the tempeh starter to take hold before other molds, but it is a bit of an art form because the starter still needs some moisture, so you don't want to completely dry out the beans. The saute function on my instapot and constant stirring has worked well for this (I first pressure cook the beans, then strain the water out, then put the beans back in the instapot to saute).

-Temperature is important but use common sense. Most articles will say that the soybeans should be kept at 95 degrees in order for the starter to take hold. It's summer time here so I just used a food thermometer and added the starter when the beans cooled to 100 degrees. I stuck it in the warmest area of my house and had no fermentation issues. Obviously in the winter time I might need to use a heating pad for the first 12 hours or so. Tempeh is native to Java, so it grows best in tropical temperatures.

-Almost every article other than the recipe I followed says that you need to dehull the soybeans first in order for the tempeh to take hold. This is simply not true. First off, many of the beans will naturally dehull during the cooking process anyway. Second, clearly my example (along with the author's) shows that the mycelium will grow on the beans regardless of hulls. Dehulling just adds another unnecessary labor intensive step.


At some point in the future I will try to make my own starter by letting the tempeh ferment until it spores, then pulverizing that and using the dust for starter. I don't plan on doing that for at least a few months since I'm still getting the hang of things and have a bag of starter that will probably last me a year, but it's something to aspire to so I can have a closed loop system. I'd also like to try using something more re-usable than plastic bags, but for now that's what I have. I'm thinking a pyrex container with small holes drilled in the lid would do the trick.

Post Reply