Fixit Log

Fixing and making things, what tools to get and what skills to learn, ...
User avatar
Sclass
Posts: 2808
Joined: Tue Jul 10, 2012 5:15 pm
Location: Orange County, CA

Re: Fixit Log

Post by Sclass »

Free brakes.

Another Autozone Duralast free brake replacement for my Accord. These were really worn down. Almost no wear groove left on the pad. Kept the mechanic out of my pocket. The pads were $45 but you get your money back when you bring in the old ones. It’s a sales gimmick that I’m going to milk as long as I can.

Brake pad swap on an 8th Gen Accord takes 15 minutes a side. Remove two caliper bolts after removing the wheel. The hardest part is resetting the piston which needs to be screwed back into the caliper.

Image

Brake tool for the piston reset. You can buy one or free rent it from Autozone.

Cheap style.
Image

Rental style. Free at Autozone.
Image

jacob
Site Admin
Posts: 16001
Joined: Fri Jun 28, 2013 8:38 pm
Location: USA, Zone 5b, Koppen Dfa, Elev. 620ft, Walkscore 77
Contact:

Re: Fixit Log

Post by jacob »

jacob wrote:
Sat Dec 02, 2023 3:13 pm
I replaced the home button switch on an old iPhone5. Cost $5 on eBay. No pictures, but this is what happened:
https://www.ifixit.com/Guide/iPhone+5+H ... ment/10594
Rebooting the phone after 1+ year of not using it caused the battery to inflate and slowly begin bulging up the screen. This is very bad (possible fire hazard) I replaced it using https://www.ifixit.com/Guide/How+to+rep ... tery/10587 and $6 for an OEM battery eBay. Crazy how little this costs.

Notable here was using substantially more than "a few drops of isopropyl" to loosen the glued in battery. It looked like strips of hotglue. Also, I skipped the "remove the top"-section, which is just a safety precaution for the apes who plan to rip the battery out with physics rather than convincing it to let go with chemistry.

About $11 later, I'm not sure reviving this old phone was worthwhile it in a functional sense. However, it was good tuition money in terms of fixing micro-electronics, which I've never really done before(*) this (free to me) phone. In case anyone [in the US] can use it for something and wants the phone, see the forum swap.

(*) Well, technically, not done for ~30+ years and back then micro was substantially less micro than today.

Add: Lessons learned? I'd say it's useful to have a few more items on hand than what's usually included in the toolset included with such DIY repairs. Handy was a 4x loupe, a bright LED light (free from the local power company, don't ask), a plastic syringe (no needle) to dispense the 90%+ alcohol, a bottle of 90% alcohol, and an electronics repair kit for the J000 driver bit and a couple of extra pry bars. All this was already at hand, so no kingdom was lost for the want of a nail.
Add2: The J000 from my kit solved what the PH000 could not. OTOH, the pentalobe from my kit is apparently different from what Apple is using because it didn't work(!!)

User avatar
Sclass
Posts: 2808
Joined: Tue Jul 10, 2012 5:15 pm
Location: Orange County, CA

Re: Fixit Log

Post by Sclass »

Good job. I like tweezers to place the tiny screws. Some of the iPhone screws are really short and need to be positioned with tweezers. Just use your watchmaker stuff. And I really like using those magnetic cards left by door to door vendors. They keep the parts tidy in the orientations they came out of the phone.

My big question with phone repair is when will my clunky old iPhone 6/SE no longer work. My pal at Apple says the new phones are much harder to service.

ducknald_don
Posts: 329
Joined: Thu Dec 17, 2020 12:31 pm
Location: Oxford, UK

Re: Fixit Log

Post by ducknald_don »

Sclass wrote:
Sun Dec 10, 2023 10:18 pm
My pal at Apple says the new phones are much harder to service.
They seem to have reversed that trend with the last couple of models:

https://www.ifixit.com/News/64865/iphone-14-teardown

User avatar
Sclass
Posts: 2808
Joined: Tue Jul 10, 2012 5:15 pm
Location: Orange County, CA

Re: Fixit Log

Post by Sclass »

That’s cool. I’ll just haveto wait a few years for the price to come down.

loutfard
Posts: 381
Joined: Fri Jan 13, 2023 6:14 pm

Re: Fixit Log

Post by loutfard »

ducknald_don wrote:
Mon Dec 11, 2023 3:49 am
They seem to have reversed that trend with the last couple of models:

https://www.ifixit.com/News/64865/iphone-14-teardown
Indeed, they _seem_ to have made repairs easier, while the reality is they made them harder. For blessed-by-Apple dealers only, a new hardware design makes physical part replacement easier. For anyone else, they made repairs neigh impossible. Apple now enforces pairing of replacement parts at the software level, against a central database. Quite the anti-feature. See https://ifixit.com/News/82493/we-are-re ... y-score-en .

I try to use things at least somewhat in line with the ERE-as-renaissance ideals. A recent iPhone is about as far as it gets from that. If I really wanted a smartphone, I'd probably get a lightly used Fairphone and flash LineageOS to it. Repairable hardware running maintainable software.

User avatar
Sclass
Posts: 2808
Joined: Tue Jul 10, 2012 5:15 pm
Location: Orange County, CA

Re: Fixit Log

Post by Sclass »

That sucks.

It’s a great business model but it’s hell on fixit and BIFL.

I get it, you cannot build a networked society on old or mixed vintage gear.

But more and more vendors are capturing my business with digital shackles.

loutfard
Posts: 381
Joined: Fri Jan 13, 2023 6:14 pm

Re: Fixit Log

Post by loutfard »

Sclass wrote:
Mon Dec 11, 2023 10:10 am
I get it, you cannot build a networked society on old or mixed vintage gear.
With all due respect for the wonderful making and fixing skills you've shown here time and again, I not just beg to differ. I'd say the opposite is true. A networked society could not have sprung up without mixed vintage gear. Mixed vintage is also a necessary condition for network resilience.

The tech oligopoly is very powerful, as evidenced by its size and profit margins. It's also extremely fragile in so many ways.

ducknald_don
Posts: 329
Joined: Thu Dec 17, 2020 12:31 pm
Location: Oxford, UK

Re: Fixit Log

Post by ducknald_don »

I have mixed feelings on it. This stuff is so reliable compared to what we had thirty or forty years ago it feels like the ability to repair is not that important anymore. Other than broken cables and a dodgy headphone jack I don't think I've ever had a mobile phone fail.

The main thing that forces me to change devices is phones going out of software support. I wish they would commit to a longer period of security updates.

User avatar
Sclass
Posts: 2808
Joined: Tue Jul 10, 2012 5:15 pm
Location: Orange County, CA

Re: Fixit Log

Post by Sclass »

Fixed my Waterpik!

Got a Christmas fix. I clean my teeth with one of these water flossers after every meal. Today my eight year old unit just wouldn’t pump. It turned on so I figured it was a bad seal. We have chloramine in our tap water and it trashes o-rings.

I whipped out my phone an almost hit buy it now on Amazon but the $80 stopped me dead in my tracks. I took the Waterpik down to the garage and here is what I found.

I got access to the pump and motor with four screws on the bottom. Inside there is a check valve (duh, it’s a pump) with three screw holding it down.

Image

I pulled the top off the valve and pulled the pintle and I found one a hair that had fallen into the reservoir and likely got sucked in and jammed the valve. Last thing I’d have thought of considering I’m bald. Must be a straggler. Pulled it out and put it all back together.

Image

It didn’t work so I took it apart again. I messed up the power switch which is this wacky rack and pinion under the rocker - likely to keep the user from getting electrocuted. Then I had to do it again because I got the check valve installed upside down. But that was about 20 minutes of tinkering.

All done and functional.

Image

Now I can afford some Christmas cheer. Merry Christmas ERE fixers!

User avatar
Sclass
Posts: 2808
Joined: Tue Jul 10, 2012 5:15 pm
Location: Orange County, CA

Re: Fixit Log

Post by Sclass »

Cleared kitchen drain. Saved a few dollars cleaning out my kitchen drain.

Here is my usual progression. I use those little drain screens so I rarely get backed up drains. But it has been several years of washing dishes (machine) and cooking. Finally the drain got slow. I tried using a force cup and like usual the problem got worse. Likely I knocked loose deposits from the pipe walls into the last passage down the pipe. It was now completely sealed.

Got out the hand drain snake. $12 at harbor freight tools. This thing is a money saver. It’ll keep the plumber out of your pocket. Out in my area drain snaking service costs $200. This cheap tool has paid for itself over and over.

Image

Some tips. I use one with the little metal shaft on the back that can be connected to a power drill. Most of the time it annoys me by rapping my knuckles as I hand crank. Today after cranking five minutes I whipped out my cordless drill and boom - power snake. I also grind a sharp point on the tip of the auger with a file.

I snaked 30 minutes to get through this stubborn clog. It was likely grease and soap but it was so solid I needed to advance my snake 1” at a time between lots of patient spinning. That’s the trick with these tiny augers. You need to go slow when you need to go slow. You can advance fast when they’re is no resistance.

I used to watch the old pros do it at my mom’s place as a kid. They had these huge 1/2” and 3/4” snakes. They would be quite sensitive to the arc in the snake and the seizing and slapping of the snake as it spins. This tells them to stop advancing and just drill the blockage. No sense fighting it. Patience. Once it breaks through the snake drags itself forward with its spiral construction.

So I basically did the same today. I hit the clog. It was only 10’ in. But it was stubborn. The flimsy 1/4” snake started twisting and slapping. I back off. Spin. Advance 1-2” then spin. Go slow. Don’t let too much snake hang out of the pipe or it whips and snares you. The drill makes this easy. I must have spun that thing a thousand revolutions.

Final tip. This tool is well used. My FIL taught me to unwind it on the lawn. Wash it with the hose. Then oil it up to keep it from rusting. I used recovered motor oil. I also took two pairs of pliers and straightened the various kinks I put in the spring over the years. I almost bought a new one since this one had already paid off but it looks good again.

Good for clogged roof gutter spouts, short runs of plumbing drain.

I was initially disappointed that the drain got clogged but I realized I’ve lived here 8 years and nothing happened. I think this is what eventually occurs after a long period of time without periodic clogs and visits by a plumber. We use these screens and it really stretches out the service interval. Another great investment.

Image

User avatar
Sclass
Posts: 2808
Joined: Tue Jul 10, 2012 5:15 pm
Location: Orange County, CA

Re: Fixit Log

Post by Sclass »

Nailed two fixes this morning. My garage door broke a hinge last night. Looks like it fatigued after many cycles. Home Depot $5. Fixed.

At the same time I turned on my sink faucet and my feet got wet. p trap extension rotted out. I touched it and my finger just punched through the copper pipe. I replaced it with a $4 drain extension from Home Depot. Same trip. It didn’t have the threaded end like the (more expensive) metal tubes so I just fitted the butt joint together after sawing it to length and I sealed it with silicone self fusing tape. Love this stuff. I keep it in the trunk of my cars. It has saved me on the side of the road once - I sealed up a pinhole leak on a low pressure diesel fuel line. This drain is low pressure so I figure it’ll make a good fix. All I need is the water to stay in the drain pipe and off my feet.

Once again kept the plumber and garage door man out of my pocket. Now I’ll go splurge on desi pizza and iced chai.

Image

Image

Image

Image

loutfard
Posts: 381
Joined: Fri Jan 13, 2023 6:14 pm

Re: Fixit Log

Post by loutfard »

@Sclass, do keep these posts going. Much appreciated!

AxelHeyst
Posts: 2170
Joined: Thu Jan 09, 2020 4:55 pm
Contact:

Re: Fixit Log

Post by AxelHeyst »

Yesterday I noticed my panels were only putting out about 60w under conditions that they should be putting out 200w. I checked a few things and decided the problem probably was indeed the panels. Maybe a diode blew. With only a couple hours of sun left I opted to:
.Grab two spare 20yo 120w panels salvaged from a neighbor,
.Root around in my spare parts bin to find a couple spare MC4 connectors and a coil of 12-2 romex,
.Wire up the two panels in series, lean them against serenity, and patch them in to my system.
.I'm now cranking away at 200w. I'll check out the old panels later when things aren't covered in ice.

User avatar
Sclass
Posts: 2808
Joined: Tue Jul 10, 2012 5:15 pm
Location: Orange County, CA

Re: Fixit Log

Post by Sclass »

fixed my dustbuster. We own several of these dustbusters. My wife dropped this one off to me today with the nose broken off. It has these two release buttons on the snout that release the tip for cleaning. They had broken. Fatigued I guess. They are complex molded plastic forms but I had a feeling I could replicate their function with a 3D print.

Image

Tear it down. Remove the broken buttons. I managed to glue one back together since my wife found one of the broken shards. I put it together just to see what I was dealing with. The glue likely isn't strong enough for a functional repair.

Image

Image

Image

This is an older vac but I've upgraded the batteries to good 18650 Li Ion cells. It really screams now. More reason not to discard it. I looked around for replacement buttons. Sometimes you can find them on ebay or amazon or even 3d models on thingiverse. No luck. Amazon had the entire snout which sold for $45. A new equivalent dustbuster with good batteries will run me over $75. Time to get to work. I don't like spending money.

An hour later I designed these. They don't look the same but functionally they are the same. A lot of the support ribs in the original were specifically to reinforce a thin injection molded part. Since I was just making one offs I could vary on the shapes a bit. Design one and hit "mirror" to get the other. Hit print and presto - new parts for $0.20 of filament. Still had red loaded from the last project. Whatever. We aren't trying to win beauty contests. Nice thing is I'll have the models so I can print replacements if it ever breaks again. I'll also be ready when my other two dustbusters break.

Image

Print them out and install.

Image

Done. Seems like a legit fix. Strong. The buttons aren't as slick as the originals but as long as they hold the thing together I'm good. Almost hit that Buy it Now button on Amazon to replace the vacuum. Ahhh, kept them out of my pocket again. Time to wander out for a taco.

Image

loutfard
Posts: 381
Joined: Fri Jan 13, 2023 6:14 pm

Re: Fixit Log

Post by loutfard »

Do you happen to use a free/open source 3d design program for these 3d designs? FreeCAD perhaps?

ffj
Posts: 387
Joined: Thu Feb 04, 2021 8:57 pm

Re: Fixit Log

Post by ffj »

I left my push mower out in the woods for two months and would you believe it wouldn't start? Ha

I unhooked the gas tank, removed the spark plug, and took the carburetor bowl off all of which I drained and dried. Put it all back together, fresh gas and it fired right up. These mowers don't like being left out in the rain.

User avatar
Sclass
Posts: 2808
Joined: Tue Jul 10, 2012 5:15 pm
Location: Orange County, CA

Re: Fixit Log

Post by Sclass »

loutfard wrote:
Thu Jan 25, 2024 4:44 am
Do you happen to use a free/open source 3d design program for these 3d designs? FreeCAD perhaps?
Hi,

I primarily use Tinkercad. It’s free and super easy to learn. It’s made for kids. It is good enough to make things that just get by. The beauty is the ease of use and all the YouTube videos. For a lot of these fixes I can produce parts that are good enough for a fix. They wouldn’t fly under professional level scrutiny but they’ll hold our old vacuum together just fine.

I’ve been playing with FreeCAD and I’ve done a couple of projects like the Swiss Army Knife handles and the HP emblem that I’ve posted to this forum. It is more flexible but with that extra capability comes learning curve. There are YouTube videos but it’s a lot more to take in than Tinkercad.

@ffj good to know. I have three mowers now. I put two in my garden shed but my third is outside. I was hoping things were sealed up well enough but I’ll remember to clean up the connections if it doesn’t start in a few pulls. The ugly red one with the welded deck shown in this thread is my beater mower I use to shred leaves and mow over rocks. I finally got it running well again after it was nearly headed for the dumpster. These things are solid gold out here in CA since small gas engines have been outlawed by the government. Only battery power from here on out. I’ll be maintaining and rebuilding my fleet of gas garden tools a long time.

ETA - I’ve gotten around a lot of seasonal carb Cleanout’s by using a fuel valve on my mowers, power washer and tiller. I cannot believe how some manufacturers didn’t include an inline valve on their yard power products.

User avatar
Sclass
Posts: 2808
Joined: Tue Jul 10, 2012 5:15 pm
Location: Orange County, CA

Re: Fixit Log

Post by Sclass »

Another brake job. I do this pretty often. These front pads lasted me 25,000 miles. I last replaced them five years ago. I live up this nasty >10% climb that eats brakes. Good thing I get free brakes and brake service. I took a few more photos documenting the steps for those who are interested in trying it out. This is a basic job that took me about fifty minutes including cleanup. I have some special tools that really speed things up that I’ll go over.

It’s a real money saver because pros really like to use brake work to over repair and charge naive customers. It’s a safety thing so people get really frightened into opening their wallet. I’ve been doing this for forty years on my vehicles. I rarely replace rotors, cylinders, lines etc. and only do pads. I don’t resurface. The car does that for you. Brakes are a scam. So with free lifetime brakes with Autozone and some cheap tools you can really save a bundle on the common maintenance item of pads which fall right behind tires, oil and batteries in order of routine car maintenance.

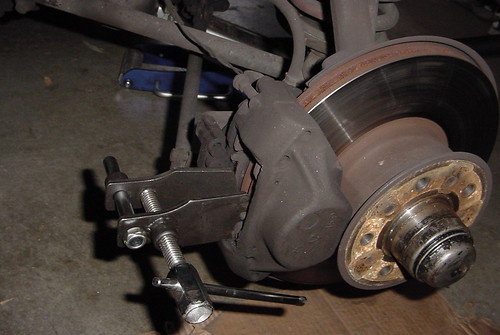
Get the car lifted on a Jack with proper safety stands. I play it safe. Wheels chocked with real wheel chocks. I’ve lasted decades under cars. I have an early memory of a car falling on a neighbor. I wasn’t there but my friend found his two legs hanging out from under the car. He was dead. Use stands. Three points or more of support.

Note the expensive impact wrench. Not necessary but it really speeds things up. I’ve gotten away with hand wrenches for years but I’ve recently migrated over to brushless dc impact drivers. Expensive but fast. Less upper body exercise though.
Image

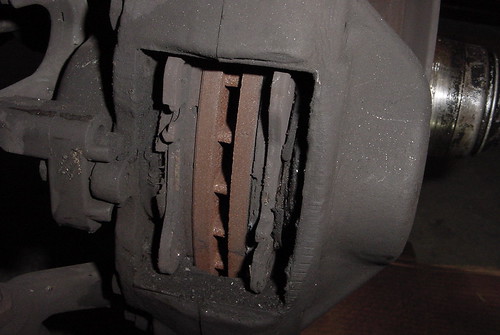
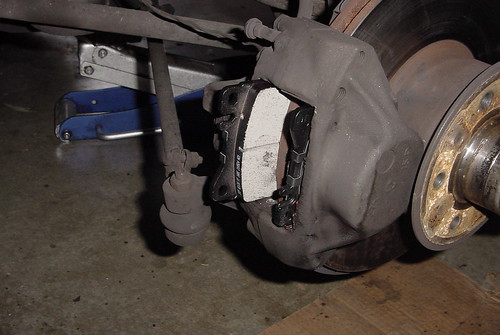
Well used pads. The rusty rotor is in the middle. Perfectly good for reuse. The friction material is the next layer. It’s 50% gone. AutoZone duralast pads have a lifetime warranty. I’ve discussed it here before. Free pads.

Image

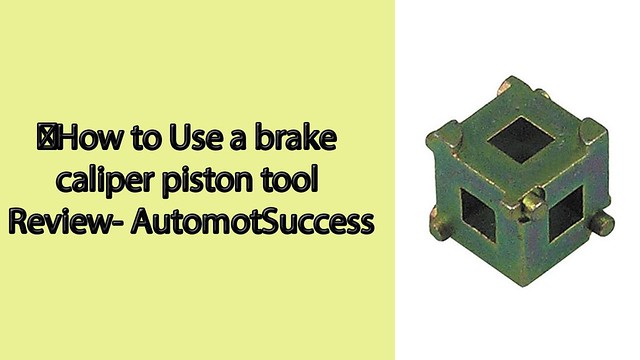
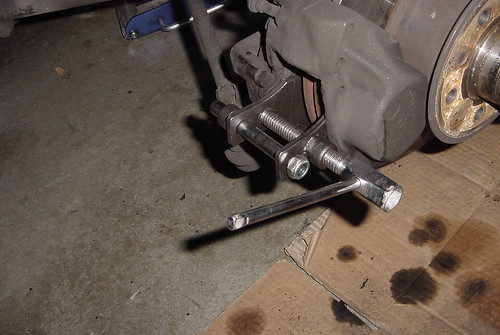
Caliper spreader. This $12 tool is a big speed up tool. It quickly and efficiently pushes the hydraulic pistons back into the caliper. For years I’ve done it with C clamps and levers but that takes 10x as much time. This tool makes the 50 minute brake job possible. It quickly performs the toughest part of changing disc brake pads. Once the gap is spread open you just pull out the pads effortlessly. If you’re going to do this buy some kind of purpose built spreader. This particular one works well on Mercedes cars. Turns a job that usually takes several minutes into several seconds.

Image

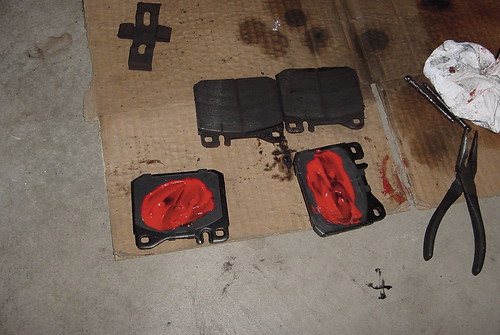
Brakes out. Obligatory before and after shot. Old vs. new (free) pads. Wow. I waited too long. I really got my money’s worth out of the old ones. Wait, all of them were free.

Image

Ok, pads out. Time to spread the pistons out a little more. Remember the new ones are much thicker than the worn out ones. I need more room. Just screw out the tool a few turns and bam, plenty of room. I used to do this with levers and c clamps as I said. Dumb. Use the $12 tool and get it done in seconds.

Image

Prep your pads with anti resonance goo. Oddly I bought this bottle of CRC brake goop in 1985. I’ve used half the bottle. It’s still good. Keeps the brakes from squealing. Unbelievable BIFL bottle bought when I was in high school. I cannot even count how many brake pad swaps I’ve done since then. I grease the pins too. Big tubs of grease also seem to last forever too.

Image

Effortlessly slip in new pads. Like shelving books. Now that the pistons are spread wide open I can literally drop the pads in. The spreader tool. Use the tool. Cheap at Aliexpress. Disk brake piston spreader. Saves time.

Image

Retainer pins back in. Looks great. Mercedes designed an easy to service caliper. Pins poke out with a punch (or an old nail). Tap them back in with a small hammer.

Image

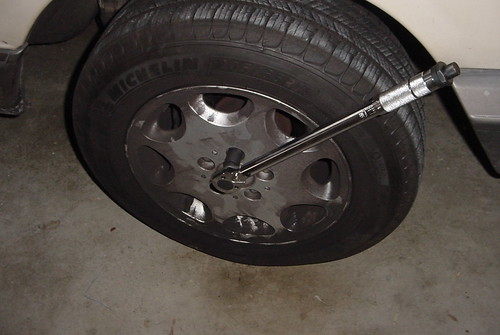
Put the wheel back on. You can use a fancy ($11) torque wrench or a tire wrench. I like the fancy wrench because the precise torque makes removing the wheel more predictable next time with my electric impact driver.

Image

Done deal. Now I just have to stop at Autozone and turn in the old pads for my 100% refund. I’ll blow it all at the Falafel truck.

I have finally hit the point financially where I can easily pay somebody to do this. However I won’t get any satisfaction from that. I hate sitting around waiting for the car. Arranging a drop off. Then getting over repaired when I know I just need pads. Pros will waste more than 50 minutes of my time. So I DIY.

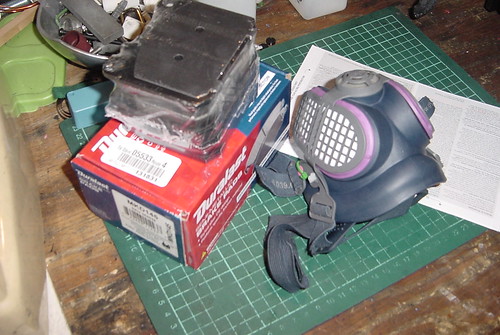
Almost forgot to mention. Buy and wear a good respirator. You don’t want brake dust in your lungs.
Image

thef0x
Posts: 84
Joined: Mon Jan 29, 2024 2:46 am

Re: Fixit Log

Post by thef0x »

Another day, another repair.

Finally got around to fixing my 2006 Honda Civic's slightly torn off front bumper, damaged before my purchase.

The problem:

Image

When I was really little, I'd sneak into my parents stereo equipment, take everything apart, and reorganize the cables back together again.

Parents were unhappy as a preteen, after coding camp, when I was able to format and install slackware linux on our 90s windows PC. Hey, I was able to install linux as a little kid!

I remember opening up my classic xbox and doing my first solder, connecting a wire between pins so I was able to root the device. I also installed linux on it? Gentoo no less and then the first and CLASSIC XBMC software. I configured it on my home network so I could use it as a streaming box. I don't think I was 13 yet.

The europhia of opening up something you own, changing it, and putting it back together. I love it.

Opening up this civic was no exception. I immediately understood a lot more about combustion engine cars.

Image

This fix was easy enough, just reassemble after fixing a missing screw!

Image

I should probably install linux on this civic somehow!!

Post Reply