
Hi,
I just installed a vanity with a sink that sits in the top from Home Depot. The box said it required this silicone calk to hold the sink to the wood cabinet.
Can anyone give me an indication of how strong this is? I was worried there were no screws or clips to hold the sink down. I was afraid my mother may knock the sink off while she leans on it for support. I lag bolted the cabinet to the wall. She broke her wall mounted sink off the wall this way. Luckily it was dangling and didn't smash her feet. I'm mostly worried about the glue joint coming loose.
I bought the caulk tube in the display right next to the sink. There was a faucet there too. It was all in an arms radius for noobs like me. It was clear GE silicone. I was thinking I needed something stronger like Liquid Nails but the sign at the store said this was the required cement.
I told the plumber I wanted this:
http://www.homedepot.com/p/Glacier-Bay- ... /203921947
The plumbing guy said $1200. Sounded a little steep for $200 in parts and what looked like half an hour of work. When I said I'd think about it he charged me $75 for coming out.
It took about 1 hour to put in plus half an hour cleanup.
Bathroom silicone strength?
Re: Bathroom silicone strength?
Hey thanks. Yeah, the valves were intact, so was the drain. I got it together fast without a drip. Lucky I guess. I've had trouble with leaky traps before.ffj wrote:
Holy shit, $1,200 to install a 19 inch vanity? With the drain and hook-ups already in place? I don't think I would have the balls to quote a price like that.
Glue is such a good idea. Screws rust out. It was fast to squirt on too.
The plumber was really confident with the quote. He didn't seem one bit scared I'd find another quote. He made me wait a day to come over so I suspect he has plenty of business.

Re: Bathroom silicone strength?
We use the exact same vanity/sink combo in all of our apartments. The vanity supports the sink without trouble. The only problem I've seen is when kids hang on the door to push themselves up to the sink.
If you haven't done it yet, be sure to affix your mother's stove to the wall with an anti-tip device. That is, if she has a stand-alone oven with stove top. We've had issues with boiling pots on the stove and someone leaning on an open oven door.
http://www.homedepot.com/p/GE-Range-Ant ... /205871400
Re: Bathroom silicone strength?
Hey Ego,
I should have guessed. That thing is really inexpensive and still functional. I'm starting to see this pattern with the home improvement types I interact with. They never want to repair. They just want to rip out and replace with some imported assembly from Home Depot. I guess it's more efficient this way. More pay for less work.
This time I'm not complaining. I got a new sink installed in three hours if you include shopping.
Mom doesn't have access to the kitchen. Too much danger here.
Very Exciting Discovery! Re: Bathroom silicone strength?
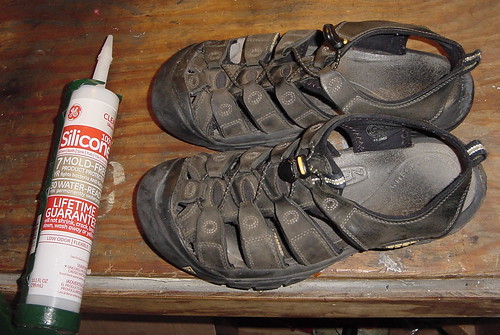
Hey, I had some Silicone left over from this project and I used it to repair my shoes. I only used 1/4 of the tube to mount the sink so I've been finding all kinds of stuff to repair with this silicone. It is very flexible, very sticky. I think this is why it works so well for shoe repair. I'd used Shoe Goo in the past and although it was very strong, it would lose its flexibility and crack.
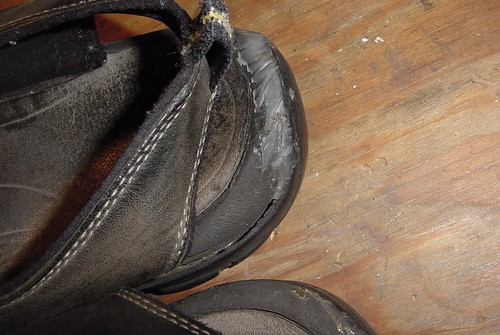
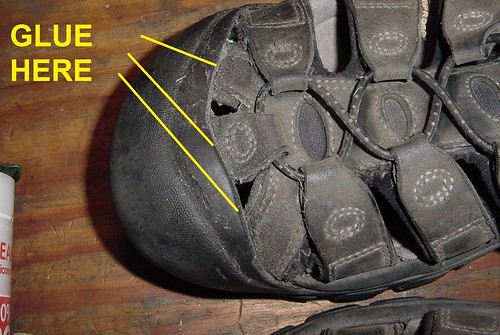
This silicone stays flexible. I bonded the leather straps back to the toe piece on my sandals. I filled in a void in the sole. And I reattached the sole that was separating into two pieces. The trick to getting a good bond is getting the rubber and leather clean. This isn't as hard as it sounds.
Here's my trick. I butter on the silicone on to the two surfaces to be bonded. Then I smear it all around with a plastic knife, preferably a free one. Keep rolling the glue over the surface like spreading peanut butter. This picks up all the loose dust and stuff the glue wouldn't have stuck to and rolls it into the matrix of the glue. You end up suspending all the surface dirt into the glue and encapsulating it in there. You basically clean the surface with the glue. This is critical for a good bond. Eventually you have glue slathered all over a clean surface that will bond. This silicone is sticky too.
Now press the two glue coated surfaces together and clamp them with tape or rubber bands or a vise. Wait 24 hours. Good bond. Good wear characteristics. I have worn these a month now for daily walks and they haven't even thought about separating.
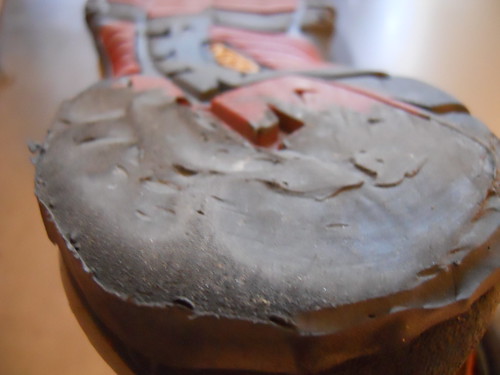
I even made some "sole" with it. I thought it wasn't tough enough but it is holding up. Next time I'll take a cheese grater to somebody's tire and make some rubber dust to mix in for wear resistance.
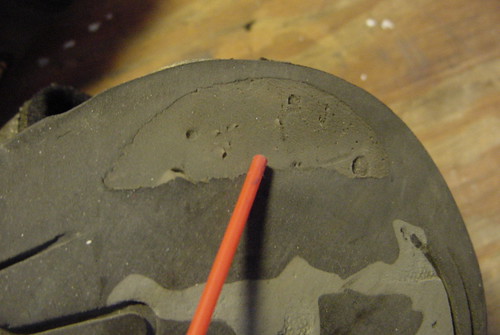
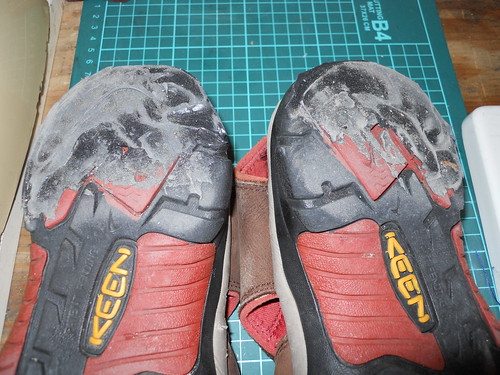
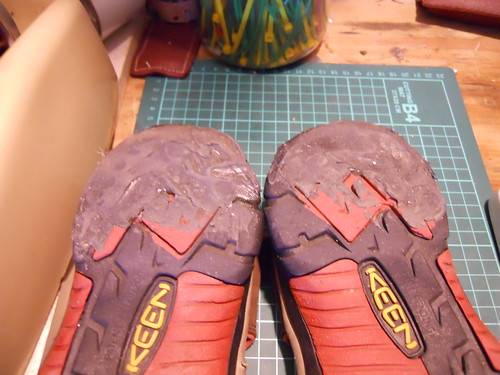
High stress points on Keens at the toe caps always separate. The silicone is holding tough after a month.
This silicone stays flexible. I bonded the leather straps back to the toe piece on my sandals. I filled in a void in the sole. And I reattached the sole that was separating into two pieces. The trick to getting a good bond is getting the rubber and leather clean. This isn't as hard as it sounds.
Here's my trick. I butter on the silicone on to the two surfaces to be bonded. Then I smear it all around with a plastic knife, preferably a free one. Keep rolling the glue over the surface like spreading peanut butter. This picks up all the loose dust and stuff the glue wouldn't have stuck to and rolls it into the matrix of the glue. You end up suspending all the surface dirt into the glue and encapsulating it in there. You basically clean the surface with the glue. This is critical for a good bond. Eventually you have glue slathered all over a clean surface that will bond. This silicone is sticky too.
Now press the two glue coated surfaces together and clamp them with tape or rubber bands or a vise. Wait 24 hours. Good bond. Good wear characteristics. I have worn these a month now for daily walks and they haven't even thought about separating.
I even made some "sole" with it. I thought it wasn't tough enough but it is holding up. Next time I'll take a cheese grater to somebody's tire and make some rubber dust to mix in for wear resistance.
High stress points on Keens at the toe caps always separate. The silicone is holding tough after a month.
-
jacob
- Site Admin
- Posts: 16126
- Joined: Fri Jun 28, 2013 8:38 pm
- Location: USA, Zone 5b, Koppen Dfa, Elev. 620ft, Walkscore 77
- Contact:
Re: Bathroom silicone strength?
$1200?! Holy hand grenade, Batman! I don't think any Chicago plumbers would charge that much. We got our plumber (who does jobs on the side with his boss's permission) to root out our kitchen sink drain (both ways from sink to clean-out and vice versa) for $50 which included taking everything apart and putting it back together. And it wasn't your regular DIY home-owners rooter job either. He found actual roots growing in the drains  (This [old] house never ceases to surprise me.) No way I could have done this with my hand cranked auger. In any case, big difference between $50 and $1200! Maybe you're paying the Beverly Hills 90210 premium? :-8 Maybe next time, keep the Mercedes parked in the garage and don't wear the Armani suit when the plumber shows up
Do the lag bolts go into the studs? If not, consider anchor bolts (solid concrete) or toggle/butterfly bolts (drywall/plaster).
Hehe, your shoe trick sounds familiar to anyone who's ever ghettoed a loose dovetail joint with sawdust and glue. Of course I wouldn't know anything about that ;-P For the soles, have you tried cutting out a sole from a used car tyre and gluing that on top. I've never done it due to lack of car tyres, but it's the standard recommendation for my new wooden clogs. Also Ho Chi Minh sandals.
Re: Bathroom silicone strength?
Oddly, the home is two blocks from the filming locations for 90210. Dillon's home and the Walsh's are down the street. Forty miles east of the real BH 90210.jacob wrote:$1200?! Holy hand grenade, Batman! I don't think any Chicago plumbers would charge that much. We got our plumber (who does jobs on the side with his boss's permission) to root out our kitchen sink drain (both ways from sink to clean-out and vice versa) for $50 which included taking everything apart and putting it back together. And it wasn't your regular DIY home-owners rooter job either. He found actual roots growing in the drains
Do the lag bolts go into the studs? If not, consider anchor bolts (solid concrete) or toggle/butterfly bolts (drywall/plaster).
Hehe, your shoe trick sounds familiar to anyone who's ever ghettoed a loose dovetail joint with sawdust and glue. Of course I wouldn't know anything about that ;-P For the soles, have you tried cutting out a sole from a used car tyre and gluing that on top. I've never done it due to lack of car tyres, but it's the standard recommendation for my new wooden clogs. Also Ho Chi Minh sandals.
-
enigmaT120
- Posts: 1240
- Joined: Thu Feb 12, 2015 2:14 pm
- Location: Falls City, OR
Re: Bathroom silicone strength?
Bad timing on the silicone suggestion, as I just repaired 3 pairs of hiking boots with my Shoe Goo. I think the Goo works better to build back up a worn sole, but you may be right about the silicone making a better repair for upper repairs. On all of mine the top was coming away from the sole in the very front. No, I don't go around kicking things that much, so I don't know why it happened that way.
Those tubes of silicone won't keep for ever after they're opened (or even before, now that I think about it) so any time you use one, it would be a good opportunity to look for other uses for it before it goes bad.
Those tubes of silicone won't keep for ever after they're opened (or even before, now that I think about it) so any time you use one, it would be a good opportunity to look for other uses for it before it goes bad.
Re: Bathroom silicone strength?
Can I ask a sort of related question?
We've had a toilet/vanity/sink unit installed (toilet and sink at opposite ends, before anyone asks!) The fitter has managed to crack a beam that goes between the two sides of the unit and sits below the sink so that, while it's not hanging off, I can freely wiggle it with my finger.
I'm chasing the fitter to replace it, because it's shit that a brand new bathroom would have a beam that's cracked right through, but I'm not having much luck. Before I go for the nuclear option and take it to small claims court or similar, how likely is it that the beam is load bearing? Is there any way to check?
Re: Bathroom silicone strength?
Excellent suggestion. I will try to repair the Birkenstock sandals I bought used for $3 and killed by wearing every day on my urban garden treks.
-
jacob
- Site Admin
- Posts: 16126
- Joined: Fri Jun 28, 2013 8:38 pm
- Location: USA, Zone 5b, Koppen Dfa, Elev. 620ft, Walkscore 77
- Contact:
Re: Bathroom silicone strength?
@Ybodon - Do you mean a joist in the floor? Picture?
Re: Bathroom silicone strength?
If the wall hasn't fallen, it isn't load bearing. 
A picture would greatly help. I can't tell what you are talking about from your description.
A picture would greatly help. I can't tell what you are talking about from your description.
-
enigmaT120
- Posts: 1240
- Joined: Thu Feb 12, 2015 2:14 pm
- Location: Falls City, OR
Re: Bathroom silicone strength?
I think all my Birkies have shoe goo on the soles. It seems to wear longer than the original sole.7Wannabe5 wrote:Excellent suggestion. I will try to repair the Birkenstock sandals I bought used for $3 and killed by wearing every day on my urban garden treks.
Re: Bathroom silicone strength?
I agree. The sole I made with silicone is actually a hole in the sole left by some kind of void on my keen that got exposed when the sole wore through. The silicon seems a little soft to make a good wearing sole.
I may try grinding up some tire tread or old tubes and making a "concrete" using tread chunks held together by bathroom silicone. I can kind of visualize making a dam around the edge of the sole with masking tape and just filling it in with the mixture and letting it self level.
When I get bored I guess I'll try.
Re: Bathroom silicone strength?
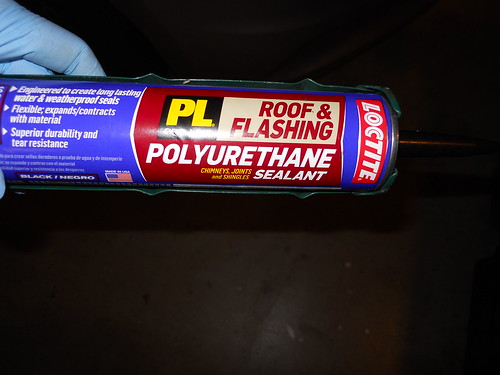
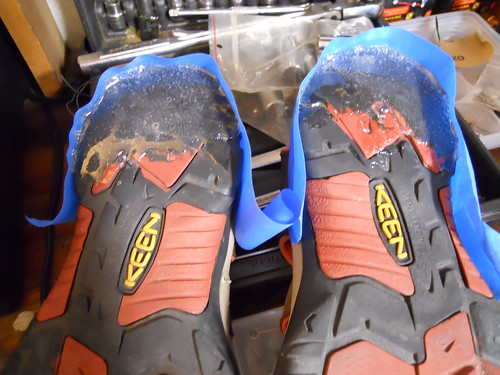
Did some more Keen Sandal repair with glue. This time I tried Loctite PL S30 black roofing cement. Poly Urethane based stuff. Came out a little soft for long term abrasion resistance. When I read polyurethane I was hoping something like a skateboard wheel but I got something like a pencil eraser. Looks pretty good and the tube was only $6 at Home Depot...and it was black. Anyone know of any high durometer urethane (1 or 2 part) that will stick to rubber that is cheap? There are things like Devcon Flexane with rubber primer but it is too expensive.
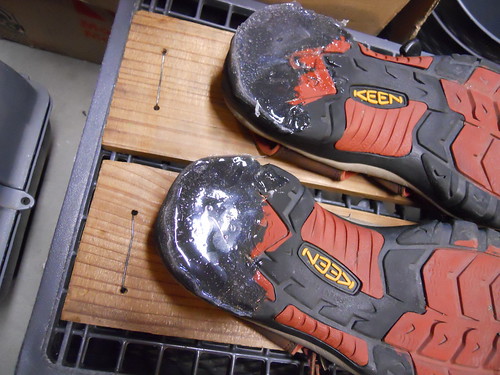
Here are the photos of my repair. Start by making a little dam with tape.
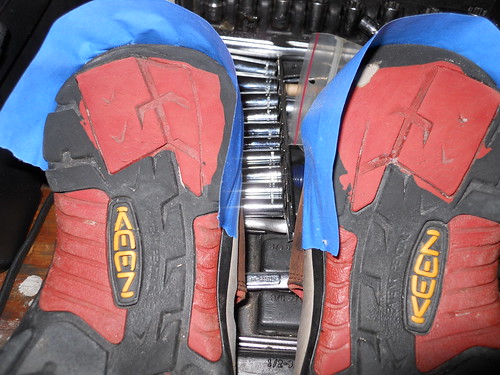
Cheap tube of PU rubber from Home Depot
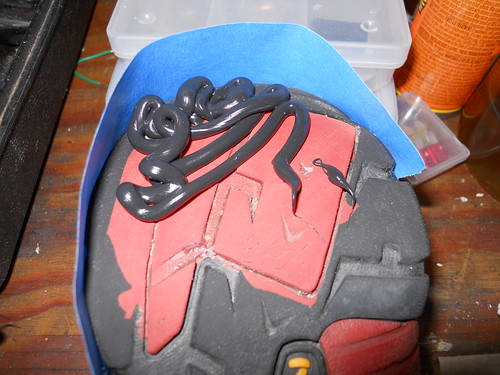
Filling and smoothing:
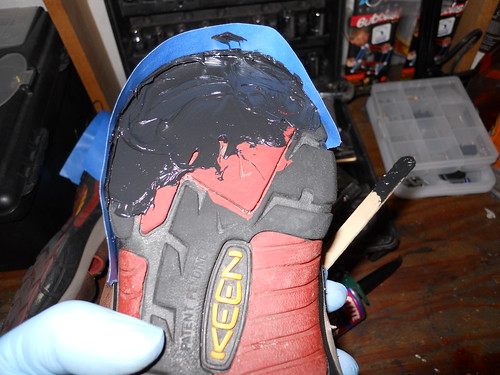
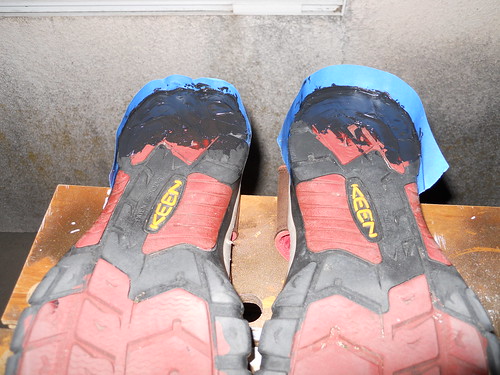
Remove tape. "Demoulding". Forgot to mention, I gave it a week to cure as per data sheet from Loctite.
Maybe people won't notice.
First walk. 1 mile on concrete. We'll see how long this lasts.
Here are the photos of my repair. Start by making a little dam with tape.
Cheap tube of PU rubber from Home Depot
Filling and smoothing:
Remove tape. "Demoulding". Forgot to mention, I gave it a week to cure as per data sheet from Loctite.
Maybe people won't notice.
First walk. 1 mile on concrete. We'll see how long this lasts.
-
enigmaT120
- Posts: 1240
- Joined: Thu Feb 12, 2015 2:14 pm
- Location: Falls City, OR
Re: Bathroom silicone strength?
I use Shoe Goo for that. Same method though, including the dams.
Re: Bathroom silicone strength?
Oh man, I just looked up black shoe goo. I should have bought that. I thought it was only a clear glue.
The Loctite PL S30 is a bit soft. I can tell it is getting worn down as I’ve walked around today. Too bad.
The Loctite PL S30 is a bit soft. I can tell it is getting worn down as I’ve walked around today. Too bad.
Re: Bathroom silicone strength?
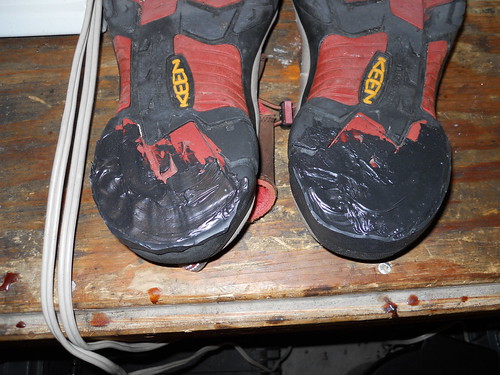
Ok, the black roofing polyurethane wore a bit fast. I thought I'd put on some shoo goo on top of that. What I'd end up with is kind of a dual compound heel. Here is the layering.
This is what my heels looked like after a week of walking around. I know I drag my heels. I can still hear my depression era grandmother nagging me how I was prematurely wearing out my shoes as a kid. She used to tell me to clomp my feet down flat so I'd evenly wear the entire shoe as I walked.
Form the masking tape dams. Fill with Shoe Goo. I could only find clear at my local Wally World but it was really cheap. $4.50. I never recall it being so cheap. Walmart is really good at forcing their vendors to lower their prices. The goo is self leveling so it is really easy to apply and smooth down. It also dries fast. Sets up in a few minutes and fully cures in 24 hours. It is so cheap I just pour it on. I used half a tube. Much cheaper than new shoes. I learned this new trick to put baby oil (Directions suggested Vaseline) on the threads of the tube before screwing the cap on so you could get it open again. Good idea. I used baby oil because I have it on the workbench. I got the cap off a day later with no effort at all.
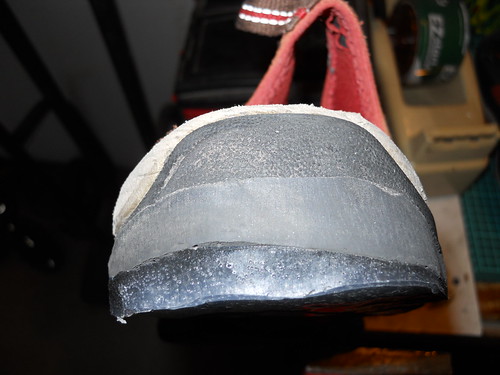
Demolded. I now have a layer of black roofers polyurethane on the sole, and then a layer of Shoe Goo for wear resistance. I'm hoping there is some engineering advantage in doing it this way. The softer mid sole may make for more comfortable walking. Perhaps the more flexible polyurethane will move better with the shoe and not delaminate as fast as the high durometer shoe goo.
Here is the cross section. Interesting layered effect. It's wearing quite well.
This is what my heels looked like after a week of walking around. I know I drag my heels. I can still hear my depression era grandmother nagging me how I was prematurely wearing out my shoes as a kid. She used to tell me to clomp my feet down flat so I'd evenly wear the entire shoe as I walked.
Form the masking tape dams. Fill with Shoe Goo. I could only find clear at my local Wally World but it was really cheap. $4.50. I never recall it being so cheap. Walmart is really good at forcing their vendors to lower their prices. The goo is self leveling so it is really easy to apply and smooth down. It also dries fast. Sets up in a few minutes and fully cures in 24 hours. It is so cheap I just pour it on. I used half a tube. Much cheaper than new shoes. I learned this new trick to put baby oil (Directions suggested Vaseline) on the threads of the tube before screwing the cap on so you could get it open again. Good idea. I used baby oil because I have it on the workbench. I got the cap off a day later with no effort at all.
Demolded. I now have a layer of black roofers polyurethane on the sole, and then a layer of Shoe Goo for wear resistance. I'm hoping there is some engineering advantage in doing it this way. The softer mid sole may make for more comfortable walking. Perhaps the more flexible polyurethane will move better with the shoe and not delaminate as fast as the high durometer shoe goo.
Here is the cross section. Interesting layered effect. It's wearing quite well.